Exploring Lift
Lift 2.0 Edition
Written by
Derek Chen-Becker, Marius Danciu and Tyler Weir
Copyright © 2008, 2009, 2010, 2011 by Derek Chen-Becker, Marius Danciu, David Pollak, and Tyler Weir.
This work is licensed under the Creative Commons Attribution-No Derivative Works 3.0 Unported License.
The home page for
Exploring Lift is at
http://exploring.liftweb.net. Here you can find up-to-date copies of the text, as well as links to the mailing list, issue tracking, and source code.
Dedication
Derek would like to thank his wife, Debbie, for her patience and support while writing this book. He would also like to thank his two young sons, Dylan and Dean, for keeping things interesting and in perspective.
Tyler would like to thank his wife, Laura, for encouraging him.
Marius would like to thank his wife, Alina, for her patience during long weekends and bearing with his monosyllabic answers while working on the book.
Acknowledgements
This book would not have been possible without the Lift Developers and especially David Pollak: without him, we wouldn’t have this opportunity.
We would also like to thank the Lift community, as well as the following individuals, for valuable feedback on the content of this book: Adam Cimarosti, Malcolm Gorman, Doug Holton, Hunter Kelly, James Matlik, Larry Morroni, Jorge Ortiz, Tim Perrett, Tim Pigden, Dennis Przytarski, Thomas Sant Ana, Heiko Seeberger, and Eric Willigers.
A huge thanks to Charles Munat for editing this work, and to Tim Perrett for helping with the REST API in Chapter 13.
1 Welcome to Lift!
Welcome to Exploring Lift. We’ve created this book to educate you about Lift, which we think is a great framework for building compelling web applications. Lift is designed to make powerful techniques easily accessible while keeping the overall framework simple and flexible. It may sound like a cliché, but in our experience Lift makes it fun to develop because it lets you focus on the interesting parts of coding. Our goal for this book is that by the end, you’ll be able to create and extend any web application you can think of.
1.1 Why Lift?
For those of you have experience with other web frameworks such as Struts, Tapestry, Rails, et cetera, you must be asking yourself, "Why another framework? Does Lift really solve problems any differently or more effectively than the ones I’ve used before?" Based on our experience (and that of others in the growing Lift community), the answer is an emphatic, "Yes!" Lift has cherry-picked the best ideas from a number of other frameworks, while creating some novel ideas of its own. It’s this combination of a solid foundation and new techniques that makes Lift so powerful. At the same time, Lift has been able to avoid the mistakes made in the past by other frameworks. In the spirit of “convention over configuration,” Lift has sensible defaults for everything while making it easy to customize precisely what you need to: no more and no less. Gone are the days of XML file after XML file providing
basic configuration for your application. Instead, a simple Lift app requires only that you add the LiftFilter to your web.xml and add one or more lines telling Lift what package your classes sit in (Section
3.2↓). The methods you code aren’t required to implement a specific interface (called a trait), although there are support traits that make things that much simpler. In short, you don’t need to write anything that isn’t explicitly necessary for the task at hand. Lift is intended to work out of the box, and to make you as efficient and productive as possible.
One of the key strengths of Lift is the clean separation of presentation content and logic, based on the bedrock concept of the Model-View-Controller
↓ pattern. One of the original Java web application technologies that’s still in use today is JSP, or Java Server Pages. JSP allows you to mix HTML and Java code directly within the page. While this may have seemed like a good idea at the start, it has proven to be painful in practice. Putting code in your presentation layer makes it more difficult to debug and understand what is going on within a page, and makes it more difficult for the people writing the HTML portion because the contents aren’t valid HTML. While many modern programming and HTML editors have been modified to accomodate this mess, proper syntax highlighting and validation don’t make up for having to switch back and forth between one or more files to follow the page flow. Lift takes the approach that there should be no code in the presentation layer, but that the presentation layer has to be flexible enough to accomodate any conceivable use. To that end, Lift uses a powerful templating system, à la Wicket, to bind user-generated data into the presentation layer. Lift’s templating is built on the XML processing capabilities of the Scala language, and allows such things as nested templates, simple injection of user-generated content, and advanced data binding capabilities. For those coming from JSP, Lift’s advanced template and XML processing allows you essentially to write custom tag libraries at a fraction of the cost in time and effort.
Lift has another advantage over many other web frameworks: it’s designed specifically to leverage the Scala
↓ programming language. Scala is a relatively new language developed by Martin Odersky and his programming language research group at EPFL Switzerland. It compiles to Java bytecode and runs on the JVM, which means that you can leverage the vast ecosystem of Java libraries just as you would with any other Java web framework. At the same time, Scala introduces some very powerful features designed to make you, the developer, more productive. Among these features are an extremely rich type system along with powerful type inference, native XML processing, full support for closures and functions as objects, and an extensive high-level library. The power of the type system together with type inference has led people to call it “the statically-typed dynamic language”. That means you can write code as quickly as you can with dynamically-typed languages (e.g. Python, Ruby, etc.), but you have the compile-time type safety of a statically-typed language such as Java. Scala is also a hybrid functional (FP) and object-oriented (OO) language, which means that you can get the power of higher-level functional languages such as Haskell or Scheme while retaining the modularity and reusability of OO components. In particular, the FP concept of immutability is encouraged by Scala, making it well-suited for writing highly-concurrent programs that achieve high throughput scalability. The hybrid model also means that if you haven’t touched FP before, you can gradually ease into it. In our experience, Scala allows you to do more in Lift with fewer lines of code. Remember, Lift is all about making you more productive!
Lift strives to encompass advanced features in a very concise and straightforward manner. Lift’s powerful support for AJAX and Comet allows you to use Web 2.0 features with very little effort. Lift leverages Scala’s Actor library to provide a message-driven framework for Comet updates. In most cases, adding Comet support to a page involves nothing more than extending a trait to define the rendering method of your page and adding an extra function call to your links to dispatch the update message. Lift handles all of the back-end and page-side coding to provide the Comet polling. AJAX support includes special handlers for doing AJAX form submission via JSON, and almost any link function can easily be turned into an AJAX version with a few keystrokes. In order to perform all of this client-side goodness, Lift has a class hierarchy for encapsulating JavaScript calls via direct JavaScript, jQuery, and YUI. The nice part is that you, too, can utilize these support classes so that code can be generated for you and you don’t have to put JavaScript logic into your templates.
1.2 What You Should Know before Starting
First and foremost, this is a book on the Lift framework. There are several things we expect you to be familiar with before continuing:
-
The Scala language and standard library. This book is not intended to be an introduction to Scala: there are several very good books available that fill that role. You can find a list of Scala books at the Scala website, http://www.scala-lang.org/node/959.
-
HTML and XML. Lift relies heavily on XHTML for its template support, so you should understand such things as DocTypes, elements, attributes, and namespaces.
-
General HTTP processing, including GET and POST submission, response codes, and content types.
1.3 Typographical Conventions
In order to better communicate concepts and techniques in this book, we have adopted the following typographical conventions:
ClassNameMonospaced typewriter text is used to indicate types, class names, and other code-related information.
...Ellipses within code listings are used to indicate omission of code to condense listings. Unless otherwise noted, the example code in this book comes from the PocketChange app (Chapter 2 on page 1↓), which has full source code available on GitHub.
1.4 For More Information about Lift
Lift has a very active community of users and developers. Since its inception in early 2007 the community has grown to hundreds of members from all over the world. The project’s leader, David Pollak, is constantly attending to the mailing list, answering questions, and taking feature requests. There is a core group of developers who work on the project, but submissions are taken from anyone who makes a good case and can turn in good code. While we strive to cover everything you’ll need to know in this book, there are several additional resources available for information on Lift:
-
The first place to look is the Lift website at http://liftweb.net/. There are links to lots of information on the site. In particular:
-
The Lift Wiki is hosted at http://www.assembla.com/wiki/show/liftweb. The Wiki is maintained not only by David, but also by many active members of the Lift community, including the authors. Portions of this book are inspired by and borrow from content on the Wiki. In particular, it has links to all of the generated documentation not only for the stable branch, but also for the unstable head, if you’re feeling adventurous. There’s also an extensive section of HowTos and articles on advanced topics that cover a wealth of information.
-
The mailing list at http://groups.google.com/group/liftweb is very active, and if there are things that this book doesn’t cover, you should feel free to ask questions there. There are plenty of very knowledgeable people on the list that should be able to answer your questions. Please post specific questions about the book to the Lift Book Google Group at http://groups.google.com/group/the-lift-book. Anything else that is Lift-specific is fair game for the mailing list.
-
Tim Perrett, another Lift committer, is writing a book on Lift for Manning called Lift in Action. More details can be found at the book’s site at http://www.manning.com/perrett/.
-
Lift has an IRC channel at irc://irc.freenode.net/lift that usually has several people on it at any given time. It’s a great place to chat about issues and ideas concerning Lift.
1.5 Your First Lift Application
We’ve talked a lot about Lift and its capabilities, so now let’s get hands-on and try out an application. Before we start, though, we need to take care of some prerequisites:
Java 1.5 JDK Lift runs on Scala, which runs on top of the JVM. The first thing you’ll need to install is a modern version of the Java SE JVM, available at
http://java.sun.com/. Recently Scala’s compiler was changed to target Java version 1.5. Version 1.4 is still available as a target, but we’re going to assume you’re using 1.5. Examples in this book have only been tested with Sun’s version of the JDK, although most likely other versions (e.g. Blackdown or OpenJDK) should work with little or no modification.
Maven 2 Maven
↓ is a project management tool that has extensive capabilities for building, dependency management, testing, and reporting. We assume that you are familiar with basic Maven usage for compilation, packaging, and testing. If you haven’t used Maven before, you can get a brief overview in appendix
A↓. You can download the latest version of Maven from
http://maven.apache.org/. Brief installation instructions (enough to get us started) are on the download page, at
http://maven.apache.org/download.html.
A programming editor This isn’t a strict requirement for this example, but when we start getting into coding, it’s very helpful to have something a little more capable than Notepad. If you’d like a full-blown IDE with support for such things as debugging, continuous compile checking, etc., then there are plugins available on the Scala website at
http://www.scala-lang.org/node/91. The plugins support:
-
If you’d like something more lightweight, the Scala language distribution comes with plugins for editors such as Vim, Emacs, jEdit, etc. You can either download the full Scala distribution from
http://www.scala-lang.org/ and use the files under
misc/scala-tool-support, or you can access the latest versions directly via the SVN (Subversion) interface at
https://lampsvn.epfl.ch/trac/scala/browser/scala-tool-support/trunk/src. Getting these plugins to work in your IDE or editor of choice is beyond the scope of this book.
Now that we have the prerequisites out of the way, it’s time to get started. We’re going to leverage Maven’s archetypes to do 99% of the work for us in this example. First, change to whatever directory you’d like to work in:
cd work
Next, we use Maven’s archetype:generate command to create the skeleton of our project:
mvn archetype:generate -U \
  -DarchetypeGroupId=net.liftweb \
  -DarchetypeArtifactId=lift-archetype-blank \
  -DarchetypeVersion=2.0 \
  -DarchetypeRepository=http://scala-tools.org/repo-releases \
  -DgroupId=demo.helloworld \
  -DartifactId=helloworld \
  -Dversion=1.0-SNAPSHOT
Maven should output several pages of text. It may stop and ask you to confirm the properties configuration, in which case you can just hit <enter>. At the end you should get a message that says BUILD SUCCESSFUL. You’ve now successfully created your first project! Don’t believe us? Let’s run it to confirm:
cd helloworld
mvn jetty:run
Maven should produce more output, ending with
[INFO] Starting scanner at interval of 5 seconds.
This means that you now have a web server (Jetty) running on port 8080 of your machine. Just go to
http://localhost:8080/ and you’ll see your first Lift page, the standard “Hello, world!” With just a few simple commands, we’ve built a functional (albeit limited) web app. Let’s go into a little more detail and see exactly how these pieces fit together. First, let’s examine the index page. Whenever Lift serves up a request in which the URL ends with a forward slash, Lift automatically looks for a file called
index.html in that directory. For instance, if you tried to go to
http://localhost:8080/test/, Lift would look for
index.html under the
test/ directory in your project. The HTML sources will be located under
src/main/webapp/ in your project directory. Here’s the
index.html file from our Hello World project:
<lift:surround with="default" at="content">
  <h2>Welcome to your project!</h2>
  <p><lift:helloWorld.howdy /></p>
</lift:surround>
This may look a little strange at first. For those with some XML experience, you may recognize the use of prefixed elements here. For those who don’t know what a prefixed element is, it’s an XML element of the form
<prefix:element>
In our case we have two elements in use:
<lift:surround> and
<lift:helloWorld.howdy />. Lift assigns special meaning to elements that use the “lift” prefix: they form the basis of lift’s extensive templating support, which we will cover in more detail in section
4.1↓. When lift processes an XML template
↓, it does so from the outermost element inward. In our case, the outermost element is
<lift:surround with=”default” at=”content”>. The
<lift:surround> element basically tells Lift to find the template named by the
with attribute (
default, in our case) and to put the contents of our element inside of that template. The
at attribute tells Lift where in the template to place our content. In Lift, this “filling in the blanks” is called
binding↓, and it’s a fundamental concept of Lift’s template system. Just about everything at the HTML/XML level can be thought of as a series of nested binds. Before we move on to the
<lift:helloWorld.howdy/> element, let’s look at the default template. You can find it in the
templates-hidden directory of the web app. Much like the
WEB-INF and
META-INF directories in a Java web application, the contents of
templates-hidden cannot be accessed directly by clients; they can, however, be accessed when they’re referenced by a
<lift:surround> element. Here is the
default.html file:
<html xmlns="http://www.w3.org/1999/xhtml" xmlns:lift="http://liftweb.net/">
  <head>
    <meta http-equiv="content-type" content="text/html; charset=UTF-8" />
    <meta name="description" content="" />
    <meta name="keywords" content="" />

    <title>demo.helloworld:helloworld:1.0-SNAPSHOT</title>
    <script id="jquery" src="/classpath/jquery.js" type="text/javascript"></script>
  </head>
  <body>
    <lift:bind name="content" />
    <lift:Menu.builder />
    <lift:msgs/>
  </body>
</html>
As you can see in the listing, this is a proper XHTML file, with <html>, <head>, and <body> tags. This is required since Lift doesn’t add these itself. Lift simply processes the XML from each template it encounters. The <head> element and its contents are boilerplate; the interesting things happen inside the <body> element. There are three elements here:
-
The <lift:bind name=”content” /> element determines where the contents of our index.html file are bound (inserted). The name attribute should match the corresponding at attribute from our <lift:surround> element.
-
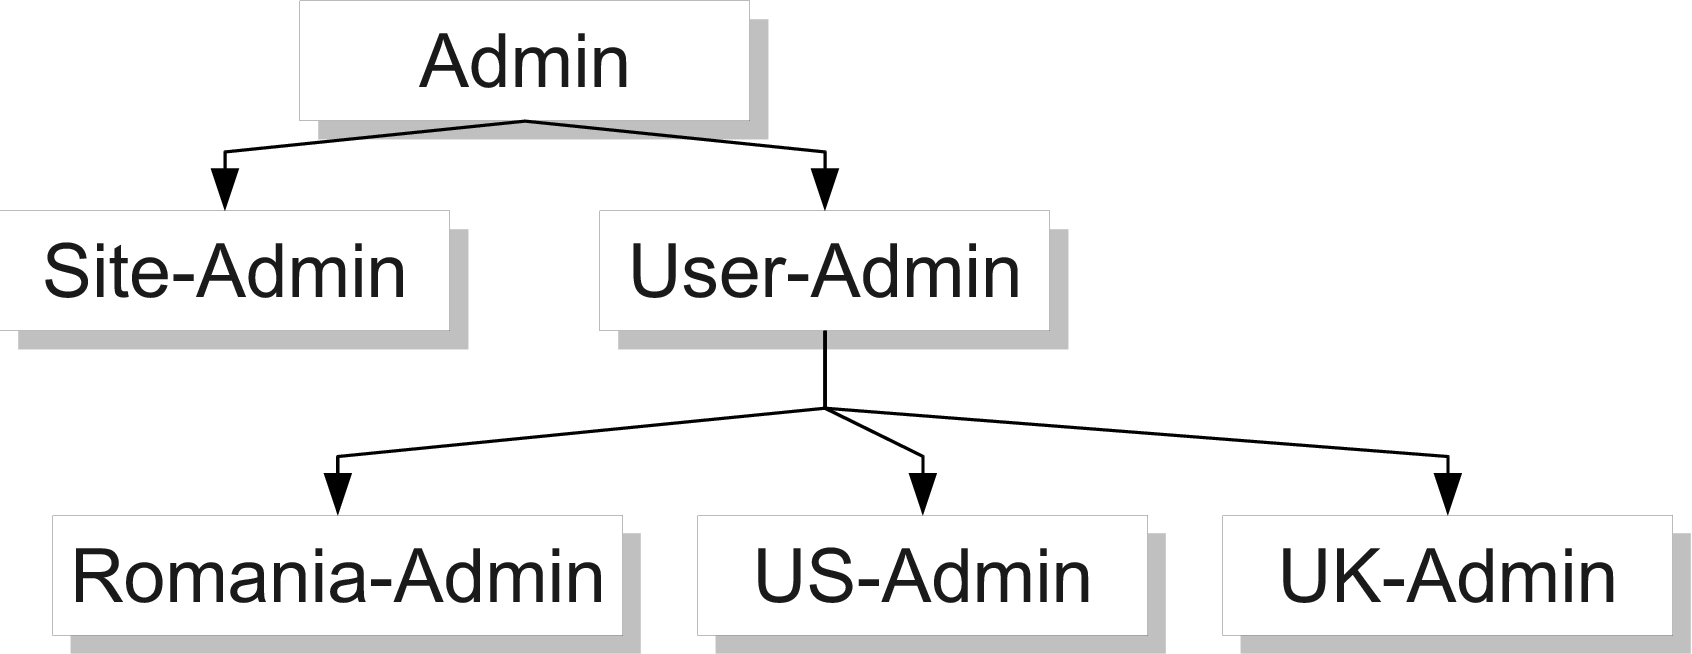
The <lift:Menu.builder /> element is a special element that builds a menu based on the SiteMap↓ (to be covered in chapter 7↓). The SiteMap is a high-level site directory component that not only provides a centralized place to define a site menu, but allows you to control when certain links are displayed (based on, say, whether users are logged in or what roles they have) and provides a page-level access control mechanism.
-
The <lift:msgs /> element allows Lift (or your code) to display messages on a page as it’s rendered. These could be status messages, error messages, etc. Lift has facilities to set one or more messages from inside your logic code.
Now let’s look back at the <lift:helloWorld.howdy /> element from the index.html file. This element (and the <lift:Menu.builder /> element, actually) is called a snippet, and it’s of the form
<lift:class.method>
Where class is the name of a Scala class defined in our project in the demo.helloworld.snippets package and method is a method defined on that class. Lift does a little translation on the class name to change camel-case back into title-case and then locates the class. In our demo the class is located under src/main/scala/demo/helloworld/snippet/HelloWorld.scala, and is shown here:
package demo.helloworld.snippet
class HelloWorld {
def howdy = <span>Welcome to helloworld at
{new _root_.java.util.Date}</span>
}
As you can see, the howdy method is pretty straightforward. Lift binds the result of executing the method (in this case a span) into the location of the snippet element. It’s interesting to note that a method may itself return other <lift:...> elements in its content and they will be processed as well. This recursive nature of template composition is part of the fundamental power of Lift; it means that reusing snippets and template pieces across your application is essentially free. You should never have to write the same functionality more than once.
Now that we’ve covered all of the actual content elements, the final piece of the puzzle is the
Boot↓ class. The
Boot class is responsible for the configuration and setup of the Lift framework. As we’ve stated earlier in the chapter, most of Lift has sensible defaults, so the
Boot class generally contains only the extras that you need. The
Boot class is always located in the
bootstrap.liftweb package and is shown here (we’ve skipped imports, etc):
package bootstrap.liftweb
import net.liftweb.util._
import net.liftweb.http._
import net.liftweb.sitemap._
import net.liftweb.sitemap.Loc._
import Helpers._
/**
* A class that’s instantiated early and run. It allows the application
* to modify Lift’s environment
*/
class Boot {
def boot {
// where to search snippet
LiftRules.addToPackages("demo.helloworld")
// Build SiteMap
val entries =
Menu(Loc("Home", List("index"), "Home")) ::
Nil
LiftRules.setSiteMap(SiteMap(entries:_*))
}
}
There are two basic configuration elements, placed in the boot method. The first is the
LiftRules.addToPackages method. It tells lift to base its searches in the
demo.helloworld package. That means that snippets would be located in the
demo.helloworld.snippets package, views (section
4.4↓) would be located in the
demo.helloworld.views package, etc. If you have more than one hierarchy (i.e. multiple packages), you can just call
addToPackages multiple times. The second item in the Boot class is the SiteMenu setup. Obviously this is a pretty simple menu in this demo, but we’ll cover more interesting examples in the SiteMap chapter.
Now that we’ve covered a basic example we hope you’re beginning to see why Lift is so powerful and why it can make you more productive. We’ve barely scratched the surface of Lift’s templating and binding capabilities, but what we’ve shown here is already a big step. In roughly ten lines of Scala code and about thirty in XML, we have a functional site. If we wanted to add more pages, we’ve already got our default template set up so we don’t need to write the same boilerplate HTML multiple times. In our example we’re directly generating the content for our helloWorld.howdy snippet, but in later examples we’ll show just how easy it is to pull content from the template itself into the snippet and modify it as needed.
In the following chapters we’ll be covering
-
Much more complex templating and snippet binding, including input forms and programmatic template selection
-
How to use SiteMap and its ancillary classes to provide a context-aware site menu and access control layer
-
How to handle state within your application
-
Lift’s ORM layer, Mapper (Chapter 8↓), which provides a powerful yet lightweight interface to databases
-
Advanced AJAX and Comet support in Lift for Web 2.0 style applications
We hope you’re as excited about getting started with Lift as we are!
2 PocketChange
As a way to demonstrate the concepts in the book, we’re going to build a basic application and then build on it as we go along. As it evolves, so will your understanding of Lift. The application we’ve picked is an Expense Tracker. We call it PocketChange.
PocketChange will track your expenses, keep a running total of what you’ve spent, allow you to organize your data using tags, and help you to visualize the data. During the later chapters of the book we’ll add a few fun features, such as AJAX charting and allowing multiple people per account (with Comet update of entries). Above all, we want to keep the interface lean and clean.
We’re going to be using the View First pattern for the design of our app, because Lift’s separation of presentation and logic via templating, views, and snippets lends itself to the View First pattern so well. For an excellent article on the design decisions behind Lift’s approach to templating and logic, read David Pollak’s Lift View First article on the Wiki.
Another important thing to note is that we’re going to breeze through the app and touch on a lot of details. We’ll provide plenty of references to the chapters where things are covered. This chapter is really intended just to give you a taste of Lift, so feel free to read ahead if you want more information on how something works. The full source for the entire PocketChange application is available at GitHub. Enough chatter, let’s go!
2.1 Defining the Model
The first step we’ll take is to define the database entities that we’re going to use for our app. The base functionality of a categorized expense tracker is covered by the following items:
-
User: A user of the application
-
Account: A specific expense account - we want to support more than one per user
-
Expense: A specific expense transaction tied to a particular account
-
Tag: A word or phrase that permits us a to categorize each expense for later searching and reporting
We’ll start out with the User, as shown in listing
2.1↓. We leverage Lift’s MegaProtoUser (Section
8.2.8 on page 1↓) class to handle pretty much everything we need for user management. For example, with just the code you see, we define an entire user management function for our site, including a signup page, a lost password page, and a login page. The accompanying SiteMap (Section
7 on page 1↓) menus are generated with a single call to
User.siteMap. As you can see, we can customize the XHTML that’s generated for the user management pages with a few simple defs. The opportunities for customization provided by MetaMegaProtoUser are extensive.
The PocketChange User Entity
package com.pocketchangeapp.model
// Import all of the mapper classes
import _root_.net.liftweb.mapper._
// Create a User class extending the Mapper base class
// MegaProtoUser, which provides default fields and methods
// for a site user.
class User extends MegaProtoUser[User] {
def getSingleton = User // reference to the companion object below
def allAccounts : List[Account] =
Account.findAll(By(Account.owner, this.id))
}
// Create a "companion object" to the User class (above).
// The companion object is a "singleton" object that shares the same
// name as its companion class. It provides global (i.e. non-instance)
// methods and fields, such as find, dbTableName, dbIndexes, etc.
// For more, see the Scala documentation on singleton objects
object User extends User with MetaMegaProtoUser[User] {
override def dbTableName = "users" // define the DB table name
// Provide our own login page template.
override def loginXhtml =
<lift:surround with="default" at="content">
{ super.loginXhtml }
</lift:surround>
// Provide our own signup page template.
override def signupXhtml(user: User) =
<lift:surround with="default" at="content">
{ super.signupXhtml(user) }
</lift:surround>
}
Note that we’ve also added a utility method,
allAccounts, to the User class to retrieve all of the accounts for a given user. We use the MetaMapper.findAll method to do a query by owner ID (Section
8.1.8 on page 1↓) supplying this user’s ID as the owner ID.
Defining the Account entity is a little more involved, as shown in Listing
2.1↓. Here we define a class with a Long primary key and some fields associated with the accounts. We also define some helper methods for object relationship joins (Section
8.1.11 on page 1↓). The Expense and Tag entities (along with some ancillary entities) follow suit, so we won’t cover them here.
The PocketChange Account Entity
package com.pocketchangeapp.model
import _root_.java.math.MathContext
import _root_.net.liftweb.mapper._
import _root_.net.liftweb.util.Empty
// Create an Account class extending the LongKeyedMapper superclass
// (which is a "mapped" (to the database) trait that uses a Long primary key)
// and mixes in trait IdPK, which adds a primary key called "id".
class Account extends LongKeyedMapper[Account] with IdPK {
// Define the singleton, as in the "User" class
def getSingleton = Account
// Define a many-to-one (foreign key) relationship to the User class
object owner extends MappedLongForeignKey(this, User) {
// Change the default behavior to add a database index
// for this column.
override def dbIndexed_? = true
}
// Define an "access control" field that defaults to false. We’ll
// use this in the SiteMap chapter to allow the Account owner to
// share out an account view.
object is_public extends MappedBoolean(this) {
override def defaultValue = false
}
// Define the field to hold the actual account balance with up to 16
// digits (DECIMAL64) and 2 decimal places
object balance extends MappedDecimal(this, MathContext.DECIMAL64, 2)
object name extends MappedString(this,100)
object description extends MappedString(this, 300)
// Define utility methods for simplifying access to related classes. We’ll
// cover how these methods work in the Mapper chapter
def admins = AccountAdmin.findAll(By(AccountAdmin.account, this.id))
def addAdmin (user : User) =
AccountAdmin.create.account(this).administrator(user).save
def viewers = AccountViewer.findAll(By(AccountViewer.account, this.id))
def entries = Expense.getByAcct(this, Empty, Empty, Empty)
def tags = Tag.findAll(By(Tag.account, this.id))
def notes = AccountNote.findAll(By(AccountNote.account, this.id))
}
// The companion object to the above Class
object Account extends Account with LongKeyedMetaMapper[Account] {
// Define a utility method for locating an account by owner and name
def findByName (owner : User, name : String) : List[Account] =
Account.findAll(By(Account.owner, owner.id.is), By(Account.name, name))
... more utility methods ...
}
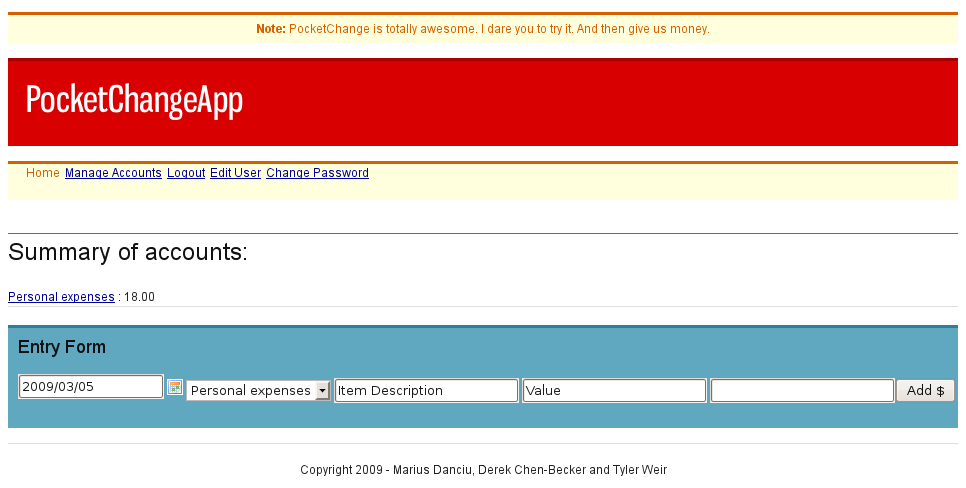
2.2 Our First Template
Our next step is to figure out how we’ll present this data to the user. We’d like to have a home page on the site that shows, depending on whether the user is logged in, either a welcome message or a summary of account balances with a place to enter new expenses. Listing
2.2↓ shows a basic template to handle this. We’ll save this as
index.html. The astute reader will notice that we have a head element but no body. This is XHTML, so how does that work? This template uses the
<lift:surround> tag (Section
4.5.17 on page 1↓) to embed itself into a master template (
/templates_hidden/default). Lift actually does what’s called a “head merge” (Section
on page 1↓) to merge the contents of the
head tag in our template below with the
head element of the master template. The
<lift:HomePage.summary> and
<lift:AddEntry.addentry> tags are calls to snippet methods. Snippets are the backing Scala code that provides the actual page logic. We’ll be covering them in the next section.
<lift:surround with="default" at="content">
<head>
<!-- include the required plugins -->
<script type="text/javascript" src="/scripts/date.js"></script>
<!--[if IE]>
<script type="text/javascript" src="/scripts/jquery.bgiframe.js">
</script>
<![endif]-->
<!-- include the jQuery DatePicker JavaScript and CSS -->
<script type="text/javascript" src="/scripts/jquery.datePicker.js">
</script>
<link rel="stylesheet" type="text/css" href="/style/datePicker.css" />
</head>
<!-- The contents of this element will be passed to the summary method
in the HomePage snippet. The call to bind in that method will
replace the XML tags below (e.g. account:name) with the account
data and return a NodeSeq to replace the lift:HomePage.summary
element. -->
<lift:HomePage.summary>
<div class="column span-24 bordered">
<h2>Summary of accounts:</h2>
<account:entry>
<acct:name /> : <acct:balance /> <br/>
</account:entry>
</div>
<hr />
</lift:HomePage.summary>
<div class="column span-24">
<!-- The contents of this element will be passed into the add method
in the AddEntry snippet. A form element with method "POST" will
be created and the XML tags (e.g. e:account) below will be
replaced with form elements via the call to bind in the add
method. This form will replace the lift:AddEntry.addentry element
below. -->
<lift:AddEntry.addentry form="POST">
<div id="entryform">
<div class="column span-24"><h3>Entry Form</h3>
<e:account /> <e:dateOf /> <e:desc /> <e:value />
<e:tags/><button>Add $</button>
</div>
</div>
</lift:AddEntry.addentry>
</div>
<script type="text/javascript">
Date.format = ’yyyy/mm/dd’;
jQuery(function () {
jQuery(’#entrydate’).datePicker({startDate:’00010101’,
clickInput:true});
})
</script>
</lift:surround>
As you can see, there’s no control logic at all in our template, just well-formed XML and some JavaScript to activate the jQuery datePicker functionality.
2.3 Writing Snippets
Now that we have a template, we need to write the HomePage and AddEntry snippets so that we can actually do something with the site. First, let’s look at the HomePage snippet, shown in Listing
2.3↓. We’ve skipped the standard Lift imports (Listing
3.3↓) to save space, but we’ve specifically imported
java.util.Date and all of our Model classes.
Defining the Summary Snippet
package com.pocketchangeapp.snippet
import ... standard imports ...
import _root_.com.pocketchangeapp.model._
import _root_.java.util.Date
class HomePage {
// User.currentUser returns a "Box" object, which is either Full
// (i.e. contains a User), Failure (contains error data), or Empty.
// The Scala match method is used to select an action to take based
// on whether the Box is Full, or not ("case _" catches anything
// not caught by "case Full(user)". See Box in the Lift API. We also
// briefly discuss Box in Appendix C.
def summary (xhtml : NodeSeq) : NodeSeq = User.currentUser match {
case Full(user) => {
val entries : NodeSeq = user.allAccounts match {
case Nil => Text("You have no accounts set up")
case accounts => accounts.flatMap({account =>
bind("acct", chooseTemplate("account", "entry", xhtml),
"name" -> <a href={"/account/" + account.name.is}>
{account.name.is}</a>,
"balance" -> Text(account.balance.toString))
})
}
bind("account", xhtml, "entry" -> entries)
}
case _ => <lift:embed what="welcome_msg" />
}
}
Our first step is to use the User.currentUser method (this method is provided by the MetaMegaProtoUser trait) to determine if someone is logged in. This method returns a “Box,” which is either Full (with a User) or Empty. (A third possibility is a Failure, but we’ll ignore that for now.) If it is full, then a user is logged in and we use the User.allAccounts method to retrieve a List of all of the user’s accounts. If the user doesn’t have accounts, we return an XML text node saying so that will be bound where our tag was placed in the template. If the user does have accounts, then we map the accounts into XHTML using the bind function. For each account, we bind the name of the account where we’ve defined the <acct:name> tag in the template, and the balance where we defined <acct:balance>. The resulting List of XML NodeSeq entities is used to replace the <lift:HomePage.summary> element in the template. Finally, we match the case where a user isn’t logged in by embedding the contents of a welcome template (which may be further processed). Note that we can nest Lift tags in this manner and they will be recursively parsed.
Of course, it doesn’t do us any good to display account balances if we can’t add expenses, so let’s define the
AddEntry snippet. The code is shown in Listing
2.3↓. This looks different from the HomePage snippet primarily because we’re using a
StatefulSnippet (Section
5.3.3 on page 1↓). The primary difference is that with a
StatefulSnippet the same “instance” of the snippet is used for each page request in a given session, so we can keep the variables around in case we need the user to fix something in the form. The basic structure of the snippet is the same as for our summary: we do some work (we’ll cover the
doTagsAndSubmit function in a moment) and then bind values back into the template. In this snippet, however, we use the
SHtml.select and
SHtml.text methods to generate form fields. The
text fields simply take an initial value and a function (closure) to process the value on submission. The
select field is a little more complex because we give it a list of options, but otherwise it is the same concept.
package com.pocketchangeapp.snippet
import ... standard imports ...
import com.pocketchangeapp.model._
import com.pocketchangeapp.util.Util
import java.util.Date
/* date | desc | tags | value */
class AddEntry extends StatefulSnippet {
// This maps the "addentry" XML element to the "add" method below
def dispatch = {
case "addentry" => add _
}
var account : Long = _
var date = ""
var desc = ""
var value = ""
// S.param("tag") returns a "Box" and the "openOr" method returns
// either the contents of that box (if it is "Full"), or the empty
// String passed to it, if the Box is "Empty". The S.param method
// returns parameters passed by the browser. In this instance, the
// name of the parameter is "tag".
var tags = S.param("tag") openOr ""
def add(in: NodeSeq): NodeSeq = User.currentUser match {
case Full(user) if user.editable.size > 0 => {
def doTagsAndSubmit(t: String) {
tags = t
if (tags.trim.length == 0)
S.error("We’re going to need at least one tag.")
else {
// Get the date correctly, comes in as yyyy/mm/dd
val entryDate = Util.slashDate.parse(date)
val amount = BigDecimal(value)
val currentAccount = Account.find(account).open_!
// We need to determine the last serial number and balance
// for the date in question. This method returns two values
// which are placed in entrySerial and entryBalance
// respectively
val (entrySerial, entryBalance) =
Expense.getLastExpenseData(currentAccount, entryDate)
val e = Expense.create.account(account)
.dateOf(entryDate)
.serialNumber(entrySerial + 1)
.description(desc)
.amount(BigDecimal(value)).tags(tags)
.currentBalance(entryBalance + amount)
// The validate method returns Nil if there are no errors,
// or an error message if errors are found.
e.validate match {
case Nil => {
Expense.updateEntries(entrySerial + 1, amount)
e.save
val acct = Account.find(account).open_!
val newBalance = acct.balance.is + e.amount.is
acct.balance(newBalance).save
S.notice("Entry added!")
// remove the statefullness of this snippet
unregisterThisSnippet()
}
case x => error(x)
}
}
}
val allAccounts =
user.allAccounts.map(acct => (acct.id.toString, acct.name))
// Parse through the NodeSeq passed as "in" looking for tags
// prefixed with "e". When found, replace the tag with a NodeSeq
// according to the map below (name -> NodeSeq)
bind("e", in,
"account" -> select(allAccounts, Empty,
id => account = id.toLong),
"dateOf" -> text(Util.slashDate.format(new Date()).toString,
date = _,
"id" -> "entrydate"),
"desc" -> text("Item Description", desc = _),
"value" -> text("Value", value = _),
"tags" -> text(tags, doTagsAndSubmit))
}
// If no user logged in, return a blank Text node
case _ => Text("")
}
}
The doTagsAndSubmit function is a new addition. Its primary purpose is to process all of the submitted data, create and validate an Expense entry, and then return to the user. This pattern of defining a local function to handle form submission is quite common as opposed to defining a method on your class. The main reason is that by defining the function locally, it becomes a closure on any variables defined in the scope of your snippet function.
2.4 A Little AJAX Spice
So far this is all pretty standard fare, so let’s push things a bit and show you some more advanced functionality. Listing
2.4↓ shows a template for displaying a table of Expenses for the user with an optional start and end date. The
Accounts.detail snippet will be defined later in this section.
Displaying an Expense Table
<lift:surround with="default" at="content">
<lift:Accounts.detail eager_eval="true">
<div class="column span-24">
<h2>Summary</h2>
<table><tr><th>Name</th><th>Balance</th></tr>
<tr><td><acct:name /></td><td><acct:balance /></td></tr>
</table>
<div>
<h3>Filters:</h3>
<table><tr><th>Start Date</th><td><acct:startDate /></td>
<th>End Date</th><td><acct:endDate /></td></tr>
</table>
</div>
<div class="column span-24" >
<h2>Transactions</h2>
<lift:embed what="entry_table" />
</div>
</lift:Accounts.detail>
</lift:surround>
The <lift:embed> tag (Section
4.5.7 on page 1↓) allows you to include another template at that point. In our case, the entry_table template is shown in Listing
2.4↓. This is really just a fragment and is not intended to be used alone, since it’s not a full XHTML document and it doesn’t surround itself with a master template. It does, however, provide binding sites that we can fill in.
The Embedded Expense Table
<table class="" border="0" cellpadding="0" cellspacing="1"
    width="100%">
  <thead>
    <tr>
      <th>Date</th><th>Description</th><th>Tags</th><th>Value</th>
      <th>Balance</th>
    </tr>
  </thead>
  <tbody id="entry_table">
    <acct:table>
      <acct:tableEntry>
    <tr><td><entry:date /></td><td><entry:desc /></td>
        <td><entry:tags /></td><td><entry:amt /></td>
        <td><entry:balance /></td>
    </tr>
      </acct:tableEntry>
    </acct:table>
  </tbody>
</table>
Before we get into the AJAX portion of the code, let’s define a helper method in our Accounts snippet class, shown in Listing
2.4↓, to generate the XHTML table entries that we’ll be displaying (assuming normal imports). Essentially, this function pulls the contents of the
<acct:tableEntry> tag (via the
Helpers.chooseTemplate method, Section
C.8 on page 1↓) and binds each
Expense from the provided list into it. As you can see in the
entry_table template, that corresponds to one table row for each entry.
The Table Helper Function
package com.pocketchangeapp.snippet
... imports ...
class Accounts {
...
def buildExpenseTable(entries : List[Expense], template : NodeSeq) = {
// Calls bind repeatedly, once for each Entry in entries
entries.flatMap({ entry =>
bind("entry", chooseTemplate("acct", "tableEntry", template),
"date" -> Text(Util.slashDate.format(entry.dateOf.is)),
"desc" -> Text(entry.description.is),
"tags" -> Text(entry.tags.map(_.tag.is).mkString(", ")),
"amt" -> Text(entry.amount.toString),
"balance" -> Text(entry.currentBalance.toString))
})
}
...
}
The final piece is our
Accounts.detail snippet, shown in Listing
2.4↓. We start off with some boilerplate calls to match to locate the
Account to be viewed, then we define some vars to hold state. It’s important that they’re vars so that they can be captured by the
entryTable,
updateStartDate, and
updateEndDate closures, as well as the AJAX form fields that we define. The only magic we have to use is the
SHtml.ajaxText form field generator (Chapter
11 on page 1↓), which will turn our update closures into AJAX callbacks. The values returned from these callbacks are JavaScript code that will be run on the client side. You can see that in a few lines of code we now have a page that will automatically update our Expense table when you set the start or end dates!
package com.pocketchangeapp.snippet
import ... standard imports ...
import com.pocketchangeapp.model._
import com.pocketchangeapp.util.Util
class Accounts {
def detail (xhtml: NodeSeq) : NodeSeq = S.param("name") match {
// If the "name" param was passed by the browser...
case Full(acctName) => {
// Look for an account by that name for the logged in user
Account.findByName(User.currentUser.open_!, acctName) match {
// If an account is returned (as a List)
case acct :: Nil => {
// Some closure state for the AJAX calls
// Here is Lift’s "Box" in action: we are creating
// variables to hold Date Boxes and initializing them
// to "Empty" (Empty is a subclass of Box)
var startDate : Box[Date] = Empty
var endDate : Box[Date] = Empty
// AJAX utility methods. Defined here to capture the closure
// vars defined above
def entryTable = buildExpenseTable(
Expense.getByAcct(acct, startDate, endDate, Empty),
xhtml)
def updateStartDate (date : String) = {
startDate = Util.parseDate(date, Util.slashDate.parse)
JsCmds.SetHtml("entry_table", entryTable)
}
def updateEndDate (date : String) = {
endDate = Util.parseDate(date, Util.slashDate.parse)
JsCmds.SetHtml("entry_table", entryTable)
}
// Bind the data to the passed in XML elements with
// prefix "acct" according to the map below.
bind("acct", xhtml,
"name" -> acct.name.asHtml,
"balance" -> acct.balance.asHtml,
"startDate" -> SHtml.ajaxText("", updateStartDate),
"endDate" -> SHtml.ajaxText("", updateEndDate),
"table" -> entryTable)
}
// An account name was provided but did not match any of
// the logged in user’s accounts
case _ => Text("Could not locate account " + acctName)
}
}
// The S.param "name" was empty
case _ => Text("No account name provided")
}
}
2.5 Conclusion
We hope that this chapter has demonstrated how powerful Lift can be while remaining concise and easy to use. Don’t worry if there’s something you didn’t understand, we’ll be explaining in more detail as we go along. We’ll continue to expand on this example app throughout the book, so feel free to make this chapter a base reference, or pull your own version of PocketChange from the git repository with the following command (assuming you have git installed):
git clone git://github.com/tjweir/pocketchangeapp.git
Now let’s dive in!
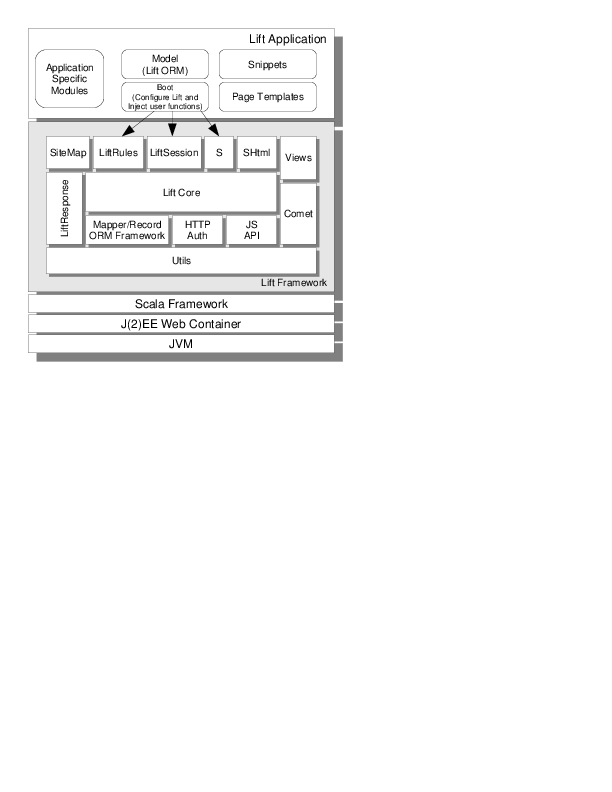
3 Lift Fundamentals
In this chapter we will cover some of the fundamental aspects of writing a lift application, including the architecture of the Lift library and how it processes requests.
3.1 Entry into Lift
The first step in Lift’s request processing is intercepting the HTTP request. Originally, Lift used a
java.servlet.Servlet instance to process incoming requests. This was changed to use a
java.servlet.Filter instance because this allows the container to handle any requests that Lift does not (in particular, static content). The filter acts as a thin wrapper on top of the existing
LiftServlet (which still does all of the work), so don’t be confused when you look at the Lift API and see both classes (
LiftFilter and
LiftServlet). The main thing to remember is that your
web.xml↓ should specify the filter and not the servlet, as shown in Listing
3.1↓.
LiftFilter Setup in web.xml
<?xml version="1.0" encoding="ISO-8859-1"?>
<!DOCTYPE web-app
  PUBLIC "-//Sun Microsystems, Inc.//DTD Web Application 2.3//EN"
  "http://java.sun.com/j2ee/dtds/web-app_2_3.dtd">
<web-app>
  <filter>
    <filter-name>LiftFilter</filter-name>
    <display-name>Lift Filter</display-name>
    <description>The Filter that intercepts lift calls</description>
    <filter-class>net.liftweb.http.LiftFilter</filter-class>
  </filter>
  <filter-mapping>
    <filter-name>LiftFilter</filter-name>
    <url-pattern>/*</url-pattern>
  </filter-mapping>
</web-app>
A full
web.xml example is shown in Section
G.1.5 on page 1↓. In particular, the filter-mapping (lines 13-16) specifies that the Filter is responsible for everything. When the filter receives the request, it checks a set of rules to see if it can handle it. If the request is one that Lift handles, it passes it on to an internal
LiftServlet instance for processing; otherwise, it chains the request and allows the container to handle it.
3.2 Bootstrap ↓
When Lift starts up an application there are a number of things that you’ll want to set up before any requests are processed. These things include setting up a site Menu (called SiteMap, Chapter
7↓), URL rewriting (Section
3.7↓), custom dispatch (Section
3.8↓), and classpath search (Section
3.2.1↓). The Lift servlet looks for the
bootstrap.liftweb.Boot↓ class and executes the
boot method in the class. You can also specify your own Boot instance by using the
bootloader↓ init param for the
LiftFilter as shown in Listing
3.2↓
Overriding the Boot Loader Class
<filter>
  ... filter setup here ...
  <init-param>
    <param-name>bootloader</param-name>
    <param-value>foo.bar.baz.MyBoot</param-value>
  </init-param>
</filter>
Your custom boot class class must subclass Bootable and implement the boot method. The boot method will only be run once, so you can place any initialization calls for other libraries here as well.
3.2.1 Class Resolution
As part of our discussion of the Boot class, it’s also important to explain how Lift determines where to find classes for Views and Snippet rendering when using implicit dispatch (we’ll cover this in Section
5.2.1 on page 1↓). The
LiftRules.addToPackages method tells lift which Scala packages to look in for a given class. Lift has implicit extensions to the paths you enter: in particular, if you tell Lift to use the
com.pocketchangeapp package, Lift will look for View classes (Section ???)under
com.pocketchangeapp.view , Comet classes (Section
11.5↓) under
com.pocketchange.comet, and Snippet classes (Chapter
5↓) under
com.pocketchangeapp.snippet. The
addToPackages method should almost always be executed in your Boot class. A minimal Boot class would look like:
class Boot {
  def boot = {
    LiftRules.addToPackages("com.pocketchangeapp")
  }
}
3.3 A Note on Standard Imports
For the sake of saving space, the following import statements are assumed for all example code throughout the rest of the book:
Standard Import Statements
import net.liftweb.common._
import net.liftweb.http._
import S._
import net.liftweb.util._
import Helpers._
import scala.xml._
3.4 Lift’s Main Objects
Before we dive into Lift’s fundamentals, we want to briefly discuss three objects you will use heavily in your Lift code. We’ll be covering these in more detail later in this chapter and in further chapters, so feel free to skip ahead if you want more details.
The
net.liftweb.http.S object represents the state of the current request (according to David Pollak, “S” is for Stateful). As such, it is used to retrieve information about the request and modify information that is sent in the response. Among other things, it can be used for notices (Section
B↓) , cookie management (Section
3.10↓), localization/internationalization (Chapter
D↓) and redirection (Section
3.9↓).
The
net.liftweb.http.SHtml object’s main purpose is to define HTML generation functions, particularly those having to do with form elements. We cover forms in detail in Chapter
6↓). In addition to normal form elements, SHtml defines functions for AJAX and JSON form elements (Chapters
11↓ and
10↓, respectively).
The net.liftweb.http.LiftRules object is where the vast majority of Lift’s global configuration is handled. Almost everything that is configurable about Lift is set up based on variables in LiftRules. Because LiftRules spans such a diverse range of functionality, we won’t be covering LiftRules directly, but as we discuss each Lift mechanism we’ll touch on the LiftRules variables and methods related to the configuration of that mechanism.
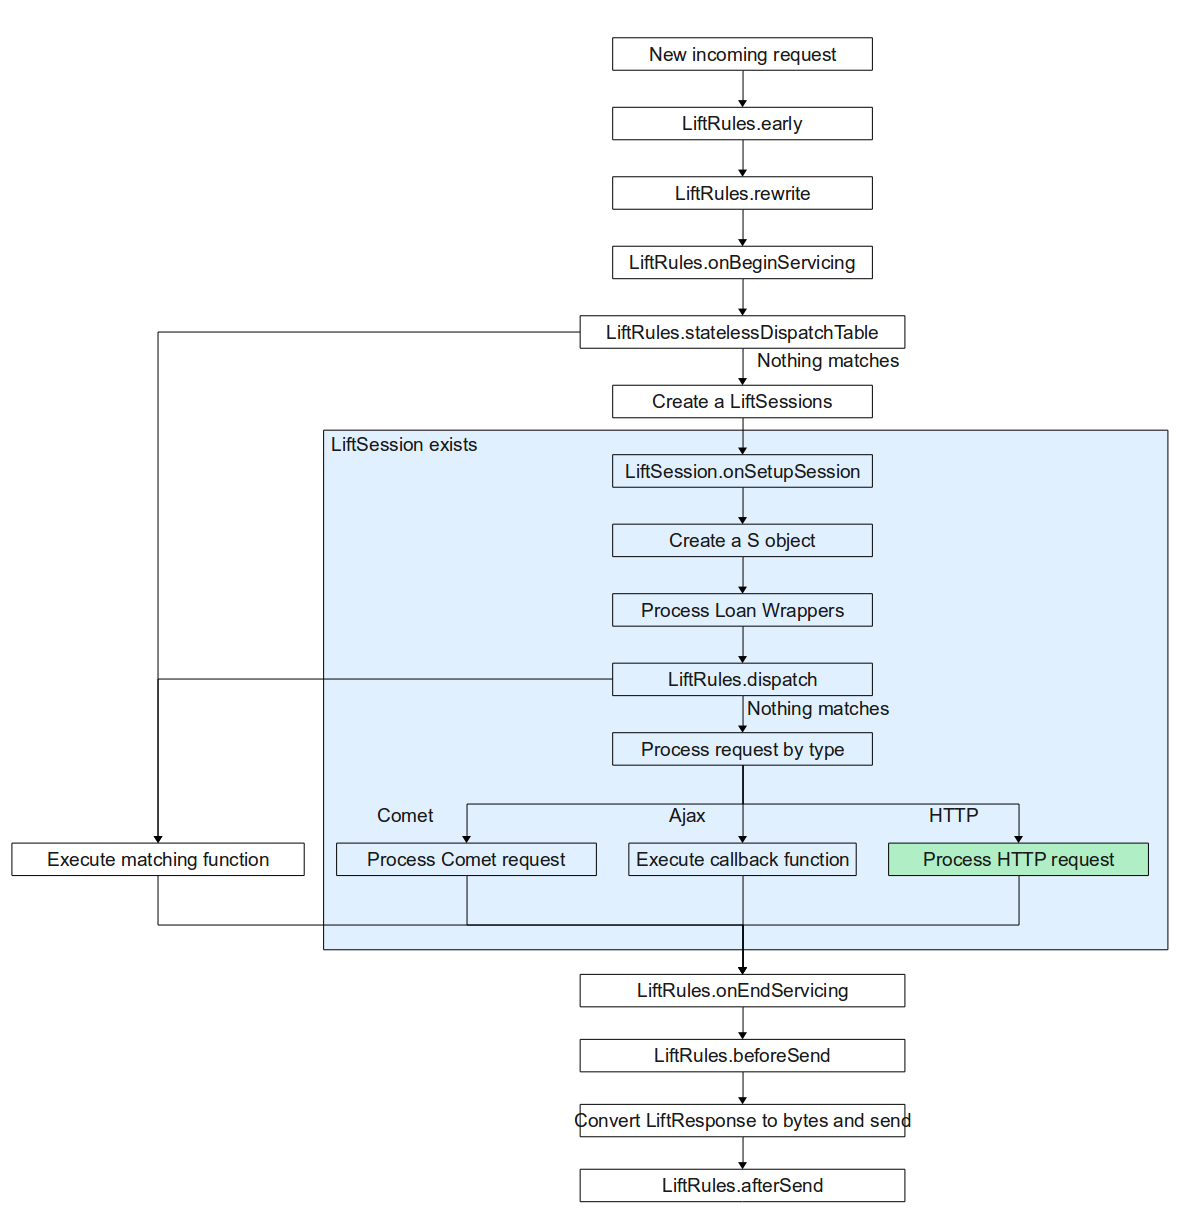
3.5 The Rendering Process
The rest of this chapter, as well as the next few chapters, are dedicated to the stages of rendering in Lift. We’ll start here by giving a brief overview of the processes by which Lift transforms a request into a response
↓. We’re only going to touch on the major points here, although the steps we do discuss will be in the order that Lift performs them. A much more detailed tour of the pipeline is given in Section
9.2↓. Starting from the initial invocation on a request, Lift will:
-
Perform any configured URL rewriting. This is covered in Section 3.7↓.
-
Execute any matching custom dispatch functions. This is split into both stateless and stateful dispatch, and will be covered in more detail in Section 3.8↓.
-
Perform automatic processing of Comet and AJAX requests (Chapter 11↓).
-
Perform SiteMap setup and matching. SiteMap, covered in Chapter 7↓, not only provides a nice site-wide menu system, but can also perform security control, URL rewrite, and other custom functionality.
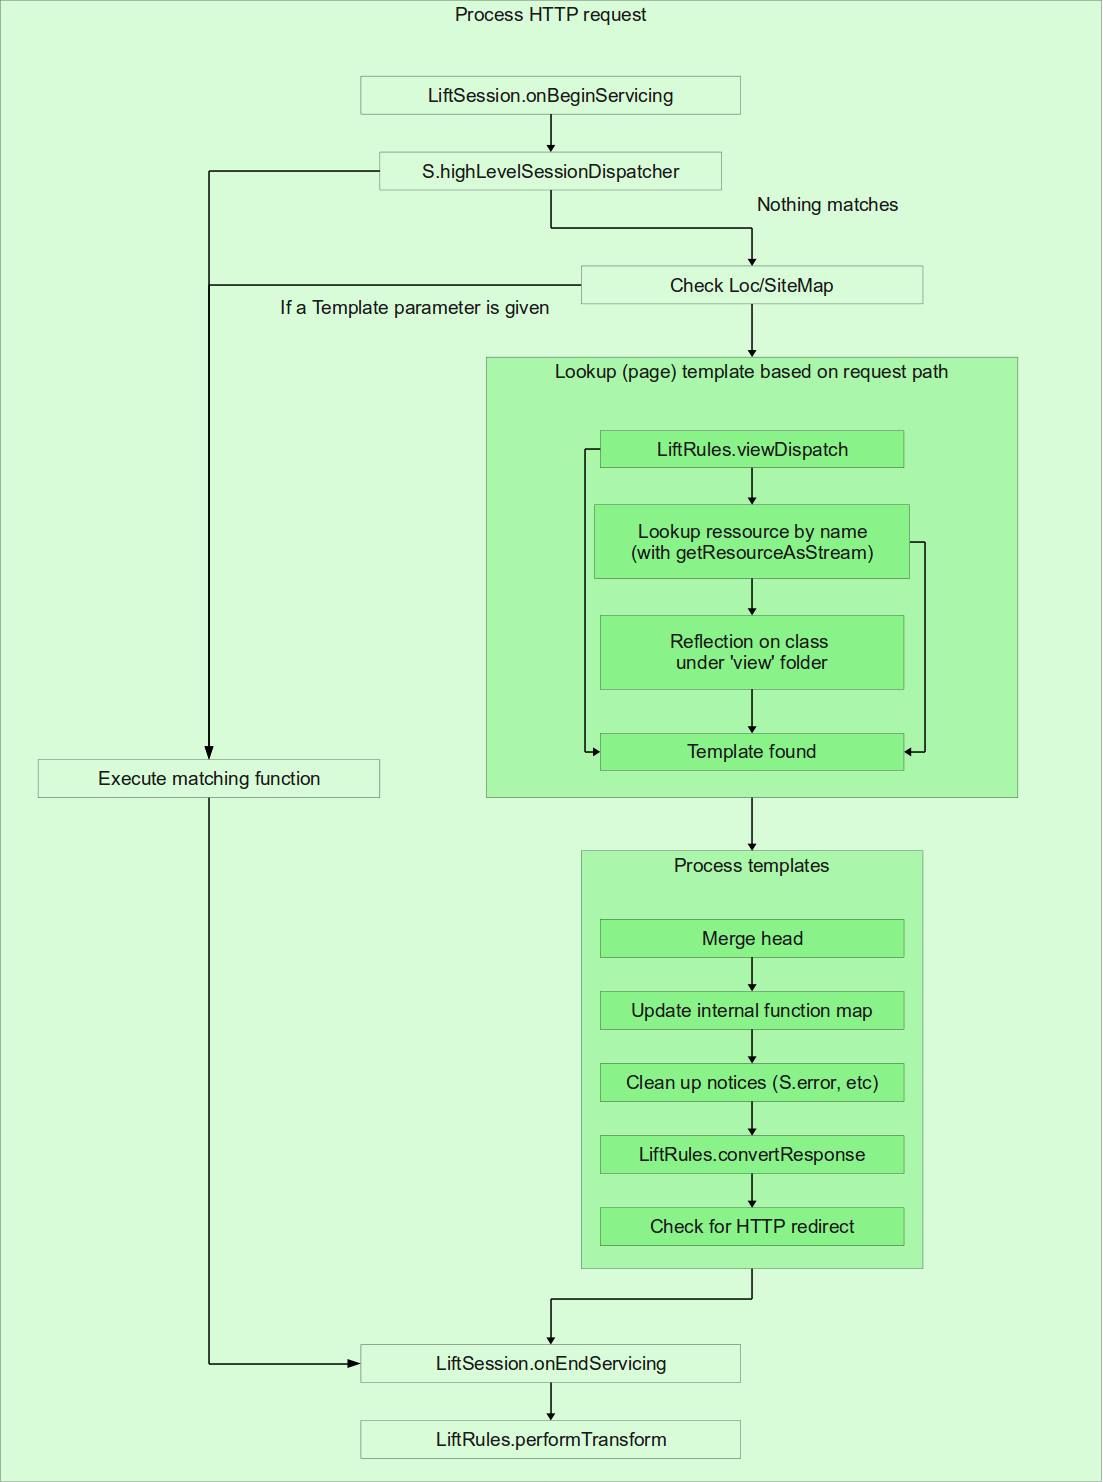
-
Locate the template XHTML to use for the request. This is handled via three mechanisms:
-
Checking the LiftRules.viewDispatch↓↓ RulesSeq to see if any custom dispatch rules have been defined. We cover custom view dispatch in Section 9.2 on page 1↓.
-
If there is no matching viewDispatch, locate a template↓ file that matches and use it. We’ll cover templates, and how they’re located, in Section 4.1↓.
-
If no templates files can be located, attempting to locate a view↓ based on implicit dispatch. We’ll cover views in Section 4.4↓.
-
Process the template, including embedding of other templates (Section 4.5.7↓), merging <head/> elements from composited templates (Section ↓), and executing snippet functions (Chapter 5↓).
The rest of this chapter will be devoted in part to the early stages of the rendering pipeline, as well as some notes on some general functionality in Lift like redirects
↓.
3.6 Notices, Warnings, and Error Messages
Feedback to the user is important. The application must be able to notify the user of errors, warn the user of potential problems, and notify the user when system status changes. Lift provides a unified model for such messages that can be used for static pages as well as for AJAX and Comet calls. We cover messaging support in Appendix
B↓.
3.7 URL Rewriting
Now that we’ve gone over Templates, Views, Snippets, and how requests are dispatched to a Class.method, we can discuss how to intercept requests and handle them the way we want to. URL rewriting
↓↓ is the mechanism that allows you to modify the incoming request so that it dispatches to a different URL. It can be used, among other things, to allow you to:
-
Use user-friendly, bookmarkable URLs like http://www.example.com/budget/2008
-
Use short URLs instead of long, hard to remember ones, similar to http://tinyurl.com
-
Use portions of the URL to determine how a particular snippet or view responds. For example, you could make it so that a user’s profile is displayed via a URL such as
http://someplace.com/user/derek instead of having the username sent as part of a query string.
The mechanism is fairly simple to set up. We need to write a partial function from a RewriteRequest to a RewriteResponse to determine if and how we want to rewrite particular requests. Once we have the partial function, we modify the
LiftRules.rewrite configuration to hook into Lift’s processing chain. The simplest way to write a partial function is with Scala’s match statement, which will allow us to selectively match on some or all of the request information. (Recall that for a partial function, the matches do not have to be exhaustive. In the instance that no RewriteRequest matches, no RewriteResponse will be generated.) It is also important to understand that when the rewrite functions run, the Lift session has not yet been created. This means that you generally can’t set or access properties in the S object. RewriteRequest is a
case object that contains three items: the parsed path, the request type and the original HttpServletRequest
↓ object. (If you are not familiar with case classes, you may wish to review the Scala documentation for them. Adding the
case modifier to a class results in some nice syntactic conveniences.)
The parsed path of the request is in a ParsePath
↓ case class instance. The ParsePath class contains
-
The parsed path as a List[String]
-
The suffix of the request (i.e. “html”, “xml”, etc)
-
Whether this path is root-relative path. If true, then it will start with /<context-path>, followed by the rest of the path. For example, if your application is deployed on the app context path (“/app”) and we want to reference the file <webapp-folder>/pages/index.html, then the root-relative path will be /app/pages/index.html.
-
Whether the path ends in a slash (“/”)
The latter three properties are useful only in specific circumstances, but the parsed path is what lets us work magic. The path of the request is defined as the parts of the URI between the context path and the query string. The following table shows examples of parsed paths for a Lift application under the “myapp” context path:
The RequestType maps to one of the five HTTP methods: GET, POST, HEAD, PUT and DELETE. These are represented by the corresponding GetRequest, PostRequest, etc. case classes, with an UnknownRequest case class to cover anything strange.
The flexibility of Scala’s matching system is what really makes this powerful. In particular, when matching on Lists, we can match parts of the path and capture others. For example, suppose we’d like to rewrite the
/account/<account name> path so that it’s handled by the
/viewAcct template as shown in Listing
3.7↓. In this case we provide two rewrites. The first matches /account/<account name> and redirects it to the /viewAcct template, passing the acctName as a “name” parameter. The second matches /account/<account name>/<tag>, redirecting it to /viewAcct as before, but passing both the “name” and a “tag” parameter with the acctName and tag matches from the ParsePath, respectively. Remember that the underscore (_) in these matching statements means that we don’t care what that parameter is, i.e., match anything in that spot.
LiftRules.rewrite.append {
  case RewriteRequest(
         ParsePath(List("account",acctName),_,_,_),_,_) =>
         RewriteResponse("viewAcct" :: Nil, Map("name" -> acctName))
  case RewriteRequest(
         ParsePath(List("account",acctName, tag),_,_,_),_,_) =>
         RewriteResponse("viewAcct" :: Nil, Map("name" -> acctName,
                                                "tag" -> tag)))
}
The RewriteResponse
↓ simply contains the new path to follow. It can also take a Map
↓ that contains parameters that will be accessible via S.param
↓↓ in the snippet or view. As we stated before, the LiftSession (and therefore most of S) isn’t available at this time, so the Map is the only way to pass information on to the rewritten location.
We can combine the ParsePath matching with the RequestType and HttpServletRequest to be very specific with our matches. For example, if we wanted to support the DELETE HTTP verb for a RESTful
↓ interface through an existing template, we could redirect as shown in Listing
3.7↓.
A Complex Rewrite Example
LiftRules.rewrite.append {
  case RewriteRequest(ParsePath("username" :: Nil, _, _, _),
                      DeleteRequest,
                      httpreq)
                      if isMgmtSubnet(httpreq.getRemoteHost()) =>
       RewriteResponse("deleteUser" :: Nil, Map("username" -> username))
}
We’ll go into more detail about how you can use this in the following sections. In particular, SiteMap
↓ (Chapter
7↓) provides a mechanism for doing rewrites combined with menu entries.
3.8 Custom Dispatch Functions
Once the rewriting phase is complete (whether we pass through or are redirected), the next phase is to determine whether there should be a custom dispatch for the request. A custom dispatch allows you to handle a matching request directly by a method instead of going through the template lookup system. Because it bypasses templating, you’re responsible for the full content of the response. A typical use case would be a web service
↓ returning XML or a service to return, say, a generated image or PDF. In that sense, the custom dispatch mechanism allows you to write your own “sub-servlets” without all the mess of implementing the interface and configuring them in web.xml
↓.
As with rewriting, custom dispatch is realized via a partial function. In this case, it’s a function of type PartialFunction[Req,() ⇒ Box[LiftResponse]] that does the work. The Req is similar to the RewriteRequest case class: it provides the path as a List[String], the suffix of the request, and the RequestType. There are three ways that you can set up a custom dispatch function:
-
Globally, via LiftRules.dispatch↓↓
-
Globally, via LiftRules.statelessDispatchTable↓↓
-
Per-Session, via S.addHighLevelSessionDispatcher↓↓
If you attach the dispatch function via LiftRules.dispatch or S.addHighLevelSessionDispatcher, then you’ll have full access to the S object, SessionVars and LiftSession; if you use LiftRules.statelessDispatchTable instead, then these aren’t available. The result of the dispatch should be a function that returns a Box[LiftResponse]. If the function returns Empty, then Lift returns a “404 Not Found” response.
As a concrete example, let’s look at returning a generated chart image from our application. There are several libraries for charting, but we’ll take a look at JFreeChart in particular. First, let’s write a method that will chart our account balances by month for the last year:
def chart (endDate : String) : Box[LiftResponse] = {
  // Query, set up chart, etc...
  val buffered = balanceChart.createBufferedImage(width,height)
  val chartImage = ChartUtilities.encodeAsPNG(buffered)
  // InMemoryResponse is a subclass of LiftResponse
  // it takes an Array of Bytes, a List[(String,String)] of
  // headers, a List[Cookie] of Cookies, and an integer
  // return code (here 200 for HTTP 200: OK)
  Full(InMemoryResponse(chartImage,
                        ("Content-Type" -> "image/png") :: Nil,
                        Nil,
                        200))
}
Once we’ve set up the chart, we use the ChartUtilities helper class from JFreeChart to encode the chart into a PNG byte array. We can then use Lift’s InMemoryResponse
↓ to pass the encoded data back to the client with the appropriate Content-Type
↓ header. Now we just need to hook the request into the dispatch table from the Boot class as shown in Listing
3.8↓. In this instance, we want state so that we can get the current user’s chart. For this reason, we use
LiftRules.dispatch as opposed to
LiftRules.statelessDispatch. Because we’re using a partial function to perform a Scala match operation, the case that we define here uses the
Req object’s
unapply method, which is why we only need to provide the
List[String] argument.
Hooking Dispatch into Boot
LiftRules.dispatch.append {
  case Req("chart" :: "balances" :: endDate :: Nil, _, _) =>
    Charting.chart(endDate) _
}
As you can see, we capture the endDate parameter from the path and pass it into our chart method. This means that we can use a URL like http://foo.com/chart/balances/20080401 to obtain the image. Since the dispatch function has an associated Lift session, we can also use the S.param method to get query string parameters, if, for example, we wanted to allow someone to send an optional width and height:
val width = S.param(“width”).map(_.toInt) openOr 400
val height = S.param(“height”).map(_.toInt) openOr 300
Or you can use a slightly different approach by using the Box.dmap method:
val width = S.param(“width”).dmap(400)(_.toInt)
val height = S.param(“height”).dmap(300)(_.toInt)
Where dmap is identical with map function except that the first argument is the default value to use if the
Box is
Empty. There are a number of other ListResponse subclasses to cover your needs, including responses for XHTML, XML, Atom, Javascript, CSS, and JSON. We cover these in more detail in Section
9.4↓.
3.9 HTTP Redirects
HTTP redirects are an important part of many web applications. In Lift there are two main ways of sending a redirect to the client:
-
Call S.redirectTo. When you do this, Lift throws an exception and catches it later on. This means that any code following the redirect is skipped. If you’re using a StatefulSnippet (Section 5.3.3↓), use this.redirectTo so that your snippet instance is used when the redirect is processed.
Important: if you use S.redirectTo within a try/catch block, you’ll need to make sure that you aren’t catching the redirect exception (Scala uses unchecked exceptions), or test for the redirect’s exception and rethrow it. Ifyou mistakenly catch the redirect exception, then no redirect will occur.
-
When you need to return a LiftResponse, you can simply return a RedirectResponse or a RedirectWithState response.
The RedirectWithState response allows you to specify a function to be executed when the redirected request is processed. You can also send Lift messages (notices, warnings, and errors) that will be rendered in the redirected page, as well as cookies to be set on redirect. Similarly, there is an overloaded version of S.redirectTo that allows you to specify a function to be executed when the redirect is processed.
Cookies are a useful tool when you want data persisted across user sessions. Cookies are essentially a token of string data that is stored on the user’s machine. While they can be quite useful, there are a few things that you should be aware of:
-
The user’s browser may have cookies disabled, in which case you need to be prepared to work without cookies or tell the user that they need to enable them for your site
-
Cookies are relatively insecure. There have been a number of browser bugs related to data in cookies being read by viruses or other sites
-
Cookies are easy to fake, so you need to ensure that you validate any sensitive cookie data
Using Cookies in Lift is very easy. In a stateful context, everything you need is provided by a few methods on the S object:
addCookie Adds a cookie to be sent in the response
deleteCookie Deletes a cookie (technically, this adds a cookie with a maximum age of zero so that the browser removes it). You can either delete a cookie by name, or with a Cookie object
findCookie Looks for a cookie with a given name and returns a Box[Cookie]. Empty means that the cookie doesn’t exist
receivedCookies Returns a List[Cookie] of all of the cookies sent in the request
responseCookies Returns a List[Cookie] of the cookies that will be sent in the response
If you need to work with cookies in a stateless context, many of the ListResponse classes (Section
9.4↓) include a List[Cookie] in their constructor or
apply arguments. Simply provide a list of the cookies you want to set, and they’ll be sent in the response. If you want to delete a cookie in a LiftResponse, you have to do it manually by adding a cookie with the same name and a
maxage of zero.
3.11 Session and Request State
Lift provides a very easy way to store per-session and per-request data through the SessionVar and RequestVar classes. In true Lift fashion, these classes provide:
-
Type-safe access to the data they hold
-
A mechanism for providing a default value if the session or request doesn’t exist yet
-
A mechanism for cleaning up the data when the variable’s lifecycle ends
Additionally, Lift provides easy access to HTTP request parameters
↓ via the S.param method, which returns a Box[String]. Note that HTTP request parameters (sent via GET or POST) differ from RequestVars in that query parameters are string values sent as part of the request; RequestVars, in contrast, use an internal per-request Map so that they can hold any type, and are initialized entirely in code. At this point you might ask what RequestVars can be used for. A typical example would be sharing state between different snippets, since there is no connection between snippets other than at the template level.
SessionVars and RequestVars are intended to be implemented as singleton objects so that they’re accessible from anywhere in your code. Listing
3.11↓ shows an example definition of a RequestVar used to hold the number of entries to show per page. We start by defining the object as extending the RequestVar. You must provide the type of the RequestVar so that Lift knows what to accept and return. In this instance, the type is an Int. The constructor argument is a by-name parameter which must evaluate to the var’s type. In our case, we attempt to use the HTTP request variable “pageSize,” and if that isn’t present or isn’t an integer, then we default to 25.
class AccountOps {
  object pageSize extends RequestVar[Int](S.param("pageSize").map(_.toInt) openOr 25)
  ...
}
Accessing the value of the
RequestVar is done via the
is method. You can also set the value using the
apply method, which in Scala is syntactically like using the
RequestVar as a function. Common uses of apply in Scala include array element access by index and companion object methods that can approximate custom constructors. For example, the
Loc object (which we’ll cover in Chapter
7↓), has an overloaded
apply method that creates a new
Loc class instance based on input parameters.
// get the value contained in the AccountOps.pageSize RequestVar
query.setMaxResults(AccountOps.pageSize.is)
// Change the value of the RequestVar. The following two lines
// of code are equivalent:
AccountOps.pageSize(50)
AccountOps.pageSize.apply(50)
In addition to taking a parameter that defines a default value for setup, you can also clean up the value when the variable ends it lifecycle. Listing
3.11↓ shows an example of opening a socket and closing it at the end of the request. This is all handled by passing a function to the
registerCleanupFunc method. The type of the function that you need to pass is
CleanUpParam ⇒ Unit, where
CleanUpParam is defined based on whether you’re using a
RequestVar or a
SessionVar. With
RequestVar,
CleanUpParam is of type
Box[LiftSession], reflecting that the session may not be in scope when the cleanup function executes. For a
SessionVar the
CleanUpParam is of type
LiftSession, since the session is always in scope for a
SessionVar (it holds a reference to the session). In our example in Listing
3.11↓ we simply ignore the input parameter to the cleanup function, since closing the socket is independent of any session state. Another important thing to remember is that you’re responsible for handling any exceptions that might be thrown during either default initialization or cleanup.
Defining a Cleanup Function
object mySocket extends RequestVar[Socket](new Socket("localhost:23")) {
  registerCleanupFunc(ignore => this.is.close)
}
The information we’ve covered here is equally applicable to SessionVars; the only difference between them is the scope of their respective lifecycles.
Another common use of RequestVar is to pass state around between different page views (requests). We start by defining a RequestVar on an object so that it’s accesible from all of the snippet methods that will read and write to it. It’s also possible to define it on a class if all of the snippets that will access it are in that class. Then, in the parts of your code that will transition to a new page you use the overloaded versions of SHtml.link or S.redirectTo that take a function as a second argument to “inject” the value you want to pass via the RequestVar. This is similar to using a query parameter on the URL to pass data, but there are two important advantages:
-
You can pass any type of data via a RequestVar, as opposed to just string data in a query parameter.
-
You’re really only passing a reference to the injector function, as opposed to the data itself. This can be important if you don’t want the user to be able to tamper with the passed data. One example would be passing the cost of an item from a “view item” page to an “add to cart” page.
Listing
3.11↓ shows how we pass an Account from a listing table to a specific Account edit page using
SHtml.link, as well as how we could transition from an edit page to a view page using
S.redirectTo. Another example of passing is shown in Listing
12.1.3 on page 1↓.
Passing an Account to View
class AccountOps {
  ...
  object currentAccountVar extends RequestVar[Account](null)
  ...
  def manage (xhtml : NodeSeq) ... {
    ...
    User.currentUser.map({user =>
      user.accounts.flatMap({acct =>
        bind("acct", chooseTemplate("account", "entry", xhtml),
          ...
          // The second argument injects the "acct" val back
          // into the RequestVar
          link("/editAcct", () => currentAccountVar(acct), Text("Edit"))
      })
    })
    ...
  }
  def edit (xhtml : NodeSeq) : NodeSeq = {
    def doSave () {
      ...
      val acct = currentAccountVar.is
      S.redirectTo("/view", () => currentAccountVar(acct))
    }
    ...
  }
}
One important thing to note is that the injector variable is called in the scope of the
following request. This means that if you want the value returned by the function at the point where you call the link or redirectTo, you’ll need to capture it in a val. Otherwise, the function will be called
after the redirect or link, which may result in a different value than you expect. As you can see in Listing
3.11↑, we set up an acct val in our doSave method prior to redirecting. If we tried to do something like
S.redirectTo("/view", () => currentAccountVar(currentAccountVar.is))
instead, we would get the default value of our RequestVar (null in this case).
3.12 Conclusion
We’ve covered a lot of material and we still have a lot more to go. Hopefully this chapter provides a firm basis to start from when exploring the rest of the book.
4 Templates in Lift
An XHTML page, being the central component of a web application, is likewise the central component of Lift’s request processing. In Lift, we go a step further and utilize a flexible yet powerful templating engine that allows us to compose an XHTML
↓ page not only out of one or more XML
↓ files, but also from methods that can programmaticaly generate template XML. Additionally, Lift 2.2
↓ brings designer-friendly templates (Section
4.2↓) and HTML5 support (Section
4.3↓). Designer-friendly templates, in particular, can simplify working with a designer because they allow templates to be fully valid XHTML or HTML5.
In this chapter we’ll discuss template capabilities and syntax, including built-in tags provided by Lift that perform special template processing (Section
4.5↓). We will also cover how you can write your own View classes, Scala code that can programmatically generate template XML (Section
4.4↓). We’ll finish up the chapter with some discussion on miscellaneous templating functionality.
4.1 Template XML
Templates
↓ form the backbone of Lift’s flexibility and power. A template is an XML document that contains Lift-specific tags, see
4.5↓, as well as whatever content you want returned to the user.
A note on nomenclature: typically when people discuss “templates” in books or on the mailing list they’re talking about XML files. We’ll cover programmatic generation of template XML in Section
4.4↓.
Lift includes several built-in XML tags for specific actions. These utilize prefixed XML elements and are of the form
<lift:tag_name/>. Lift also allows you to define your own tags, which are called
snippets↓ (Chapter
5↓). These user-defined tags are linked to Scala methods and these methods can process the XML contents of the snippet tag, or can generate their own content from scratch. A simple template is shown in Listing
4.1↓.
<lift:surround with="default" at="content">
  <head><title>Hello!</title></head>
  <lift:Hello.world />
</lift:surround>
Notice the tags that are of the form
<lift:name> which in this case are
<lift:surround> and
<lift:snippet>. These are two examples of Lift-specific tags. We’ll discuss all of the tags that users will use in Section
4.5↓, but let’s briefly discuss the two shown here. We use the built-in
<lift:surround>↓ tag (Section
4.5.17↓) to make Lift embed our current template inside the “default” template. We also use
<lift:snippet> tag (aliased to Hello.world) to execute a snippet that we defined. In this instance, we execute the method
world in the class
Hello to generate some content.
4.1.1 Locating Template XML
During request processing, Lift first tries to match against the
LiftRules.viewDispatch↓↓ function to see if an explicit View method is defined for the request. If there isn’t a
viewDispatch match, then Lift next tries to locate a file in the template directory tree (typically in a WAR archive) that matches the request. Lift tries several suffixes (html, xhtml, htm, and no suffix) and also tries to match based on the client’s
Accept-Language header. The pattern Lift uses is:
<path to template>[_<language tag>][.<suffix>]
Because Lift will implicitly search for suffixes, it’s best to leave the suffix off of your links within the web app. If you have a link with an href of /test/template.xhtml, it will only match that file, but if you use /test/template for the href and you have the following templates in your web app:
-
/test/template.xhtml
-
/test/template_es_ES.xhtml (Spanish localized for Spain)
-
/test/template_ja.xhtml
then Lift will use the appropriate template based on the user’s requested language if a corresponding template is available. For more information regarding internationalization please see Appendix
D↓. In addition to normal templates, your application can make use of hidden templates
↓. These are templates that are located under the
/templates-hidden directory of your web app. Technically, Lift hides files in any directory ending in “-hidden”, but templates-hidden is somewhat of a de facto standard. Like the
WEB-INF directory, the contents cannot be directly requested by clients. They can, however, be used by other templates through mechanisms such as the
<lift:surround> and
<lift:embed> tags (Section
4.5.7↓). If a static file can’t be located then Lift will attempt to locate a View class (Section
4.4↓) that will process the request. If Lift cannot locate an appropriate template based on the request path then it will return a 404 to the user.
4.1.2 Processing Template XML
Once Lift has located the correct template, the next step is to process the contents. It is important to understand that Lift processes XML tags recursively, from the outermost tag to the innermost tag. That means that in our example Listing
4.1↑, the surround tag gets processed first. In this case the surround loads the default template and embeds our content at the appropriate location. The next tag to be processed is the
<lift:Hello.world/> snippet. This tag is essentially an alias for the lift:snippet tag (specifically,
<lift:snippet type=“Hello:world”>) , and will locate the Hello class and execute the world method on it. If you omit the “method” part of the type and only specify the class (
<lift:Hello> or
<lift:snippet type=“Hello”>), then Lift will attempt to call the
render method of the class.
To give a more complex example that illustrates the order of tag processing, consider Listing
4.1.2↓. In this example we have several nested snippet tags, starting with
<A.snippet />. Listing
4.1.2↓ shows the backing code for this example. Snippets are covered in more detail in Chapter
5↓.
A Recursive Tag Processing Example
<lift:A.snippet>
  <p>Hello, <A:name />!</p>
  <p>
    <lift:B.snippet>
      <B:title />
      <lift:C.snippet />
    </lift:B.snippet>
  </p>
</lift:A.snippet>
The first thing that happens is that the contents of the
<lift:A.snippet> tag are passed as a
NodeSeq argument to the
A.snippet method. In the
A.snippet method we bind
↓, or replace, the
<A:name /> tag with an XML Text node of “The A snippet”. The rest of the input is left as-is and is returned to Lift for more processing. Lift examines the returned
NodeSeq for more lift tags and finds the
<lift:B.snippet> tag. The contents of the
<lift:B.snippet> tag are passed as a
NodeSeq argument to the
B.snippet method, where the
<B.title /> tag is bound with the XML Text node “The B snippet”. The rest of the contents are left unchanged and the transformed
NodeSeq is returned to Lift, which scans for and finds the
<lift:C.snippet /> tag. Since there are no child elements for the
<lift:C.snippet /> tag, the
C.snippet method is invoked with an empty
NodeSeq and the
C.snippet returns the Text node “The C snippet”.
The Recursive Tag Snippets Code
... standard Lift imports ...
class A {
  def snippet (xhtml : NodeSeq) : NodeSeq =
    bind("A", xhtml, "name" -> Text("The A snippet"))
}
class B {
  def snippet (xhtml : NodeSeq) : NodeSeq =
    bind("B", xhtml, "title" -> Text("The B snippet"))
}
class C {
  def snippet (xhtml : NodeSeq) : NodeSeq = Text("The C snippet")
}
While the contents of the
A.snippet tag are passed to the
A.snippet method, there’s no requirement that the contents are actually used. For example, consider what would happen if we swapped the B and C snippet tags in our template, as shown in Listing
4.1.2↓. In this example, the
C.snippet method is called before the
B.snippet method. Since our
C.snippet method returns straight XML that doesn’t contain the B snippet tag, the B snippet will never be executed! We’ll cover how the
eager_eval tag attribute can be used to reverse this behavior in Section
5.3.4↓.
The Swapped Recursive Snippet Template
<lift:A.snippet>
  <p>Hello, <A:name />!</p>
  <p>
    <lift:C.snippet>
      <lift:B.snippet>
        <B:title />
      </lift:B.snippet>
    </lift:C.snippet>
  </p>
</lift:A.snippet>
<!-- After the A and C snippets have been processed: -->
<p>Hello, The A snippet</p>
<p>The C snippet</p>
As you can see, templates are a nice way of setting up your layout and then writing a few methods to fill in the XML fragments that make up your web applications. They provide a simple way to generate a uniform look for your site, particularly if you assemble your templates using the surround and embed tags. If you’d like programmatic control over the template XML used for a particular request, you’ll want to use a View, which is discussed in the next section.
4.2 Designer-Friendly Templates ↓↓
New in Lift 2.2 is the ability to use fully valid XHTML (or HTML5, which we’ll discuss in Section
4.3↓) for your templates. There are a number of features involved in designer-friendly templates (or DFTs for short), so let’s go through each one.
4.2.1 Determining the Content Element↓
In XML-based templates, the entire XML file is considered to hold the contents of the template. In DFTs, we want to be able to include the full XHTML or HTML5 markup, including tags like <DOCTYPE>, <html/>, etc. without necessarily including all of that in the output of the template (for example, in an embedded template). Lift supports choosing a child element of the template to represent the actual contents via the use of one of two related mechanisms.
The first mechanism is to put a
lift:content_id attribute on the HTML element, as shown in Listing
4.2.1↓. The drawback to this approach is that you have to specify the “lift” namespace in the html tag or you might get validation errors.
Assigning a Content ID on the HTML element
<!DOCTYPE html PUBLIC "-//W3C//DTD XHTML 1.0 Transitional//EN"
    "http://www.w3.org/TR/xhtml1/DTD/xhtml1-transitional.dtd">
 <html xmlns="http://www.w3.org/1999/xhtml"
       xmlns:lift="http://liftweb.net"
       lift:content_id="real_content">
   <head>
	<title>Not really</title>
   </head>
   <body>
     <div id="real_content">
       <h1>Welcome to your project!</h1>
     </div>
   </body>
 </html>
The second, safer approach, is to specific the
lift:content_id marker as part of the body element’s
class attribute, as shown in Listing
4.2.1↓.
Assigning a Content ID in the Body class
<!DOCTYPE html PUBLIC "-//W3C//DTD XHTML 1.0 Transitional//EN"
    "http://www.w3.org/TR/xhtml1/DTD/xhtml1-transitional.dtd">
 <html xmlns="http://www.w3.org/1999/xhtml">
   <head>
	<title>Not really</title>
   </head>
   <body class="lift:content_id=real_content">
     <div id="real_content">
       <h1>Welcome to your project!</h1>
     </div>
   </body>
 </html>
4.2.2 Invoking Snippets Via the Class Attribute↓
In XML-based templates, Lift looks for tags with the “lift” prefix to process. In DFTs, the
class attribute is used instead for invocation. This form of invocation is discussed in more detail in Section
5.1 on page 1↓.
4.2.3 Binding via CSS transforms↓
Lift 2.2 introduces a new feature for binding values into snippet markup by using CSS id and class attributes instead of prefixed XML elements. This support is detailed in Section
5.3.2 on page 1↓.
4.3 HTML5 Support ↓↓↓
We just discussed Templates and saw that through a combination of an XML file, Lift tags, and Scala code we can respond to requests made by a user. You can also generate an XHTML response entirely in code using a View. Custom dispatch is a similar method which can be used to programmatically return any kind of response (not just XHTML), and is covered in more depth in Section
3.8↑.
A view function is a normal Scala method of type
() ⇒ scala.xml.NodeSeq↓. The
NodeSeq that’s returned from a view is processed for template tags in the same way that XML loaded from a static file would be. As we showed in Section
3.5↑, there are two ways that a View can be invoked. The first is by defining a partial function for
LiftRules.viewDispatch↓↓, which allows you to dispatch to any statically-available method (i.e. on an
object, not a
class), or to a
LiftView (explained in a moment) object for any arbitrary request path. The second way that a View can be invoked is by reflection: if the first element of the request path matches the class name of the View (as defined in Section
3.2.1↑), then the second element is used to look up the View function depending on which trait the View class implements. For performance reasons, explicit dispatch via
LiftRules.viewDispatch is recommended because reflection incurs a significant cost for each request. When you use
LiftRules.viewDispatch, you need to provide an instance of
scala.lang.Either to differentiate the dispatch type: a
scala.lang.Left indicates a method returning a
Box[NodeSeq], while a
scala.lang.Right indicates a
LiftView object. If you want to dispatch a request to a
LiftView object, the match in the
LiftRules.viewDispatch is made on all path components except the last one (e.g.
List.init), and that object’s
dispatch method is checked against the last component of the path to further determine which method on the object will handle the request. Listing
4.4↓ shows how we can define an RSS view as a feed using explicit dispatch. Note that we use extraction on the requested path in this case to provide account-specific feeds and a security token to prevent feed browsing.
// In Boot.boot:
LiftRules.viewDispatch.append {
// This is an explicit dispatch to a particular method based on the path
case List("Expenses", "recent", acctId, authToken) =>
Left(() => Full(RSSView.recent(acctId, authToken)))
// This is a dispatch via the same LiftView object. The path
// "/Site/news" will match this dispatch because of our dispatch
// method defined in RSSView. The path "/Site/stuff/news" will not
// match because the dispatch will be attempted on List("Site","stuff")
case List("Site") => Right(RSSView)
}
// Define the View object:
object RSSView extends LiftView {
def dispatch = {
case "news" => siteNews
}
def recent(acctId : String, authToken : String)() : NodeSeq = {
// User auth, account retrieval here
...
<lift:surround with="rss" at="content">
...
</lift:surround>
}
// Display a general RSS feed for the entire site
def siteNews() : NodeSeq = { ... }
}
If you want to use reflection for dispatch
↓↓ then there are two traits that you can use when implementing a view class: one is the
LiftView↓ trait, the other is the
InsecureLiftView↓ trait, both under the
net.liftweb.http package. As you may be able to tell from the names, we would prefer that you extend the
LiftView trait. The
InsecureLiftView determines method dispatch by turning a request path into a class and method name. For example, if we have a path
/MyStuff/enumerate, then Lift will look for a class called
MyStuff in the view subpackage (class resolution is covered in Section
3.2.1↑) and if it finds
MyStuff and it has a method called
enumerate, then Lift will execute the
enumerate method and return its result to the user. The main concern here is that Lift uses reflection
↓ to get the method with
InsecureLiftView, so it can access any method in the class, even ones that you don’t intend to make public. A better way to invoke a View is to extend the
LiftView trait, which defines a dispatch partial function. This dispatch function maps a string (the “method name”) to a function that will return a
NodeSeq. Listing
4.4↓ shows a custom
LiftView class where the path
/ExpenseView/enumerate will map to the
ExpenseView.doEnumerate method. If a user attempts to go to
/ExpenseView/privateMethod they’ll get a 404 because
privateMethod is not defined in the dispatch method. If, however, our
ExpenseView class implemented the
InsecureLiftView trait and someone visited
/ExpenseView/privateMethod, we would lose our hard drive (on Unix at least).
class ExpenseView extends LiftView {
override def dispatch = {
case "enumerate" => doEnumerate _
}
def doEnumerate () : NodeSeq = {
...
<lift:surround with="default" at="content">
{ expenseItems.toTable }
</lift:surround>
}
def privateMethod () : NodeSeq = {
Runtime.getRuntime.exec("rm -rf /")
}
}
A major difference between Views and other programmatic rendering approaches (such as Custom Dispatch) is that the
NodeSeq returned from the View method is processed for template tags including
surrounds and
includes, just as it would be for a snippet. That means that you can use the full power of the templating system from within your View, as shown in Listing
4.4↑’s
doEnumerate method.
Since you can choose not to include any of the pre-defined template XHTML, you can easily generate any XML-based content, such as Atom or RSS feeds, using a View.
In the earlier sections on Templates and Views we briefly touched on some of Lift’s built-in tags, namely, <lift:snippet/> and <lift:surround/>. In this section we’ll go into more detail on those tags as well as cover the rest of Lift’s tags.
The
<lift:a/> tag is used internally by
SHtml.a to create an anchor tag that will call an AJAX function when clicked. This tag is generally not used directly by developers. See Section
11.4 on page 1↓ for more details.
Usage: <lift:bind name=”binding_name” />
The
<lift:bind/> tag is used as a placeholder for insertion of content within included templates when using the
<lift:surround/> and <lift:embed/> tags. See Section
4.7↓ for examples and discussion.
Usage: <lift:bind-at name=”binding_name”>contents</lift:bind-at>
The
<lift:bind-at/> tag is used to replace named
<lift:bind/> tags within
<lift:surround/> and
<lift:embed/> tags. See Section
4.7↓ for examples and discussion.
Usage: <lift:children>...multiple xml nodes here...</lift:children>
The purpose of the
<lift:children/> tag is to allow you to create fragment templates with more than one root element that still parse as valid XML. For example, Listing
4.5.4↓ shows a template that we might want to embed into other templates. The problem is that XML requires a single root element, and in this case we have two.
A Non-Conforming XML Fragment
<div>First Div</div>
<div>Second Div</div>
By using the
<lift:children/> tag, as shown in Listing
4.5.4↓, we have a valid XML file. Lift essentially replaces the
<lift:children/> tag with its contents.
A Conforming XML Fragment
<lift:children>
<div>First Div</div>
<div>Second Div</div>
</lift:children>
Usage: <lift:comet type="ClassName" name=”optional”/>
The
<lift:comet/> tag embeds a Comet actor into your page. The class of the Comet actor is specified by the
type attribute. The
name attribute tells Lift to create a unique instance of the Comet actor; for example, you could have one Comet actor for site updates and another for admin messages. The contents of the tag are used by the Comet actor to bind a response. Listing
4.5.5↓ shows an example of a Comet binding that displays expense entries as they’re added. Comet is covered in more detail in Chapter
11↓.
<div class="accountUpdates">
  <lift:comet type="AccountMonitor">
    <ul><account:entries>
      <li><entry:time/> : <entry:user /> : <entry:amount /></li>
    </account:entries></ul>
  </lift:comet>
</div>
As we mention in the embed tag documentation, mixing Comet with AJAX responses can be a bit tricky due to the embedded JavaScript that Comet uses.
Usage: <lift:CSS.blueprint />
       <lift:CSS.fancyType />
The <lift:CSS/> tag is used to insert the blueprint and (optionally) fancyType CSS stylesheets
Usage: <lift:embed what="template_name" />
The
embed tag allows you to embed a template within another template. This can be used to assemble your pages from multiple smaller templates, and it also allows you to access templates from JavaScript commands (Chapter
10↓). As with the
surround tag, the template name can be either the base filename or a fully-qualified path.
Note that if you use the embed tag to access templates from within a JsCmd (typically an AJAX call), any JavaScript in the embedded template won’t be executed. This includes, but is not limited to, Comet widgets.
The snippet tag is covered in detail in Section
5.1 on page 1↓, part of the chapter on snippets.
Usage: <lift:surround with="template_name" at=”binding”>
         children
       </lift:surround>
The
surround tag surrounds the child nodes with the named template. The child nodes are inserted into the named template at the binding point specified by the
at parameter (we’ll cover the bind tag in Section
4.5.2↑). Typically, templates that will be used to surround other templates are incomplete by themselves, so we usually store them in the
<app root>/templates-hidden subdirectory so that they can’t be accessed directly. Having said that, “incomplete” templates may be placed in any directory that templates would normally go in. The most common usage of
surround is to permit you to use a “master” template for your site CSS, menu, etc. An example use of
surround is shown in Listing
4.5.17↓. We’ll show the counterpart master template in the section on the bind tag. Note also that the surrounding template name can be either a fully-qualified path (i.e. “/templates-hidden/default”), or just the base filename (“default”). In the latter case, Lift will search all subdirectories of the app root for the template. By default, Lift will use “/templates-hidden/default” if you don’t specify a
with attribute, so Listings
4.5.17↓ and
4.5.17↓ are equivalent.
<lift:surround with="default" at="content">
  <p>Welcome to PocketChange!</p>
</lift:surround>
Surrounding with the default template
<lift:surround at="content">
  <p>Welcome to PocketChange!</p>
</lift:surround>
Note that you can use multiple surround templates for different functionality, and surrounds can be nested. For example, you might want to have a separate template for your administrative pages that adds a menu to your default template. In that case, your
admin.html could look like Listing
4.5.17↓. As you can see, we’ve named our bind point in the admin template “content” so that we keep things consistent for the rest of our templates. So if, for example, we were going to nest the template in Listing
4.5.17↑ above into the
admin.html template in Listing
4.5.17↓, all we’d need to do is change it’s
with attribute from “default” to “admin.”
<lift:surround with="default" at="content">
  <lift:Admin.menu />
  <lift:bind name="content" />
</lift:surround>
You cannot have a hidden template with the same name as a sub-directory of your webapp directory. For example, if you had an admin.html template in /templates-hidden, you could not also have an admin directory.
4.5.21 with-resource-id
4.6 Head and Tail Merge
Another feature of Lift’s template processing is the ability to merge the HTML
head↓ element in a template with the
head element in the surrounding template. In our example, Listing
4.1↑, notice that we’ve specified a
head tag inside the template. Without the head merge, this
head tag would show up in the default template where our template gets bound. Lift is smart about this, though, and instead takes the content of the
head element and merges it into the outer template’s
head element. This means that you can use a
surround tag to keep a uniform default template, but still do things such as changing the title of the page, adding scripts or special CSS, etc. For example, if you have a table in a page that you’d like to style with jQuery’s TableSorter, you could add a head element to insert the appropriate script:
<lift:surround with="default" at="foo">
<head><script src="/scripts/tablesorter.js" type="text/javascript" /><head>
...
</lift:surround>
In this manner, you’ll import TableSorter for this template alone.
4.7 Binding
5 Snippets↓
Put simply, a snippet is a Scala method that transforms input XML into output XML
↓. Snippets act as independent (or dependent, if you want) pieces of logic that you insert into your page to perform rendering. As such, snippets form the backbone of Lift’s View-First
↓ rendering architecture. Although snippets aren’t the only mechanism Lift has for rendering page views (see Views, Section
4.4 on page 1↑, Custom Dispatch, Section
3.8 on page 1↑, or even the REST API, Chapter
15↓), they’re so widely used and so important that we feel they warrant their own chapter.
In this chapter we will cover the ins and outs of snippets, from the snippet tag that you place in your templates, through how the snippet method is resolved, to the snippet method definition itself. We’ll also cover related topics and some advanced functionality in snippets for those looking to push Lift’s boundaries.
5.1 The Snippet Tag↓↓
Usage: <lift:snippet type="snippetName" ...options... />
       <lift:snippetName ...options... />
       <div class=”lift:snippetName?opt1=...;opt2=...;opt3=...” />
The snippet tag is what you use to tell Lift where and how to invoke a snippet method on given XML content. The most important part of the tag is the snippet name, which is used to resolve which snippet method will process the snippet tag contents. We’ll cover how the snippet name is resolved to a concrete method in section
5.2↓.
Note that there is a shorthand for the type attribute simply by appending the snippet name after the lift: prefix. If you use this shorthand, make sure to avoid naming your snippets the same as Lift’s built-in tags, such as surround, children, embed, etc.
In addition to the the type attribute, Lift will process several other options:
form If the
form↓ attribute is included with a value of either “POST” or “GET”, then an appropriate form tag will be emitted into the XHTML using the specified submission method. If you omit this tag from a snippet that generates a form, the form elements will display but the form won’t submit.
multipart ↓↓The
multipart attribute is a boolean (the default is false, specify “yes”, “true” or “1” to enable) that specifies whether a generated form tag should be set to use multipart form submission. This is most typically used for file uploads (Section
6.4↓). If you don’t also specify the
form attribute then this won’t do anything.
eager_eval ↓The eager_eval attribute is a boolean (the default is false, specify “yes”, “true” or “1” to enable) that controls the order of processing for the snippet tag contents. Normally, the snippet is processed and then the XML returned from the snippet is further processed for Lift tags. Enabling eager_eval reverses this order so that the contents of the snippet tag are processed first. We cover this in more detail with an example in Section
5.3.4↓.
With Lift 2.2’s Designer-Friendly Templates (Section
4.2 on page 1↑), you can also specify a snippet tag as part of the class attribute for a given element. Attributes for snippets invoked in this manner are passed via a query string. Listing
5.1↓ shows an example of how we can use the standard
lift:surround processing by modiying the
class of our content element.
Invoking Snippets Via the Class Attribute
<!DOCTYPE html PUBLIC "-//W3C//DTD XHTML 1.0 Transitional//EN"
    "http://www.w3.org/TR/xhtml1/DTD/xhtml1-transitional.dtd">
 <html xmlns="http://www.w3.org/1999/xhtml">
   <head>
	<title>Not really</title>
   </head>
   <body class="lift:content_id=real_content">
     <div class="lift:surround?with=default;at=content" id="real_content">
       <h1>Welcome to your project!</h1>
     </div>
   </body>
 </html>
5.2 Snippet Dispatch ↓
The first step taken by Lift when evaluating a snippet tag is to resolve what snippet method will actually process the content. There are several mechanisms that are used to resolve the method, but they can be broken down into two main approaches: dispatch via reflection and explicit dispatch. In addition, Lift allows per-request remapping of snippet names via
S.mapSnippet↓. We’ll cover each in the following sections.
5.2.1 Implicit Dispatch Via Reflection↓↓
The simplest, and default, approach to resolving snippet names is to use implicit dispatch via reflection. When using implicit dispatch, Lift will use the snippet name specified in the snippet tag to first locate a class. Lift will then either instantiate a class, or if it’s a stateful snippet (we’ll cover stateful snippets in Section
5.3.3↓), retrieve the current instance. One Lift has a class instance, it uses the snippet name to further determine which method in the class to execute. There are three ways to specify this:
-
Via the type attribute on the snippet tag. The value should be “ClassName:method” for the particular snippet method you want to have handle the tag
-
Via a tag suffix of Class.method. This is the same as specifying the type=”Class:method” attribute
-
Via a tag suffix of just Class. This will use the render method on the specified class to handle the tag
Classes are resolved as specified in Section
3.2.1↑.
The most important thing to remember when using implicit dispatch is that your snippet classes must be members of a snippet subpackage as registered by LiftRules.addToPackages. For example, if you have LiftRules.addToPackages(“com.foo”) in your Boot.boot method, snippets should be members of com.foo.snippet.
Listing
5.2.1↓ shows three equivalent snippet tags. Note: these are only equivalent because the method name is “render.” If we had chosen a different method, e.g., “list,” then the third example below will still call a “render” method.
It’s important to note that with pure implicit dispatch, Java’s reflection allows access to
any method on the enclosing class, no matter what the protection on the method is set to (e.g. private, protected). Because of this, it’s possible to invoke private and protected methods via implicit dispatch, which could be a security concern.This is one reason that we recommend using either DispatchSnippet or explicit dispatch for production sites. We’ll cover both of these approaches momentarily.
Another important note is that lookup via reflection is relatively expensive operation, yet another reason that we recommend explicit dispatch for production sites.
<lift:snippet type="MyClass:render" />
<lift:MyClass.render />
<lift:MyClass />
In addition to “pure” implicit dispatch, you can exert a little more control on which method in a given class handles a snippet by implementing the
net.liftweb.http.DispatchSnippet↓ trait. This trait contains a single method, dispatch, of type
PartialFunction[String, NodeSeq ⇒ NodeSeq] that maps the method name (the “method” part of “Class.method” or “Class:method” as described above) to a particular method. Only method names defined in the dispatch PartialFunction can be executed; any methods that aren’t covered by the partial function will result in a snippet failure. Listing
5.2.1↓ shows how you can control the dispatch by providing a custom
dispatch def.
Using DispatchSnippet to Control Snippet Method Selection
package com.foo.snippet
import scala.xml.{NodeSeq,Text}
import net.liftweb.http.DispatchSnippet
class SomeSnippetClass extends DispatchSnippet {
def dispatch : DispatchIt = {
// We have to use a partially-applied (trailing "_") version
// of the functions that we dispatch to
case "foo" => myFooMethod _
case "bar" => someOtherBarMethod _
case _ => catchAllMethod _
}
def myFooMethod (xhtml : NodeSeq) : NodeSeq = { ... }
def someOtherBarMethod (xhtml : NodeSeq) : NodeSeq = { ... }
def catchAllMethod(xhtml : NodeSeq) : NodeSeq = Text("You’re being naughty!")
}
To summarize, implicit dispatch is the default method by which Lift resolves snippet tag names to the actual class and method that will process the snippet tag contents. Although implicit dispatch is simple to use and works well, security concerns lead us to recommend the use of the
DispatchSnippet↓ trait. Even with
DispatchSnippet, however, the implicit class resolution still uses reflection, so if you’re trying to make things performant you should use explicit dispatch instead.
5.2.2 Explicit Dispatch↓
Explicit dispatch allows you to have direct control over which methods will be executed for a given snippet name. There are two ways that you can define snippet name to method mappings: via LiftRules.snippetDispatch, which points Lift to DispatchSnippet instances, and LiftRules.snippets, which points Lift directly at methods.
Let’s first take a look at
LiftRules.snippetDispatch, the more generic option. When a snippet tag is encountered with a snippet name of the form
A.B or
A:B, Lift will take the first portion (
A) and use that as the lookup for
snippetDispatch. The
PartialFunction needs to return an instance of
DispatchSnippet, so typically you will implement your explicit dispatch snippets using an
object instead of a
class. Listing
5.2.2↓ shows how we define our object. Note that the
dispatch method will be executed with the “
B” portion of the snippet name (as we defined above) as its argument. Other than the fact that it’s an object, the definition is essentially identical to our implicit dispatch class in Listing
5.2.1↑.
Defining an Explicit Snippet Object
// The package *doesn’t* need to be "snippet" because there’s
// no reflection involved here
package com.foo.logic
import scala.xml.{NodeSeq,Text}
import net.liftweb.http.DispatchSnippet
object HelloWorld extends DispatchSnippet {
// We define dispatch as a val so that it doesn’t get re-created
// on each request
val dispatch : DispatchIt = {
case name => render(name) _
}
def render (name : String)(ignore : NodeSeq) : NodeSeq =
Text("Hello, world! Invoked as " + name)
}
Now that we have our snippet object, we can bind it to a particular snippet name in our
Boot.boot method, as shown in Listing
5.2.2↓. It’s interesting to note that this is actually how Lift defines many of its tags, such as
<lift:embed/>,
<lift:surround/>, and
<lift:comet/>. In our case, we’ve bound our snippet object to
<lift:HelloWorld/>, and because our
DispatchSnippet uses a simple variable binding for its
dispatch method case, we can invoke the same snippet with
<lift:HelloWorld.hey />,
<lift:HelloWorld.useless/>, or even
<lift:HelloWorld.this_is_getting_silly/>, and the snippet will tell us what name it was invoked with (
<lift:HelloWorld/> will invoke with the name “render”, following Lift’s normal snippet tag conventions). Noe that if you’re setting up a dispatch for a
StatefulSnippet↓↓, return a new instance of your
StatefulSnippet class.
StatefulSnippet instances will properly register themselves ahead of the
snippetDispatch partial function on each successive request.
Binding Our Explicit Snippet Object
class Boot {
  def boot {
    ...
    LiftRules.snippetDispatch.append {
      case "HelloWorld" => com.foo.logic.HelloWorld
      // For StatefulSnippets, return a *new instance*
      case "HelloConversation" =>
        new com.foo.logic.StatefulHelloWorld
    }
  }
}
Now let’s look at
LiftRules.snippets. This is a more fine-grained approach to explicit dispatch that doesn’t require the
DispatchSnippet trait. Instead, we bind a list of snippet name components corresponding to the parts of the snippet name separated by either “:” or “.”, and point it directly at a given snippet method. Assuming we’re using the same snippet object in Listing
5.2.2↑, we can bind the
<lift:HelloWorld/> tag by setting up
LiftRules.snippets in our Boot.boot method as shown in Listing
5.2.2↓. Notice that in order to bind the same way that we did with
snippetDispatch, we need two lines to match the un-suffixed and suffixed versions. If you omit the un-suffixed line you will get a snippet failure.
Explicitly Binding a Snippet Method
import com.foo.logic
class Boot {
  def boot {
    ...
    LiftRules.snippets.append {
      // Matches a tag without a suffix (<lift:HelloWorld />)
      case List("HelloWorld") => HelloWorld.render("no name") _
      case List("HelloWorld", name) => HelloWorld.render(name) _
    }
  }
}
5.2.3 Per-request Remapping↓
The final piece of snippet mapping that we want to discuss is per-request remapping. The S.mapSnippet method allows you to modify which snippet method will service a given snippet tag within your page processing. For example, Listing
5.2.3↓ shows how we can conditionally “blank” a snippet based on logic in a second snippet. This functionality isn’t used frequently as the other types of snippet dispatch, but it’s here in case you need it.
import scala.xml.NodeSeq
import net.liftweb.http.S
class Display {
def header (xhtml : NodeSeq) : NodeSeq = {
...
// If simple is set, we don’t display complexStuff
S.param("simple").foreach {
S.mapSnippet("complexStuff", ignore => Text(""))
}
}
def complexStuff (xhtml : NodeSeq) : NodeSeq = {
...
}
}
5.3 Snippet Methods
Now that we’ve examined how Lift determines which snippet to execute, let’s look at what a snippet method actually does. A snippet method is essentially a transform, taking a single
scala.xml.NodeSeq↓ argument and returning a
NodeSeq.
Note: Although Scala can often infer return types, it’s important to explicitly specify the return type of your snippet methods as
NodeSeq. Failure to do so may prevent Lift from locating the snippet method if you’re using implicit dispatch (Section
5.2.1↑), in which case the snippet won’t execute!
The argument passed to the snippet method is the XML content of the snippet tag. Because Lift processes XML from the root element down to the child elements (outside-in), the contents of the snippet tag aren’t processed until
after the snippet method processes them. You may reverse the order of processing by specifying the
eager_eval attribute on the tag (Section
5.3.4↓). As an example, let’s say we wanted a snippet that would output the current balance of our ledger, shown in Listing
5.3↓. We simply return an XML Text node with the formatted balance. Note that the XML result from a snippet is itself processed recursively, so the
lift:Util.time snippet will be processed after our snippet method returns.
Returning Tags from a Snippet
class Ledger {
  def balance (content : NodeSeq) : NodeSeq =
    <p>{currentLedger.formattedBalance}
      as of <lift:Util.time /></p>
}
It is this hierarchical processing of template tags that makes Lift so flexible. For those of you coming to Lift with some JSP experience, Lift is designed to let you write something similar to tag libraries, but that are much more powerful and much simpler to use.
5.3.1 Binding Values in Snippets ↓↓
So far we’ve shown our snippets generating complete output and ignoring the input to the method. Lift actually provides some very nice facilities for using the input NodeSeq within your snippet to help keep presentation and code separate. First, remember that the input NodeSeq consists of the child elements for the snippet tag in your template.
<lift:Ledger.balance>
  <ledger:balance/> as of <ledger:time />
</lift:Ledger.balance>
For example, given a template containing the snippet tag shown in Listing
5.3.1↑, the Ledger.balance method receives
<ledger:balance/> as of <ledger:time />
as its input parameter. This is perfectly correct XML, although it may look a little strange at first unless you’ve used prefixed elements in XML before. The key is that Lift allows you to selectively “bind”, or replace, these elements with data inside your snippet. The Helpers.bind method takes three arguments:
-
The prefix for the tags you wish to bind, in this instance, “ledger”
-
The NodeSeq that contains the tags you wish to bind
-
One or more BindParam elements that map the tag name to a replacement value
While you can create your own
BindParam instances by hand, we generally recommend importing
Helpers._, which among other things contains a convenient implicit conversion to BindParam using the “->” operator. With this knowledge in hand, we can change our previous definition of the balance method in Listing
5.3↑ to that in Listing
5.3.1↓ below.
Binding the Ledger Balance
class Ledger {
  def balance (content : NodeSeq ) : NodeSeq =
    bind ("ledger", content,
          "balance" -> Text(currentLedger.formattedBalance),
          "time" -> Text((new java.util.Date).toString))
}
As you can see here, we actually gain a line of code over our previous effort, but the trade-off makes it far simpler for us to change the layout just by editing the template.
One last aspect of binding that we want to discuss is that any attributes set on the input elements that are being bound will be discarded
↓ if you use the “->” binding operator. See Section
5.4↓ for more details on how you manipulate attributes in bindings, including how you can retain attributes on binding elements from your templates by using the “-%>”
↓ binding operator instead.
5.3.2 CSS Selector Transforms ↓↓↓↓
In addition to the binding support detailed in Section
5.3.1↑, Lift 2.2 introduces binding via CSS transforms as part of its support for designer friendly templates. These allow you to bind values into template XHTML (or HTML5, see Section
4.3 on page 1↑) by using the attributes on specific elements. Let’s start by looking at a basic example, corresponding to the examples in Section
5.3.1↑.
Listing
5.3.2↓ shows a Designer-Friendly version of Listing
5.3.1↑. You can see that we’re invoking the
Ledger.balance snippet via the class attribute, and we’ve specified the binding elements as normal
<span/> elements with
id attributes.
<div class="lift:Ledger.balance">
  <span id="balance">$0</span> as of <span id="time">midnight</span>
</div>
Now, we need to perform the CSS transform within our snippet. The binding implicits for CSS transforms are found on the
net.liftweb.util.BindHelpers object/trait, so you should import it (in particular, the
strToCssBindPromoter method). Listing
5.3.2↓ shows how we modify the snippet in Listing
5.3.1↑ to utilize the new CSS transform.
Binding the Ledger Balance with CSS
import net.liftweb.util.BindHelpers._
class Ledger {
def balance = "#balance" #> currentLedger.formattedBalance &
"#time" #> (new java.util.Date).toString
}
As you can see in this example, CSS transforms are comprised of three parts: the transform selector, the transform operator (
#>), and the right hand side value. This value can be a number of different things, which we’ll cover in Section
5.3.2.2↓, but in our case we’re using a
MappedField and a
String. Additionally, you can chain transforms together with the
& operator.
5.3.2.1 CSS Selector Syntax
The selector syntax is based on a subset of CSS, so if you already know that you’re well on your way. The syntax can operate on elements based on id or class, and can also operate on attributes of those elements. Let’s look at the basic syntax:
-
#foo - Selects the element with an id attribute of “foo”
-
.foo - Selects all elements with a CSS class of “foo”
-
@foo - Selects all elements with a name attribute of “foo”
-
attrName=attrValue - Selects all elements with an attribute of “attrName” equal to “attrValue”
-
element - Selects all “element” elements (e.g. span, h1, etc.)
-
:type - Selects all elements with a type of “type”. The type must be one of:
-
button
-
checkbox
-
file
-
password
-
radio
-
reset
-
submit
-
text
-
* - Selects all elements
The element matching the selector is replaced by the result of processing the replacement. That means that in the example of Listing
5.3.2↑ the
span elements will be replaced with straight Text elements, resulting in the markup shown in Listing
5.3.2.1↓ (in other words, no remaining markup).
Sample CSS Transform Result
$12.42 as of Fri Jan 14 08:29:50 MST 2011
You can further refine the replacement with an optional qualifier. We’ve already seen how omitting the qualifer results in wholesale replacement of the matching element, but there are a few additional options:
-
* - Replaces the children of the selected element. For example, if we changed our selector in Listing 5.3.2↑ from “#balance” to “#balance *”, we would be replacing the text node child (“$0”), with the resulting markup:
<span id="balance">$12.42</span> as of Fri Jan 14 08:29:50 MST 2011
Note that when we perform child replacement, the parent’s attributes
↓ are carried over to the resulting element. There is an exception to this in the case of iterated replacements, which we’ll cover in Section
5.3.2.2↓.
-
*+ - Appends to the children of the selected element. For example, given the template
<span id="love">I love </span>
The transform
"#love *+" #> "figs"
Would result in the markup
<span id="love">I love figs</span>
-
-* - Prepends to the children of the selected element. This operates the same as appending.
-
[name] - ↓Sets the value of the ”name” attribute on the selected element. If the attribute already exists on the selected element, its value is replaced, otherwise the attribute is added. For example, if we wanted to replace both the link text and href of a link via CSS transform for the template
<a href="#">ReplaceMe</a>
We could perform this by chaining two selections together, one for the child element (link text) and one for the href attribute:
"a *" #> "This is the link text"&
  "a [href]" #> "http://foo.com/bar"
Note that the order of the selections is not important.
-
[name+] - Appends a value to the attribute on the selected element. If the attribute doesn’t already exist on the element then this behaves the same as the [name] qualifier. One example would be adding to the class attribute for a given element:
"tr [class+]" #> (if (index % 2) "odd" else "even")
-
^^ - Makes the selected element the root of the returned elements. This can be used to select a particular element from a template, similar to BindHelpers.chooseTemplate. The right hand side for the selected element is ignored, but you can chain further transforms to modify the returned element. For example, if we decided to only output the balance in Listing 5.3.2↑, we could do so by changing our snippet code to:
def balance = "#balance ^^" #> "ignore" &
  "#balance" #> currentLedger.formattedBalance
5.3.2.2 Right Hand Side Values
The right hand side of a CSS transform operates on the selected element to either transform or replace it. It can be one of:
-
String constant - returns a Text node for the String. For example, in Listing 5.3.2↑:
"#time" #> (new java.util.Date).toString
-
A NodeSeq constant - returns the NodeSeq itself. In Listing 5.3.2↑ we could have done this instead:
"#time" #> Text((new java.util.Date).toString)
-
NodeSeq ⇒ NodeSeq - a function that transforms the selected element. Note that CSS transforms extend NodeSeq ⇒ NodeSeq, so you can nest transforms like
// Select the element with id "entry" and then bind its
// nested "name" element
"#entry" #> { "#name" #> account.name }
-
net.liftweb.util.Bindable - Instances that implement the Bindable trait will be automatically converted into a NodeSeq. Among other things, MappedField and Record.Field support this, which allows us to use instances directly:
"#description" #> account.description
-
Boolean, Int, Long or Symbol - These are automatically promoted to a String via the net.liftweb.util.StringPromotable trait and implicits on its companion object
"#viewperm" #> account.isViewableBy(someUser)
-
A Box, Option or Seq of String, NodeSeq, Bindable or values convertable by StringPromotable - These will be converted into a net.liftweb.util.IterableConst, which is used to compute a Seq[NodeSeq]. If your selector replaces the children of the selected element (*), the IterableConst is applied to the selected element once for each item in the Seq. In other words, you get a copy of the selected element for each original input. For example, given the template:
<h2>Account names:</h2>
<ul>
<li id="item">Account</li>
</ul>
We can iterate over a list of accounts with the CSS transform:
"#item *" #> accounts.map(_.name.toString)
Which, assuming a set of accounts named “A”, “B”, and “C”, results in:
<h2>Account names:</h2>
<ul>
<li id="item">A</li>
  <li>B</li>
  <li>C</li>
</ul>
Note that the id attribute is only placed on the first transformed element. Subsequent replacements strip the id attribute so that it remains unique on the page. This special handling applies only to the id attribute; other attributes, such as class, are not similarly stripped.
Passing in a
None/
Empty will remove the selected element. For example, you can delete an attribute
↓↓ with the following code:
val blank: Option[String] = None
"#thing [class]" #> blank
-
A Box, Option or Seq of NodeSeq ⇒ NodeSeq - These will be converted into a net.liftweb.util.IterableFunc, and follow the same rules for replacement as IterableConst (e.g. child replacement repetition).
5.3.3 Stateless versus Stateful Snippets ↓↓
The lifecycle of a snippet is stateless by default. That means that for each request, Lift creates a new instance of the snippet class to execute (or uses the same staic method if using explicit dispatch, Section
5.2.2↑). Any changes you make to instance variables will be discarded after the request is processed. If you want to keep some state around, you have a couple of options:
-
Store the state in a cookie↓ (Section 3.10↑). This can be useful if you have data that you want to persist across sessions. The down side is that you have to manage the cookie as well as deal with any security implications for the data in the cookie as it’s stored on the user’s machine.
-
Store the state in a SessionVar↓ (Section 3.11↑). This is a little easier to manage than cookies, but you still have to handle adding and removing the session data if you don’t want it around for the duration of the session. As with a cookie, it is global, which means that it will be the same for all snippet instances for a given session.
-
Pass the state around in a RequestVar↓ by setting “injector” functions in your page transition functions (e.g. SHtml.link, S.redirectTo, etc). We cover this technique in Section 3.11↑.
-
Use a StatefulSnippet↓ subclass. This is ideal for small, conversational state, such as a form that spans multiple pages or for a page where you have multiple variables that you want to be able to tweak individually.
Using a
StatefulSnippet is very similar to using a normal snippet but with the addition of a few mechanisms. First, the
StatefulSnippet trait extends
DispatchSnippet (see Section
5.2.1↑), allowing you to define which methods handle which snippets based on the
dispatch method. Because Scala allows
defs to be implemented by
vars in subclasses, we can redefine the dispatch behavior as a result of snippet processing.
Another thing to remember when using StatefulSnippets is that when you render a form, a hidden field is added to the form that permits the same instance of the StatefulSnippet that created the form to be the target of the form submission. If you need to link to a different page, but would like the same snippet instance to handle snippets on that page, use the StatefulSnippet.link method (instead of SHtml.link); similarly, if you need to redirect to a different page, the StatefulSnippet trait defines a redirectTo method. In either of these instances, a function map is added to the link or redirect, respectively, that causes the instance to be reattached.
When might you use a stateful snippet? Consider a multi-part form where you’d like to have a user enter data over several pages. You’ll want the application to maintain the previously entered data while you validate the current entry, but you don’t want to have to deal with a lot of hidden form variables. Using a StatefulSnippet instance greatly simplifies writing the snippet because you can keep all of your pertinent information around as instance variables instead of having to insert and extract them from every request, link, etc.
Listing
5.3.3↓ shows an example of a stateful snippet that handles the above example. Note that for this example, the URL (and therefore, the template) don’t change between pages. The template we use is shown in Listing
5.3.3↓. Remember to call
unregisterThisSnippet() when you’re finished with your workflow in order to stop the current instance from being used.
... standard Lift imports ...
import scala.xml.Text
class BridgeKeeper extends StatefulSnippet {
// Define the dispatch for snippets. Note that we are defining
// it as a var so that the snippet for each portion of the
// multi-part form can update it after validation.
var dispatch : DispatchIt = {
// We default to dispatching the "challenge" snippet to our
// namePage snippet method. We’ll update this below
case "challenge" => firstPage _
}
// Define our state variables:
var (name,quest,color) = ("","","")
// Our first form page
def firstPage (xhtml : NodeSeq) : NodeSeq = {
def processName (nm : String) {
name = nm
if (name != "") {
dispatch = { case "challenge" => questPage _ }
} else {
S.error("You must provide a name!")
}
}
bind("form", xhtml,
"question" -> Text("What is your name?"),
"answer" -> SHtml.text(name, processName))
}
def questPage (xhtml : NodeSeq) : NodeSeq = {
def processQuest (qst : String) {
quest = qst
if (quest != "") {
dispatch = {
case "challenge" if name == "Arthur" => swallowPage _
case "challenge" => colorPage _
}
} else {
S.error("You must provide a quest!")
}
}
bind("form", xhtml,
"question" -> Text("What is your quest?"),
"answer" -> SHtml.text(quest, processQuest))
}
def colorPage (xhtml : NodeSeq) : NodeSeq = {
def processColor (clr : String) {
color = clr
if (color.toLowercase.contains "No,") {
// This is a cleanup that removes the mapping for this
// StatefulSnippet from the session. This will happen
// over time with GC, but it’s best practice to manually
// do this when you’re finished with the snippet
this.unregisterThisSnippet()
S.redirectTo("/pitOfEternalPeril")
} else if (color != "") {
this.unregisterThisSnippet()
S.redirectTo("/scene24")
} else {
S.error("You must provide a color!")
}
}
bind("form", xhtml,
"question" -> Text("What is your favorite color?"),
"answer" -> SHtml.text(color, processColor))
}
// and so on for the swallowPage snippet
...
}
The StatefulSnippet Example Template
<lift:surround with="default" at="content">
  <lift:BridgeKeeper.challenge form="POST">
    <form:question /> : <form:answer /> <br />
    <input type="submit" value="Answer" />
  </lift:BridgeKeeper.challenge>
</lift:surround>
If you’re using implicit dispatch (Section
5.2.1↑), then you’re done. If you want to use explicit dispatch
↓↓, however, you need to do a little more work than usual in the
LiftRules.snippetDispatch setup. Listing
5.3.3↓ shows how we can bind our own StatefulSnippet classes without using reflection.
Explicit Dispatch with Stateful Snippets
// In your boot method:
LiftRules.snippetDispatch.append {
  // S.snippetForClass checks to see if an instance has already
  // registered. This is the case after form submission or when
  // we use the StatefulSnippet.link or .redirectTo methods
  case "BridgeKeeper" => S.snippetForClass("TestHello") openOr {
    // If we haven’t already registered an instance, create one
    val inst = new com.test.TestHello
    // The name is what Lift uses to locate an instance (S.snippetForClass)
    // We need to add it so that the Stateful callback functions can
    // self-register
    inst.addName("TestHello")
    // Register this instance for the duration of the request
    S.overrideSnippetForClass("TestHello", inst)
    inst
  }
5.3.4 Eager Evaluation
As we mentioned in Section
5.3↑, Lift processes the contents of a snippet tag after it processes the tag itself. If you want the contents of a snippet tag to be processed
before the snippet, then you need to specify the
eager_eval↓ attribute on the tag:
<lift:Hello.world eager_eval=”true”>...</lift:Hello.world>
This is especially useful if you’re using an embedded
↓↓↓ template (Section
4.5.7↑). Consider Listing
5.3.4↓: in this case, the
eager_eval parameter makes Lift process the
<lift:embed /> tag before it executes the
Hello.world snippet method. If the “formTemplate” template looks like Listing
5.3.4↓, then the
Hello.world snippet sees the
<hello:name /> and
<hello:time /> XML tags as its
NodeSeq input. If the
eager_eval attribute is removed, however, the Hello.world snippet sees only a
<lift:embed /> tag that will be processed after it returns.
Embedding and eager evaluation
<lift:Hello.world eager_eval="true">
  <lift:embed what="formTemplate" />
</lift:Hello.world>
The formTemplate template
<lift:children>
<hello:name />
<hello:time />
</lift:children>
5.4 Handling XHTML Attributes in Snippets↓↓
It’s a common requirement that elements contain XHTML attributes to control things like style, provide an id, register javascript event handlers, and other functionality. Lift provides two main approaches to applying attributes to elements either in your snippet code or directly in the XHTML template.
5.4.1 Direct Manipulation in Code
You can apply attributes directly to XHTML elements using the “%” operator
↓ to apply a
scala.xml.UnprefixedAttribute instance to an element. Lift’s
net.liftweb.util.Helpers trait contains an implicit conversion from a
Pair[String,_] to an
UnprefixedAttribute called
pairToUnprefixed that allows you to use a simpler syntax. You may chain invocations of “%” to apply multiple attributes. For example, Listing
5.4.1↓ shows how you can apply an “id” and “class” attribute to a text box and to a normal paragraph.
Applying Attributes with
%
val myInput = SHtml.text("", processText(_)) % ("id" -> "inputField") %
  ("class" -> "highlighted")
Note that the % metadata mechanism is actually part of the Scala XML library. Specifically,
scala.xml.Elem has a
% method that allows the user to update the attributes on a given XML element by passing in a
scala.xml.UnprefixedAttribute. We suggest reading more about this in the Scala API documents, or in the Scala XML docbook at
http://burak.emir.googlepages.com/scalaxbook.docbk.html.
5.4.2 XHTML Attribute Pass-through↓↓
The second main approach to modifying XHTML attributes is to specify them directly in your templates. This has the benefit of allowing your template designers to directly manipulate things like style-related attributes and keeping the markup and the logic separate. Listing
5.4.2↓ shows how you can utilize the “-%>”
↓ binding operator instead of “->” to preserve attributes.
// the markup
<lift:Ledger.balance>
<ledger:time id="myId"/>
</lift:Ledger.balance>
// The snippet class
class Ledger {
def balance (content : NodeSeq ) : NodeSeq = {
bind ("ledger", content,
"time" -%> <span>{(new java.util.Date).toString}</span>)
}
}
The resulting node will be something like
<span id=”myId”>Sat Mar 28 16:43:48 EET 2009</span>
In addition to the “-%>” binding operator, there is also the “_id_>”
↓operator, which uses the element’s name as its “id” attribute. Listing shows a snippet method using the “_id_>” attribute and Listing shows the resulting markup.
Binding with the _id_> operator
def idByName (xhtml : NodeSeq) : NodeSeq =
  bind("example", xhtml, "name" _id_> <span>Fred</span>)
<!-- Input: -->
<lift:HelloWorld.idByName>
Hi, <example:name />
</lift:HelloWorld.idByName>
<!-- Output: -->
Hi, <span id="name">Fred</span>
6 Forms in Lift
In this chapter we’re going to discuss the specifics of how you generate and process forms with Lift. Besides standard GET/POST form processing, Lift provides AJAX forms (Chapter
11↓) as well as JSON form processing (Section
10.4.1↓), but we’re going to focus on the standard stuff here. We’re going to assume that you have a general knowledge of basic HTML form tags as well as how CGI
↓ form processing works.
6.1 Form Fundamentals
Let’s start with the basics of Lift form processing. A form in Lift is usually produced via a snippet that contains the additional
form attribute. As we mentioned in Section
5.1↑, this attribute takes the value GET or POST, and when present makes the snippet code embed the proper form tags around the snippet HTML. Listing
6.1↓ shows an example of a form that we will be discussing throughout this section.
<lift:Ledger.add form="POST">
  <entry:description /> <entry:amount /><br />
  <entry:submit />
</lift:Ledger.add>
The first thing to understand about Lift’s form support is that you generally don’t use the HTML tags for form elements directly, but rather you use generator functions on
net.liftweb.http.SHtml. The main reason for this is that it allows Lift to set up all of the internal plumbing so that you keep your code simple. Additionally, we use Lift’s binding mechanism (Section
5.3.1↑) to “attach” the form elements in the proper location. In our example in Listing
6.1↑, we have bindings for a description field, an amount, and a submit button.
Our next step is to define the form snippet itself. Corresponding to our example template is Listing
6.1↓. This shows our add method with a few vars to hold the form data and a binding to the proper form elements. We’ll cover the
processEntryAdd method in a moment; for now let’s look at what we have inside the add method.
def add (xhtml : NodeSeq) : NodeSeq = {
var desc = ""
var amount = "0"
def processEntryAdd () { ... }
bind("entry", xhtml,
"description" -> SHtml.text(desc, desc = _),
"amount" -> SHtml.text(amount, amount = _),
"submit" -> SHtml.submit("Add", processEntryAdd))
}
First, you may be wondering why we use vars defined inside the method. Normally, these vars would be locally scoped (stack-based) and would be discarded as soon as the method returns. The beauty of Scala and Lift is that the right hand argument of each of the SHtml functions is actually a function itself. Because these functions, also known as anonymous closures
↓, reference variables in local scope, Scala magically transforms them to heap variables behind the scenes. Lift, in turn, adds the function callbacks for each form element into its session state so that when the form is submitted, the appropriate closure is called and the state is updated. This is also why we define the
processEntryAdd function inside of the
add method: by doing so, the
processEntryAdd function
also has access to the closure variables. In our example, we’re using Scala’s placeholder “_” shorthand to define our functions. Your description processing function could also be defined as:
newDesc => description = newDesc
One important thing to remember, however, is that each new invocation of the add method (for each page view) will get its own unique instance of the variables that we’ve defined. That means that if you want to retain values between submission and re-rendering of the form, you’ll want to use
RequestVars (Section
3.11↑) or a
StatefulSnippet (Section
5.3.3↑) instead . Generally you will only use vars defined within the snippet method when your form doesn’t require validation and you don’t need any of the submitted data between snippet executions. An example of using
RequestVars for your form data would be if you want to do form validation and retain submitted values if validation fails, as shown in Listing
6.1↓. In this instance, we set an error message (more in Chapter
B↓). Since we don’t explicitly redirect, the same page is loaded (the default “action” for a page in Lift is the page itself) and the current RequestVar value of description is used as the default value of the text box.
Using RequestVars with Forms
object description extends RequestVar("")
object amount extends RequestVar("0")
def add (xhtml : NodeSeq) : NodeSeq = {
def processEntryAdd () =
if (amount.toDouble <= 0) {
S.error("Invalid amount")
} else {
// ... process Add ...
redirectTo(...)
}
bind("entry", xhtml,
"description" -> SHtml.text(description.is, description(_)),
...
}
The next thing to look at is how the form elements are generated. We use the SHtml helper object to generate a form element of the appropriate type for each variable. In our case, we just want text fields for the description and amount, but SHtml provides a number of other form element types that we’ll be covering later in this section. Generally, an element generator takes an argument for the initial value as well as a function to process the submitted value. Usually both of these arguments will use a variable, but there’s nothing stopping you from doing something such as
“description” -> SHtml.text(“”, println(“Description = “ + _))
Finally, our submit function executes the partially applied processEntryAdd function, which, having access to the variables we’ve defined, can do whatever it needs to do when the submit button is pressed.
6.2 Attributes for Form Elements↓
In addition to the approaches shown in Section
5.4↑, the SHtml generator functions allow you to apply attributes by passing the attribute name/value pairs as final arguments. This is usually simpler, and in some cases is much simpler than using the “%” operator directly. For example, checkbox and radio form elements are acutally returned as ChoiceHolder instances, which do not directly support the “%” operator. Listing
6.2↓ shows how to apply the same attributes as Listing
5.4.1↑ using the varargs approach.
Applying Attributes as Varargs
val myInput = SHtml.text("", processText(_), "id" -> "inputField",
  "class" -> "highlighted")
6.3 An Overview of Form Elements
Now that we’ve covered the basics of forms, we’re going to go into a little more detail for each form element generator method on SHtml. The
a method (all 3 variants) as well as the
ajax* methods are specific to AJAX forms, which are covered in detail in Chapter
11↓. The
json* methods are covered in Section
10.4.1↓. We’ll be covering the fileUpload method in detail in Section
6.4↓. One final note before we dive in is that most generator methods have an overload with a trailing asterisk (i.e.
hidden_*); these are generally equivalent to the overloads without an asterisk but are intended for Lift’s internal use.
The
checkbox method generates a checkbox form element, taking an initial Boolean value as well as a function
(Boolean) ⇒ Any that is called when the checkbox is submitted. If you’ve done a lot of HTML form processing you might wonder how this actually occurs, since
an unchecked checkbox is not actually submitted as part of a form. Lift works around this by adding a hidden form element for each checkbox with the same element name, but with a false value, to ensure that the callback function is always called. Because more than one XML node is returned by the generator, you can’t use the % metadata mechanism to set attributes on the check box element. Instead, use attribute pairs as arguments to the generator function as outlined in Section
5.4.1↑.
For example, Listing
6.3.1↓ shows a checkbox with an id of “snazzy” and a class attribute set to “woohoo.”
SHtml.checkbox_id(false, if (_) frobnicate(),
                  Full("snazzy"), "class" -> "woohoo")
The
hidden method generates a hidden form field. Unlike the HTML hidden field, the hidden tag is not intended to hold a plain value; rather, in Lift it takes a function
() ⇒ Any argument that is called when the form is submitted. As with most of the other generators, it also takes a final varargs sequence of
Pair[String,String] attributes to be added to the XML node. Listing
6.3.2↓ shows an example of using a hidden field to “log” information. (When the form is submitted, “Form was submitted” will be printed to stdout. This can be a useful trick for debugging if you’re not using a full-blown IDE.)
SHtml.hidden(() => println("Form was submitted"))
The link method generates a standard HTML link to a page (an
<a> tag, or anchor
↓), but also ensures that a given function is executed when the link is clicked. The first argument is the web context relative link path, the second argument is the
() ⇒ Any function that will be executed when the link is clicked, and the third argument is a NodeSeq that will make up the body of the link. You may optionally pass one or more
Pair[String,String] attributes to be added to the link element. Listing
6.3.3↓ shows using a link to load an
Expense entry for editing from within a table. In this case we’re using a
RequestVar to hold the entry to edit, so the link function is a closure that loads the current
Expense entry. This combination of link and
RequestVars is a common pattern for passing objects between different pages.
object currentExpense extends RequestVar[Box[Expense]](Empty)
def list (xhtml : NodeSeq) : NodeSeq = {
...
val entriesXml =
entries.map(entry =>
bind("entry", chooseTemplate("expense", "entries", xhtml),
...
"edit" -> SHtml.link("/editExpense",
() => currentExpense(Full(entry)),
Text("Edit")))
)
}
6.3.4 text and password
The text and password methods generate standard
text and
password input fields, respectively. While both take string default values and
(String) ⇒ Any functions to process the return, the password text field masks typed characters and doesn’t allow copying the value from the box on the client side. Listing
6.3.4↓ shows an example of using both text and password for a login page.
def login(xhtml : NodeSeq) : NodeSeq = {
  var user = ""; var pass = "";
  def auth () = { ... }
  bind("login", xhtml,
       "user" -> SHtml.text(user, user = _, "maxlength" -> "40")
       "pass" -> SHtml.password(pass, pass = _)
       "submit" -> SHtml.submit("Login", auth))
}
Alternatively, you might want the user (but not the password) to be stored in a
RequestVar so that if the authentication fails the user doesn’t have to retype it. Listing
6.3.4↓ shows how the snippet would look in this case.
A RequestVar Text Field Example
object user extends RequestVar[String]("")
def login(xhtml : NodeSeq) : NodeSeq = {
  var pass = "";
  def auth () = { ... }
  bind("login", xhtml,
       "user" -> SHtml.text(user.is, user(_), "maxlength" -> "40"),
       "pass" -> SHtml.password(pass, pass = _),
       "submit" -> SHtml.submit("Login", auth))
}
The textarea method generates a
textarea HTML form element. Generally the functionality mirrors that of
text, although because it’s a
textarea, you can control width and height by adding
cols and
rows attributes as shown in Listing
6.3.5↓. (You can, of course, add any other HTML attributes in the same manner.)
var noteText = ""
val notes =
  SHtml.textarea(noteText, noteText = _,
                 "cols" -> "80", "rows" -> "8")
Submit generates the submit form element (typically a button). It requires two parameters: a String value to use as the button label, and a function
() ⇒ Any that can be used to process your form results. One important thing to note about submit is that form elements are processed in the order that they appear in the HTML document. This means that you should put your submit element last in your forms: any items after the submit element won’t have been “set” by the time the submit function is called. Listings
6.3.4↑ and
6.3.4↑ use the
SHtml.submit method for the authentication handler invocation.
6.3.7 multiselect
Up to this point we’ve covered some fairly simple form elements. Multiselect is a bit more complex in that it doesn’t just process single values. Instead, it allows you to select multiple elements out of an initial Seq and then process each selected element individually. Listing
6.3.7↓ shows using a multiselect to allow the user to select multiple categories for a ledger entry. We assume that a Category entity has an id synthetic key as well as a String name value. The first thing we do is map the collection of all categories into pairs of (
value,
display) strings. The value is what will be returned to our processing function, while the display string is what will be shown in the select box for the user. Next, we turn the current entry’s categories into a Seq of just value strings, and we create a Set variable to hold the returned values. Finally, we do our form binding. In this example we use a helper function,
loadCategory (not defined here), that takes a String representing a Category’s primary key and returns the category. We then use this helper method to update the Set that we created earlier. Note that the callback function will be executed
for each selected item in the multiselect, which is why the callback takes a String argument instead of a
Set[String]. This is also why we have to use our own set to manage the values. Depending on your use case, you may or may not need to store the returned values in a collection.
def mySnippet ... {
  val possible = allCategories.map(c => (c.id.toString, c.name))
  val current = currentEntry.categories.map(c => c.id.toString)
  var updated = Set.empty[Category]
  bind (...,
    "categories" ->
      SHtml.multiselect(possible, current, updated += loadCategory(_)))
}
The radio method generates a set of radio buttons that take String values and return a single String (the selected button) on form submission. The values are used as labels for the Radio buttons, so you may need to set up a
Map to translate back into useful values. The radio method also takes a Box[String] that can be used to pre-select one of the buttons. The value of the Box must match one of the option values, or if you pass Empty no buttons will be selected. Listing
6.3.8↓ shows an example of using radio to select a color. In this example, we use a
Map from color names to the actual color values for the translation. To minimize errors, we use the
keys property of the Map to generate the list of options.
import java.awt.Color
var myColor : Color = _
val colorMap = Map("Red" -> Color.red,
                   "White" -> Color.white,
                   "Blue" -> Color.blue)
val colors = SHtml.radio(colorMap.keys.toList, Empty, myColor = colorMap(_))
The select method is very similar to the multiselect method except that only one item may be selected from the list of options. That also means that the default option is a
Box[String] instead of a
Seq[String]. As with
multiselect, you pass a sequence of (value, display) pairs as the options for the select, and process the return with a
(String) ⇒ Any function. Listing
6.3.9↓ shows an example of using a select to choose an account to view.
var selectedAccount : Account = _
val accounts = User.accounts.map(acc => (acc.id.toString, acc.name))
val chooseAccount =
  SHtml.select(accounts, Empty,
               selectedAccount = loadAccount(_), "class" -> "myselect")
An important thing to note is that Lift will verify that the value submitted in the form matches one of the options that was passed in. If you need to do dynamic updating of the list, then you’ll need to use
untrustedSelect (Section
6.3.11↓).
One of the drawbacks with the select and multiselect generators is that they deal only in Strings; if you want to select objects you need to provide your own code for mapping from the strings. The
selectObj generator method handles all of this for you. Instead of passing a sequence of (value string, display string) pairs, you pass in a sequence of (object, display string) pairs. Similarly, the default value is a
Box[T] and the callback function is
(T) ⇒ Any , where T is the type of the object (
selectObj is a generic function). Listing
6.3.10↓ shows a reworking of our radio example (Listing
6.3.8↑) to select Colors directly. Note that we set the select to default to
Color.red by passing in a
Full Box.
Using selectObj for Colors
... standard Lift imports ...
import _root_.java.awt.Color
class SelectSnippet {
def chooseColor (xhtml : NodeSeq) : NodeSeq = {
var myColor = Color.red
val options = List(Color.red, Color.white, Color.blue)
val colors = SHtml.selectObj(options, Full(myColor), myColor = _)
bind(...)
}
}
6.3.11 untrustedSelect
The untrustedSelect generator is essentially the same as the select generator, except that the value returned in the form isn’t validated against the original option sequence. This can be useful if you want to update the selection on the client side using JavaScript.
6.4 File Uploads ↓↓
File uploads are a special case of form submission that allow the client to send a local file to the server. This is accomplished by using multipart forms. You can enable this by setting the
multipart attribute on your snippet tag to
true. Listing
6.4↓ shows how we can add a file upload to our existing expense entry form so that users can attach scanned receipts to their expenses. We modify our template to add a new form, shown below. Note the
multipart=”true” attribute.
<lift:AddEntry.addEntry form="POST" multipart="true">
  ... existing headers ...
  <td>Receipt (JPEG or PNG)</td>
  ... existing form fields ...
  <td><e:receipt /></td>
  ...
</lift:AddEntry.addEntry>
On the server side, Listing
6.4↓ shows how we modify the existing
addEntry snippet to handle the (optional) file attachment. We’ve added some logic to the existing form submission callback to check to make sure that the image is of the proper type, then we use the
SHtml file upload generator with a callback that sets our
fileHolder variable. The callback for the
fileUpload generator takes a
FileParamHolder, a special case class that contains information about the uploaded file. The FileParamHolder case class has four parameters:
nameThe name of the form field that this file is associated with, as sent by the client
mimeTypeThe mime type as sent by the client
filenameThe filename as sent by the client
fileAn Array[Byte] containing the uploaded file contents
In our example, we want to save the file data into a MappedBinary field on our expense entry. You could just as easily process the data in place using a scala.io.Source or
java.io.ByteArrayInputStream, or output it using a java.io.FileOutputStream.
class AddEntry {
...
// Add a variable to hold the FileParamHolder on submission
var fileHolder : Box[FileParamHolder] = Empty
...
def doTagsAndSubmit (t : String) {
...
val e : Expense = ...
// Add the optional receipt if it’s the correct type
val receiptOk = fileHolder match {
// An empty upload gets reported with a null mime type,
// so we need to handle this special case
case Full(FileParamHolder(_, null, _, _)) => true
case Full(FileParamHolder(_, mime, _, data))
if mime.startsWith("image/") => {
e.receipt(data).receiptMime(mime)
true
}
case Full(_) => {
S.error("Invalid receipt attachment")
false
}
case _ => true
}
(e.validate, receiptOk) match {
...
}
...
}
bind("e", in,
...
"receipt" -> SHtml.fileUpload(fileHolder = _),
"tags" -> SHtml.text(tags, doTagsAndSubmit))
}
}
By default
↓, Lift will utilize the
InMemoryFileParamHolder ↓to represent uploaded file data. This implementation reads the uploaded data directly into memory (you retrieve the byte array with the
file val). If you would prefer to have Lift write uploaded data to disk and then give you a server-local filename to work with, you can use the
LiftRules.handleMimeFile configuration hook to instead use the
OnDiskFileParamHolder↓, as shown in Listing
6.4↓. The OnDiskFileParamHolder class has an additional property,
localFile, that is a
java.io.File object for the temporary upload file.
Using OnDiskFileParamHolder
// in Boot.boot:
LiftRules.handleMimeFile = OnDiskFileParamHolder.apply
7 SiteMap
SiteMap is a very powerful part of Lift that does essentially what it says: provides a map (menu) for your site. Of course, if all it did was generate a set of links on your page, we wouldn’t have a whole chapter dedicated to it. SiteMap not only handles the basic menu generation functionality, but also provides:
-
Access control mechanisms that deal not only with whether a menu item is visible, but also whether the page it points to is accessible
-
Grouping of menu items so that you can easily display portions of menus where you want them
-
Nested menus so you can have hierarchies
-
Request rewriting (similar to Section 3.7↑)
-
State-dependent computations for such things as page titles, page-specific snippets, etc.
The beauty of SiteMap is that it’s very easy to start out with the basic functionality and then expand on it as you grow.
7.1 Basic SiteMap Definition
Let’s start with our basic menu for PocketChange. To keep things simple, we’ll just define four menu items to begin:
-
A home page that displays the user’s entries when the user is logged in, or a welcome page when the user is not
-
A logout link when the user is logged in, log in and registration links and pages when the user is not
-
Pages to view or edit the user’s profile, available only when the user is logged in
-
A help page, available whether the user is logged in or not
We’ll assume that we have the corresponding pages, "homepage", "login", "logout", and "profile," written and functional. We’ll also assume that the help page(s) reside under the "help" subdirectory to keep things neat, and that the entry to help is /help/index.
7.1.1 The Link Class
The Link class is a fundamental part of Menu definitions. The
Link class contains two parameters: a
List[String] of path components, and a boolean value that controls whether prefix matching is enabled. The path components represent the portion of the URI following your web context, split on the "/" character. Listing
7.1.1↓ shows how you would use Link to represent the "/utils/index" page. Of course, instead of
“utils” :: “index” :: Nil, you could as easily use
List(“utils”, “index”) if you prefer.
val myUtilsIndex = new Link("utils" :: "index" :: Nil, false)
Prefix matching allows the path components you specify to match any longer paths as well. Following our first example, if you wanted to match anything under the utils directory (say, for access control), you would set the second parameter to
true, as shown in Listing
7.1.1↓.
val allUtilPages = new Link("utils" :: Nil, true)
The ExtLink object can be used to create a Link instance using your own full link URL. As its name implies, it would usually be used for an external location. Listing
7.1.2↓ shows a menu item that points to a popular website.
val goodReference = Menu(Loc("reference",
                             ExtLink("http://www.liftweb.net/"),
                             "LiftWeb"))
7.1.3 Creating Menu Entries
Menu entries are created using the Menu class, and its corresponding Menu object. A Menu, in turn, holds a Loc trait instance, which is where most of the interesting things happen. A menu can also hold one or more child menus, which we’ll cover in Section
7.1.4↓. Note that the Loc object has several implicit methods that make defining Locs easier, so you generally want to import them into scope . The simplest way is to import
net.liftweb.sitemap.Loc._, but you can import specific methods by name if you prefer. A Loc can essentially be thought of as a link in the menu, and contains four basic items:
-
The name of the Loc: this must be unique across your sitemap because it can be used to look up specific Menu items if you customize your menu display (Section 7.2.3↓)
-
The link to which the Loc refers: usually this will referernce a specific page, but Lift allows a single Loc to match based on prefix as well (Section 7.1.1↑)
-
The text of the menu item, which will be displayed to the user: you can use a static string or you can generate it with a function (Section 7.2.2↓)
-
An optional set of LocParam parameters that control the behavior and appearance of the menu item (see Sections 7.2↓,7.3↓, 7.5↓, and 7.4↓)
For our example, we’ll tackle the help page link first, because it’s the simplest (essentially, it’s a static link). The definition is shown in Listing
7.1.3↓. We’re assuming that you’ve imported the Loc implicit methods to keep things simple. We’ll cover instantiating the classes directly in later sections of this chapter.
val helpMenu = Menu(Loc("helpHome",
                        ("help" :: "" :: Nil) -> true,
                        "Help"))
Here we’ve named the menu item "helpHome." We can use this name to refer back to this menu item elsewhere in our code. The second parameter is a
Pair[List[String],Boolean] which converts directly to a Link class with the given parameters (see Section
7.1.1↑ above). In this instance, by passing in true, we’re saying that anything under the help directory will also match. If you just use a List[String], the implicit conversion is to a Link with prefix matching disabled. Note that SiteMap won’t allow access to any pages that don’t match any Menu entries, so by doing this we’re allowing full access to all of the help files without having to specify a menu entry for each. The final parameter, "Help," is the text for the menu link, should we choose to generate a menu link from this SiteMap entry.
7.1.4 Nested Menus
The Menu class supports child menus by passing them in as final constructor parameters. For instance, if we wanted to have an "about" menu under Help, we could define the menu as shown in Listing
7.1.4↓.
val aboutMenu = Menu(Loc("about", "help" :: "about" :: Nil, "About"))
val helpMenu = Menu(Loc(...as defined above...), aboutMenu)
When the menu is rendered it will have a child menu for About. Child menus are only rendered by default when the current page matches their parent’s Loc. That means that, for instance the following links would show in an "About" child menu item:
But the following would not:
We’ll cover how you can customize the rendering of the menus in Section
7.2.3↓.
7.1.5 Setting the Global SiteMap
Once you have all of your menu items defined, you need to set them as your SiteMap. As usual, we do this in the Boot class by calling the
setSiteMap method on LiftRules, as shown in Listing
7.1.5↓. The
setSiteMap method takes a SiteMap object that can be constructed using your menu items as arguments.
LiftRules.setSiteMap(SiteMap(homeMenu, profileMenu, ...))
When you’re dealing with large menus, and in particular when your model objects create their own menus (see MegaProtoUser, Section
8.2.8↓ ), then it can be more convenient to define List[Menu] and set that. Listing
7.1.5↓ shows this usage.
Using List[Menu] for SiteMap
val menus = Menu(Loc("HomePage", "", "Home"),...) ::
            ...
            Menu(...) :: Nil
LiftRules.setSiteMap(SiteMap(menus : _*))
The key to using List for your menus is to explicitly define the type of the parameter as "_*" so that it’s treated as a set of varargs instead of a single argument of type List[Menu].
7.2 Customizing Display
There are many cases where you may want to change the way that particular menu items are displayed. For instance, if you’re using a Menu item for access control on a subdirectory, you may not want the menu item displayed at all. We’ll discuss how you can control appearance, text, etc. in this section.
The Hidden LocParam does exactly what it says: hides the menu item from the menu display. All other menu features still work. There is a variety of reasons why you might not want a link displayed. A common use, shown in Listing
7.2.1↓, is where the point of the item is to restrict access to a particular subdirectory based on some condition. (We’ll cover the
If tag in Section
7.3.1↓.)
val receiptImages =
  Menu(Loc("receipts",
          ("receipts" :: Nil) -> true,
          "Receipts",
          Hidden, If(...)))
Note that in this example we’ve used the implicit conversion from Pair[String,Boolean] to Link to make this Menu apply to everything under the "receipts" directory.
7.2.2 Controlling the Menu Text
The
LinkText class is what defines the function that will return the text to display for a given menu item. As we’ve shown, this can easily be set using the implicit conversion for string
→ LinkText from
Loc. As an added bonus, the implicit conversion actually takes a by-name
String for the parameter. This means that you can just as easily pass in a function to generate the link text as a static string. For example, with our profile link we may want to make the link say "<username>’s profile". Listing
7.2.2↓ shows how we can do this by defining a helper method, assuming that there’s another method that will return the current user’s name (we use the ubiquitous
Foo object here).
def profileText = Foo.currentUser + "’s profile"
val profileMenu = Menu(Loc("Profile",
                           "profile" :: Nil,
                           profileText, ...))
Of course, if you want you can construct the
LinkText instance directly by passing in a constructor function that returns a
NodeSeq. The function that you use with
LinkText takes a type-safe input parameter, which we’ll discuss in more detail in Section
7.6.2↓.
7.2.3 Using <lift:Menu>
So far we’ve covered the Scala side of things. The other half of the magic is the special
<lift:Menu> tag. It’s this tag that handles the rendering of your menus into XHTML. The Menu tag uses a built-in snippet to provide several rendering methods. The most commonly used method is the
Menu.builder snippet. This snippet renders your entire menu structure as an unordered list (
<ul> in XHTML). Listing
7.2.3↓ shows an example of using the Menu tag to build the default menu (yes, it’s that easy).
Rendering with <lift:Menu.title>
<div class="menu">
  <lift:Menu.builder />
</div>
Of course, Lift offers more customization on this snippet than just emitting some XHTML. By specifying some prefixed attributes on the tag itself, you can add attributes directly to the menu elements. The following prefixes are valid for attributes:
-
ul - Adds the specified attribute to the <ul> element that makes up the menu
-
li - Adds the specified attribute to each <li> element for the menu
-
li_item - Adds the specified attribute to the current page’s menu item
-
li_path - Adds the specified attribute to the current page’s breadcrumb trail (the breadcrumb trail is the set of menu items that are direct ancestors in the menu tree)
The suffix of the attributes represents the name of the HTML attribute that will be added to that element, and can be anything. It will be passed directly through. For instance, we can add CSS
↓ classes to our menu and elements fairly easily, as shown in Listing
7.2.3↓. Notice that we also add a little JavaScript to our current menu item.
Using Attribues with Menu.builder
<lift:Menu.builder
  li:class="menuitem"
  li_item:class="selectedMenu"
  li_item:onclick="javascript:alert(’Already selected!’);" />
In addition to rendering the menu itself, the Menu class offers a few other tricks. The
Menu.title↓ snippet can be used to render the title of the page, which by default is the name parameter of the Loc for the menu (the first parameter). If you write your own Loc implementation (Section
7.6↓), or you use the Title
↓ LocParam (Section
7.4.3↓), you can overide the title to be whatever you’d like. Listing
7.2.3↓ shows how you use
Menu.title. In this particular example the title will be rendered as "
Home Page".
// In Boot:
val MyMenu = Menu(Loc("Home Page", "index" :: Nil, "Home"))
// In template (or wherever)
<title><lift:Menu.title/></title>
The next snippet in the Menu class is
item. The
Menu.item snippet allows you to render a particular menu item by specifying the name attribute (matching the first parameter to Loc). As with
Menu.builder, it allows you to specify additional prefixed attributes for the link to be passed to the emitted item. Because it applies these attributes to the link itself, the only valid prefix is "
a". Additionally, if you specify child elements for the snippet tag, they will be used instead of the default link text. Listing
7.2.3↓ shows an example using our "
Home Page" menu item defined in Listing
7.2.3↑. As you can see, we’ve added some replacement text as well as specifying a CSS
↓ class for the link.
<lift:Menu.item name="Home Page"
  a:class="homeLink">
  <b>Go Home</b>
</lift:Menu.item>
The final snippet that the Menu class provides is the
Menu.group method. We’re going to cover the use of
Menu.group in detail in Section
7.5.2↓.
7.3 Access Control
So far we’ve covered how to control the display side of Menus; now we’ll take a look at some of the plumbing behind the scenes. One important function of a Menu is that it controls access to the pages in your application. If no Menu matches a given request, then the user gets a 404 Not Found error. Other than this binary control of "matches → display" and "doesn’t match → don’t display", SiteMap provides for arbitrary access checks through the If and Unless LocParams.
The
If↓ LocParam takes a test function,
() ⇒ Boolean, as well as failure message function,
() ⇒ LiftResponse, as its arguments. When the
Loc that uses the
If clause matches a given path, the test function is executed, and if true then the page is displayed as normal. If the function evaluates to false, then the failure message function is executed and its result is sent to the user. There’s an implicit conversion in
Loc from a
String to a response which converts to a
RedirectWithState↓ instance (Section
3.9↑). The redirect is to the location specified by
LiftRules.siteMapFailRedirectLocation, which is the root of your webapp ("/") by default. If you want, you can change this in
LiftRules for a global setting, or you can provide your own
LiftResponse↓. Listing
7.3.1↓ shows a revision of the profile menu that we defined in Listing
7.2.2↑, extended to check whether the user is logged in. If the user isn’t logged in, we redirect to the login page.
val loggedIn = If(() => User.loggedIn_?,
                  () => RedirectResponse("/login"))
val profileMenu = Menu(Loc("Profile",
                           "profile" :: Nil,
                           profileText, loggedIn))
The
Unless↓ LocParam is essentially the mirror of
If. The exact same rules apply, except that the page is displayed only if the test function returns false. The reason that there are two classes to represent this behavior is that it’s generally clearer when a predicate is read as "working" when it returns true.
7.4 Page-Specific Rendering
Page specific rendering with SiteMap is an advanced technique that provides a lot of flexibility for making pages render differently depending on state.
7.4.1 The Template Parameter
Generally, the template that will be used for a page is derived from the path of the request. The
Template LocParam, however, allows you to completely override this mechanism and provide any template you want by passing in a function
() ⇒ NodeSeq. Going back to our example menus (Section
7.1↑), we’d like the welcome page to show either the user’s entries or a plain welcome screen depending on whether they’re logged in. One approach to this is shown in Listing
7.4.1↓. In this example, we create a
Template class that generates the appropriate template and then bind it into the home page menu
Loc. (See the Lift API for more on the Template class.)
val homepageTempl = Template({ () =>
  <lift:surround with="default" at="content">
  { if (User.loggedIn_?) {
      <lift:Entries.list />
    } else {
      <lift:embed what="welcome" />
    }
  }
  </lift:surround>
})
val homeMenu = Menu(Loc("Home Page",
                        "" :: Nil,
                        "Home Page", homepageTempl))
7.4.2 The Snippet and LocSnippets Parameters
Besides overriding the template for a page render (admittedly, a rather coarse approach), SiteMap has two mechanisms for overriding or defining the behavior of specific snippets. The first, Snippet, allows you to define the dispatch for a single snippet based on the name of the snippet. Listing
7.4.2↓ shows how we could use Snippet to achieve the same result for the home page rendering as we just did with the Template parameter. All we need to do is use the <lift:homepage> snippet on our main page and the snippet mapping will dispatch based on the state. (Here we’ve moved the welcome text into a Utils.welcome snippet.)
Using the Snippet LocParam
val homeSnippet = Snippet("homepage",
  if (User.loggedIn_?) {
    Entries.list _
  } else {
    Utils.welcome _
  })
val homeMenu = Menu(Loc("Home Page",
                        "" :: Nil,
                        "Home Page", homeSnippet))
The LocSnippets trait extends the concept of Snippet to provide a full dispatch partial function. This allows you to define multiple snippet mappings associated with a particular Loc. To simplify things, Lift provides a DispatchLocSnippets trait that has default implementations for
apply and
isDefinedAt; that means you only need to provide a
dispatch method implementation for it to work. Listing
7.4.2↓ shows an example of using DispatchLocSnippets for a variety of snippets.
val entrySnippets = new DispatchLocSnippets {
  def dispatch = {
    case "entries" => Entries.list _
    case "add" => Entries.newEntry _
  }
}
As we mentioned in Section
7.2.3↑, the Title LocParam can be used to provide a state-dependent title for a page. The Title case class simply takes a function
(T) ⇒ NodeSeq, where T is a type-safe parameter (we’ll cover this in Section
7.6.2↓). Generally you can ignore this parameter if you want to, which is what we do in Listing
7.4.3↓.
val userTitle = Title((_) =>
  if (User.loggedIn_?) {
    Text(User.name + "’s Account")
  } else {
    Text("Welcome to PocketChange")
  })
val homeMenu = Menu(Loc("Home Page",
                        "" :: Nil,
                        "Home Page", homepageTempl, userTitle))
7.5 Miscellaneous Menu Functionality
These are LocParams that don’t quite fit into the other categories.
Test is intended to be used to ensure that a given request has the proper parameters before servicing. With Test, you provide a function,
(Req) ⇒ Boolean that is passed the full Req object. Note that the test is performed when SiteMap tries to locate the correct menu, as opposed to If and Unless, which are tested after the proper Loc has been identified. Returning a false means that this Loc doesn’t match the request, so SiteMap will continue to search through your Menus to find an appropriate Loc. As an example, we could check to make sure that a given request comes from Opera (the Req object provides convenience methods to test for different browsers; see the Lift API for a full list) with the code in Listing
7.5.1↓.
val onlyOpera = Test(req => req.isOpera)
val operaMenu = Menu(Loc("Opera", "opera" :: Nil, "Only Opera", onlyOpera))
The LocGroup param allows you to categorize your menu items. The
Menu.group snippet (mentioned in Section
7.2.3↑) allows you to render the menu items for a specific group. A menu item may be associated with one or more groups. Simply add a LocGroup param with string arguments for the group names, as shown in Listing
7.5.2↓.
val siteMenu = Menu(Loc(...,LocGroup("admin", "site")))
In your templates, you then specify the binding of the menu as shown in Listing
7.5.2↓. As you can see, we’ve also added a prefixed attribute to control the CSS
↓ class of the links ("a" is the only valid prefix), and we’ve added some body XHTML for display. In particular, the <menu:bind> tag controls where the menu items are rendered. If you don’t provide body elements, or if you provide body elements without the <menu:bind> element, your body XHTML will be ignored and the menu will be rendered directly.
<div class="site">
  <ul>
  <lift:Menu.group group="site"
    a:class="siteLink">
   <li><menu:bind /></li>
  </lift:Menu.group>
  </ul>
</div>
7.6 Writing Your Own Loc
As we’ve shown, there’s a lot of functionality available for your Menu items. If you need more control, though, the Loc trait offers some functionality, such as rewriting, that doesn’t have a direct correspondence in a LocParam element. The basic definition of a Loc implementation covers a lot of the same things. The following vals and defs are abstract, so you must implement them yourself:
-
def name: the name that can be used to retrieve the menu via Menu.item
-
def link: the actual link; you can use the implicit conversions from List[String] or Pair[List[String],Boolean], or you can create the Link object yourself
-
def text: the text that will be displayed to the user; you can use the implicit conversion from String, or you can provide your own LinkText instance
-
def params: must return a List[LocParam] that is used to control behavior as we’ve shown in the previous sections
-
def defaultParams: used for type-safe rewriting, which we’ll cover in Section 7.6.2↓
Essentially, these mirror the params that are required when you use Loc.apply to generate a Loc. We’re going to write our own Loc implementation for our Expenses in this section to demonstrate how this works. Because this overlaps with existing functionality in the PocketChange application, we’ll be using a branch in the PocketChange app. You can pull the new branch with the command
git checkout --track -b custom-loc origin/custom-loc
You can then switch back and forth between the branches with the commands:
git checkout master
git checkout custom-loc
7.6.1 Corresponding Functions
Table
7.1↓ lists the LocParams and their corresponding methods in Loc, with notes to explain any differences in definition or usage. If yould prefer to use the LocParams instead, just define the
params method on Loc to return a list of the LocParams you want.
|
Hidden
|
N/A
|
To make your Loc hidden, add a Hidden LocParam to your params method return value
|
|
If/Unless
|
override testAccess
|
You need to return an Either to indicate success (Left[Boolean]) or failure (Right[Box[LiftResponse]])
|
|
Template
|
override calcTemplate
|
Return a Box[NodeSeq]
|
|
Snippet and LocSnippets
|
override snippets
|
Snippet is a PartialFunction[String, Box[ParamType]), NodeSeq => NodeSeq], which lets you use the type-safe parameter to control behavior.
|
|
Title
|
override title
|
You can override "def title" or "def title(in: ParamType)" depending on whether you want to use type-safe parameters
|
|
Test
|
override doesMatch_?
|
It’s your responsibility to make sure that the path of the request matches your Loc, since this method is what SiteMap uses to find the proper Loc for a request
|
|
LocGroup
|
override inGroup_?
|
Nothing special here
|
Table 7.1 LocParam Methods in Loc
7.6.2 Type Safe Parameters
One of the nice features of Loc is that it allows you to rewrite requests in a type-safe manner. What this means is that we can define a rewrite function on our Loc instance that returns not only a standard RewriteResponse, but also a parameter that we can define to pass information back to our menu to control behavior. The reason that this is type-safe is that we define our Loc on the type of the parameter itself. For instance, let’s expand the functionality of our app so that we have a page called "acct" that shows the expense entries for a given account. We would like this page to be viewable only by the owner of the account under normal circumstances, but to allow them to share it with other members if they wish to. Let’s start by defining our type-safe parameter class as shown in Listing
7.6.2↓.
abstract class AccountInfo
case object NoSuchAccount extends AccountInfo
case object NotPublic extends AccountInfo
case class FullAccountInfo(account : Account,
                           entries : List[Expense]) extends AccountInfo
We define a few case classes to indicate various states. The FullAccountInfo holds the account itself as well as some flags for behavior. Now that we have our parameter type, we can start to define our Loc, as shown in Listing
7.6.2↓.
class AccountLoc extends Loc[AccountInfo] {
...
}
Assuming that an Account instance has a unique string ID, we would like to use URL rewriting so that we can access a ledger via "/acct/<unique id>". Our rewrite function, shown in Listing
7.6.2↓, handles a few different things at once. It handles locating the correct account and then checking the permissions if everything else is OK.
override def rewrite = Full({
  case RewriteRequest(ParsePath(List("acct", aid), _, _, _), _, _) => {
    Account.findAll(By(Account.stringId, aid)) match {
      case List(account) if account.is_public.is => {
        (RewriteResponse("account" :: Nil),
         FullAccountInfo(account, account.entries))
      }
      case List(account) => {
        (RewriteResponse("account" :: Nil),
         NotPublic)
      }
      case _ => {
        (RewriteResponse("account" :: Nil),
         NoSuchAccount)
      }
    }
  }
})
Now that we’ve defined the transformation from URL to parameter, we need to define the behaviors based on that parameter. The account page will show a list of expense entries only if the account is located and is public. For this example we’ll use a single template and we’ll change the snippet behavior based on our parameter, as shown in Listing
7.6.2↓.
Defining Snippet Behavior
override def snippets = {
  case ("entries", Full(NoSuchAccount)) => {ignore : NodeSeq =>
    Text("Could not locate the requested account")}
  case ("entries", Full(NotPublic)) => {ignore : NodeSeq =>
    Text("This account is not publicly viewable")}
  case ("entries", Full(FullAccountInfo(account, List()))) => {ignore : NodeSeq =>
    Text("No entries for " + account.name.is)}
  case ("entries", Full(FullAccountInfo(account, entries))) =>
    Accounts.show(entries) _
}
In this example, we simply return some text if the
Account can’t be located, isn’t public, or doesn’t have any
Expense entries. Remember that this function needs to return a snippet function, which expects a NodeSeq parameter. This is why we need to include the
ignore parameter as part of our closures. If our
Account does have entries, we return a real snippet method defined in our
Accounts object. In our template, we simply use an entries snippet tag, as shown in Listing
7.6.2↓.
<lift:surround with="default" at="content">
  <lift:entries  eager_eval="true">
    <h1><lift:Menu.title /></h1>
    <lift:embed what="entry_table" />
  </lift:entries>
</lift:surround>
We’re using our embedded table template for the body of the table along with the
eager_eval attribute so that we can use the same markup for all occurrences of our expense table display. We can also define the title of the page based on the
title parameter, as shown in Listing
7.6.2↓.
override def title(param : AccountInfo) = param match {
  case FullAccountInfo(acct, _) =>
    Text("Expense summary for " + acct.name.is)
  case _ => Text("No account")
}
7.6.3 Dynamically Adding Child Menus
TBW
7.6.4 Binding Your Custom Loc
7.7 Conclusion
As we’ve shown in this chapter, SiteMap offers a wide range of functionality to let you control site navigation and access. You can customize the display of your individual items using the LinkText LocParam as well as through the functionality of the built-in Menu builder and item snippets. You can use the If and Unless LocParams to control access to your pages programmatically, and you can use the Test LocParam to check the request before it’s even dispatched. Page-specific rendering can be customized with the Template, Snippet, and LocSnippet LocParams, and you can group menu items together via the LocGroup LocParam. Finally, you can consolidate all of these functions by writing your own Loc trait subclass directly, and gain the additional benefit of type-safe URL rewriting. Together these offer a rich set of tools for building your web site exactly they way you want to.
8 The Mapper and Record Frameworks
In our experience, most webapps end up needing to store user data somewhere. Once you start working with user data, though, you start dealing with issues like coding up input forms, validation
↓, persistence, etc. to handle the data. That’s where the Mapper and Record frameworks come in. These frameworks provides a scaffolding for all of your data manipulation needs. Mapper is the original Lift persistence framework, and it is closely tied to JDBC for its storage. Record is a new refactorization of Mapper that is backing-store agnostic at its core, so it doesn’t matter whether you want to save your data to JDBC, JPA, or even something such as XML. With Record, selecting the proper driver will be as simple as hooking the proper traits into your class.
The Record framework is relatively new to Lift. The plan is to move to Record as the primary ORM framework for Lift sometime post-1.0. Because Record is still under active design and development, and because of its current “moving target” status, this chapter is mostly going to focus on Mapper. We will, however, provide a few comparitive examples of Record functionality to give you a general feel for the flavor of the changes. In any case, Mapper will not go away even when record comes out, so you can feel secure that any code using Mapper will be viable for quite a while.
8.1 Introduction to Mapper and MetaMapper
Let’s start by discussing the relationship between the Mapper
↓ and MetaMapper
↓ traits (and the corresponding Record
↓ and MetaRecord
↓). Mapper provides the
per-instance functionality for your class, while MetaMapper handles the
global operations for your class and provides a common location to define per-class static specializations of things like field order, form generation, and HTML representation. In fact, many of the Mapper methods actually delegate to methods on MetaMapper. In addition to Mapper and MetaMapper, there is a third trait, MappedField, that provides the per-field functionality for your class. In Record, the trait is simply called “Field”. The MappedField trait lets you define the individual validators as well as filters to transform the data and the field name. Under Record, Field adds some functionality such as tab order and default error messages for form input handling.
8.1.1 Adding Mapper to Your Project
Since Mapper is a separate module, you need to add the following dependency to your pom.xml to access it:
Mapper POM Dependency
<project ...>
  ...
  <dependencies>
    ...
    <dependency>
      <groupId>net.liftweb</groupId>
      <artifactId>lift-mapper</artifactId>
      <version>1.0</version> <!-- or 1.1-SNAPSHOT, etc -->
    </dependency>
  </dependencies>
  ...
</project>
You’ll also need the following import in any Scala code that uses Mapper:
Mapper Imports
import _root_.net.liftweb.mapper._
8.1.2 Setting Up the Database Connection
The first thing you need to do is to define the database connection. We do this by defining an object called
DBVendor (but you can call it whatever you want). This object extends the net.liftweb.mapper.ConnectionManager trait and must implement two methods: newConnection and releaseConnection. You can make this as sophisticated as you want, with pooling, caching, etc., but for now, Listing
8.1.2↓ shows a basic implementation to set up a PostgreSQL driver.
.. standard Lift imports ...
import _root_.net.liftweb.mapper._
import _root_.java.sql._
object DBVendor extends ConnectionManager {
// Force load the driver
Class.forName("org.postgresql.Driver")
// define methods
def newConnection(name : ConnectionIdentifier) = {
try {
Full(DriverManager.getConnection(
"jdbc:postgresql://localhost/mydatabase",
"root", "secret"))
} catch {
case e : Exception => e.printStackTrace; Empty
}
}
def releaseConnection (conn : Connection) { conn.close }
}
class Boot {
def boot {
...
DB.defineConnectionManager(DefaultConnectionIdentifier, DBVendor)
}
}
A few items to note:
-
The name parameter for newConnection can be used if you need to have connections to multiple distinct databases. One specialized case of this is when you’re doing DB sharding (horizontal scaling). Multiple database usage is covered in more depth in Section 8.3.1↓
-
The newConnection method needs to return a Box[java.sql.Connection]. Returning Empty indicates failure
-
The releaseConnection method exists so that you have complete control over the lifecycle of the connection. For instance, if you were doing connection pooling yourself you would return the connection to the available pool rather than closing it
-
The DB.defineConnectionManager call is what binds our manager into Mapper. Without it your manager will never get called
8.1.3 Constructing a Mapper-enabled Class
Now that we’ve covered some basic background, we can start constructing some Mapper classes to get more familiar with the framework. We’ll start with a simple example of a class for an expense transaction from our PocketChange application with the following fields:
-
Date
-
Description: a string with a max length of 100 chars
-
Amount: a decimal value with a precision of 16 digits and two decimal places
-
A reference to the Account that owns the transaction
Given these requirements we can declare our
Expense class as shown in Listing
8.1.3↓.
import _root_.java.math.MathContext
class Expense extends LongKeyedMapper[Expense] with IdPK {
def getSingleton = Expense
object dateOf extends MappedDateTime(this)
object description extends MappedString(this,100)
object amount extends MappedDecimal(this, MathContext.DECIMAL64, 2)
object account extends MappedLongForeignKey(this, Account)
}
For comparison, the Record version is shown in Listing
8.1.3↓. This example already shows some functionality that hasn’t been ported over to Record from Mapper; among other things, the
IdPK trait, and foreign key fields (many to one mappings) are missing. The other minor differences are that the
getSingleton method has been renamed to
meta, and the Field traits use different names under the Record framework (i.e.
DateTimeField vs
MappedDateTime).
import _root_.java.math.MathContext
import _root_.net.liftweb.record._
class Expense extends KeyedRecord[Expense,Long] {
def meta = Expense
def primaryKey = id
object id extends LongField(this) with KeyField[Long,Expense]
object dateOf extends DateTimeField(this)
object description extends StringField(this, 100)
object amount extends DecimalField(this, MathContext.DECIMAL64, 2)
object account extends LongField(this)
}
As you can see, we’ve set
Expense to extend the
LongKeyedMapper and
IdPK traits and we’ve added the fields required by our class. We would like to provide a primary key for our entity; while not strictly necessary, having a synthetic primary key often helps with CRUD operations. The
LongKeyedMapper trait accomplishes two objectives: it tells Lift that we want a primary key defined and that the key should be a long. This is basically a shortcut for using the
KeyedMapper[Long,Expense]↓ trait. When you use the
KeyedMapper trait you need to provide an implementation for the
primaryKeyField def, which must match the type of the
KeyedMapper trait and be a subtype of
IndexedField↓. The
IdPK trait handles the implementation, but note that
IdPK currently only supports
Long keys. Mapper supports both indexed
Longs and
Strings, so if you want
Strings you’ll need to explicitly use
KeyedMapper[String,...] and provide the field definition yourself. It’s possible to use some other type for your primary key, but you’ll need to roll your own (Section
8.2.7↓). Technically
Int indexes are supported as well, but there is no corresponding trait for an
Int foreign key. That means that if you use an
Int for the primary key, you may not be able to add a relationship to another object (Section
8.1.4↓), unless you write your own. Record is a little more flexible in primary key selection because it uses, in effect, a marker trait (
KeyField) to indicate that a particular field is a key field. One thing to note is that in the Mapper framework, the table name
↓ for your entity defaults to the name of the class (Expense, in our case). If you want to change this, then you just need to override the
dbTableName↓ def in your MetaMapper object.
Looking at these examples, you’ve probably noticed that the fields are defined as objects rather than instance members (vars). The basic reason for this is that the MetaMapper needs access to fields for its validation and form functionality; it is more difficult to cleanly define these properties in the MetaMapper if it had to access member vars on each instance since a MetaMapper instance is itself an object. Also note that
MappedDecimal is a custom field type, which we’ll cover in Section
8.2.7↓.
In order to tie all of this together, we need to define a matching
LongKeyedMetaMapper↓ object as the singleton for our entity, as shown in Listing
8.1.3↓. The Meta object (whether MetaMapper or MetaRecord) is where you define most behavior that is common across all of your instances. In our examples, we’ve decided to name the meta object and instance class the same. We don’t feel that this is unclear because the two together are what really define the ORM behavior for a “type.”
object Expense extends Expense with LongKeyedMetaMapper[Expense] {
  override def fieldOrder = List(dateOf, description, amount)
}
In this instance, we’re simply defining the order of fields as they’ll be displayed in XHTML
↓ and forms
↓ by overriding the
fieldOrder method. The default behavior is an empty list, which means no fields are involved in display or form generation. Generally, you will want to override
fieldOrder because this is not very useful. If you don’t want a particular field to show up in forms or XHTML output, simply omit it from the fieldOrder
↓ list.
Because fields aren’t actually instance members, operations on them are slightly different than with a regular var. The biggest difference is how we set fields: we use the apply method. In addition, field access can be chained so that you can set multiple field values in one statement, as shown in Listing
8.1.3↓:
myEntry.dateOf(new Date).description("A sample entry")
myEntry.amount(BigDecimal("127.20"))
The underlying value of a given field can be retrieved with the
is method (the
value method in Record) as shown in Listing
8.1.3↓.
Accessing Field Values in Record
// mapper
val tenthOfAmount = myEntry.amount.is / 10
val formatted = String.format("%s : %s",
                              myEntry.description.is,
                              myEntry.amount.is.toString)
// record
if (myEntry.description.value == "Doughnuts") {
  println("Diet ruined!")
}
8.1.4 Object Relationships
Often it’s appropriate to have relationships between different entities. The archetypical example of this is the parent-child relationship. In SQL, a relationship can be defined with a foreign key that associates one table to another based on the primary key of the associated table. As we showed in Listing
8.1.3↑, there is a corresponding
MappedForeignKey trait, with concrete implementations for Long and String foreign keys. Once we have this defined, accessing the object via the relationship is achieved by using the
obj method on the foreign key field. Note that the
obj method returns a
Box, so you need to do some further processing with it before you can use it. With the foreign key functionality you can easily do one-to-many and many-to-one
↓ relationships (depending on where you put the foreign key). One-to-many
↓ relationships can be achieved using helper methods on the “one” side that delegate to queries. We’ll cover queries in a moment, but Listing
8.1.4↓ shows examples of two sides of the same relationship.
Accessing Foreign Objects
class Expense extends LongKeyedMapper[Expense] with IdPK {
...
object account extends MappedLongForeignKey(this, Account)
def accountName =
Text("My account is " + (account.obj.map(_.name.is) openOr "Unknown"))
}
class Account ... {
...
def entries = Expense.findAll(By(Expense.account, this.id))
}
If you want to do many-to-many
↓ mappings you’ll need to provide your own “join” class with foreign keys to both of your mapped entities. An example would be if we wanted to have tags (categories) for our ledger entries and wanted to be able to have a given entry have multiple tags (e.g., you purchase a book for your mother’s birthday, so it has the tags Gift, Mom, and Books). First we define the
Tag entity, as shown in Listing
8.1.4↓ .
class Tag extends LongKeyedMapper[Tag] with IdPK {
  def getSingleton = Tag
  object name extends MappedString(this,100)
}
object Tag extends Tag with LongKeyedMetaMapper[Tag] {
  override def fieldOrder = List(name)
}
Next, we define our join entity, as shown in Listing
8.1.4↓. It’s a
LongKeyedMapper just like the rest of the entities, but it only contains foreign key fields to the other entities.
class ExpenseTag extends LongKeyedMapper[ExpenseTag] with IdPK {
def getSingleton = ExpenseTag
object tag extends MappedLongForeignKey(this,Tag)
object expense extends MappedLongForeignKey(this,Expense)
}
object ExpenseTag extends ExpenseTag with LongKeyedMetaMapper[ExpenseTag] {
def join (tag : Tag, tx : Expense) =
this.create.tag(tag).expense(tx).save
}
To use the join entity, you’ll need to create a new instance and set the appropriate foreign keys to point to the associated instances. As you can see, we’ve defined a convenience method on our
Expense meta object to do just that. To make the many-to-many
↓ accessible as a field on our entities, we can use the HasManyThrough trait, as shown in Listing
8.1.4↓.
HasManyThrough for Many-to-Many Relationships
class Expense ... {
  object tags extends HasManyThrough(this, Tag,
    ExpenseTag, ExpenseTag.tag, ExpenseTag.expense)
}
A similar field could be set up on the Tag entity to point to entries. It’s important to note a few items:
-
The only way to add new entries is to directly construct the ExpenseTag instances and save them (either directly or via a helper method). You can’t make any modifications via the HasManyThrough trait
-
Although the field is defined as a query, the field is actually lazy and only runs once. That means if you query it and then add some new ExpenseTag instances, they won’t show up in the field contents
If you want a way to retrieve the joined results such that it pulls fresh from the database each time, you can instead define a helper join method as shown in Section
8.1.11 on page 1↓.
It’s often helpful to add indexes to a database to improve performance. Mapper makes it easy to do most simple indexing simply by overriding the
dbIndexed_? ↓ def on the field. Listing
8.1.5↓ shows how we would add an index to our
Expense.account field.
class Expense ... {
  object account extends ... {
    override def dbIndexed_? = true
  }
}
Mapper provides for more complex indexing via the
MetaMapper.dbIndexes def combined with the
Index,
IndexField and
BoundedIndexField case classes. Listing
8.1.5↓ shows some examples of how we might create more complex indices.
object Expense extends ... {
  // equivalent to the previous listing
  override dbIndexes = Index(IndexField(account)) :: Nil
  // equivalent to "create index ... on transaction_t (account, description(10))"
  override dbIndexes = Index(IndexField(account),
                             BoundedIndexField(description,10))
}
8.1.6 Schema Mapping
The Mapper framework makes it easy not only to define domain objects, but also to create the database schema to go along with those objects. The
Schemifier↓ object is what does all of the work for you: you simply pass in the
MetaMapper objects that you want the schema created for and it does the rest. Listing
8.1.6↓ shows how we could use
Schemifier to set up the database for our example objects. The first argument controls whether an actual write will be performed on the database. If false,
Schemifier will log all of the DDL statements that it would like to apply, but no changes will be made to the database. The second argument is a logging function (logging is covered in Appendix
E↓). The remaining arguments are the
MetaMapper objects that you would like to have schemified. You need to be careful to remember to include all of the objects, otherwise the tables won’t be created.
Schemifier.schemify(true, Log.infoF _, User, Expense, Account, Tag, ExpenseTag)
As we mentioned in Section
8.1.3↑, you can override the default table name for a given Mapper class via the
dbTableName def in the corresponding MetaMapper. The default table name is the name of the Mapper class, except when the class name is also an SQL reserved word; in this case, a “_t” is appended to the table name. You can also override individual column names on a per-field basis by overriding the
dbColumnName↓ def in the field itself. Like tables, the default column name for a field will be the same as the field name as long as it’s not an SQL reserved word; in this case a “_c” is appended to the column name. Listing
8.1.6↓ shows how we could make our
ExpenseTag.expense field map to “expense_id”.
Setting a Custom Column Name
class ExpenseTag ... {
  object expense extends ... {
    override def dbColumnName = "expense_id"
  }
}
8.1.7 Persistence Operations on an Entity
Now that we’ve defined our entity we probably want to use it in the real world to load and store data. There are several operations on MetaMapper that we can use :
create Creates a new instance of the entity
save Saves an instance to the database.
delete Deletes the given entity instance
count Returns the number of instances of the given entity. An optional query criteria list can be used to narrow the entities being counted
countByInsecureSQL Similar to count, except a raw SQL string can be used to perform the count. The count value is expected to be in the first column and row of the returned result set. An example would be
-
Expense.countByInsecureSQL(“select count(amount) “ +
  “from Expense where amount > 20”, ...)
We’ll cover the IHaveValidatedThisSQL parameter in a moment.
There are also quite a few methods available for retrieving instances from the database. Each of these methods comes in two varieties: one that uses the default database connection, and one that allows you to specify the connection
↓ to use (Section
8.3.1 on page 1↓). The latter typically has “DB” appended to the method name. The query methods on
MetaMapper are:
findAll Retrieves a list of instances from the database. The method is overloaded to take an optional set of query criteria parameters; these will be covered in detail in their own section,
8.1.8↓.
findAllByInsecureSQL Retrieves a list of instances based on a raw SQL query. The query needs to return columns for all mapped fields. Usually you can use the BySQL QueryParameter to cover most of the same functionality.
findAllByPreparedStatement Similar to findAllByInsecureSQL except that prepared statements are used, which usually means that the driver will handle properly escaping arguments in the query string.
findAllFields This allows you to do a normal query returning only certain fields from your Mapper instance. For example, if you only wanted the amount from the transaction table you would use this method. Note that any fields that aren’t specified in the query will return their default value. Generally, this method is only useful for read access to data because saving any retrieved instances could overwrite real data.
findMap* These methods provide the same functionality as the non-Map methods, but take an extra function argument that transforms an entity into a Box[T], where T is an arbitrary type. An example would be getting a list of descriptions of our transactions:
The KeyedMapperClass adds the find method, which can be used to locate a single entity based on its primary key. In general these operations will be supported in both Record and Mapper. However, because Record isn’t coupled tightly to a JDBC backend some of the find methods may not be supported directly and there may be additional methods not available in Mapper for persistence. For this reason, this section will deal specifically with Mapper’s persistence operations.
Creating an Instance
Once we have a
MetaMapper object defined we can use it to create objects using the
create↓ method. You generally don’t want to use the “new” operator because the framework has to set up internal data for the instance such as field owner, etc. This is important to remember, since nothing will prevent you from creating an instance manually: you may just get errors when you go to use the instance. The
join method in Listing
8.1.4↑ shows an example of create usage.
Saving an Instance
Saving an instance is as easy as calling the
save method on the instance you want to save. Optionally, you can call the
save method on the Meta object, passing in the instance you want to save. The
save method uses the the
saved_? and
clean_? flags to determine whether an insert or update is required to persist the current state to the database, and returns a boolean to indicate whether the save was successful or not. The
join method in Listing
8.1.4↑ shows an example of
save usage.
Deleting an Instance
There are several ways to delete instances. The simplest way is to call the
delete_! method on the instance you’d like to remove. An alternative is to call the
delete_! method on the Meta object, passing in the instance to delete. In either case, the
delete_! method returns a boolean indicating whether the delete was successful or not. Listing
3 on page 1↓ shows an example of deleting instances.
if (! myExpense.delete_!) S.error("Couldn’t delete the expense!")
//or
if (! (Expense delete_! myExpense)) S.error(...)
Another approach to deleting entities is to use the
bulkDelete_!! method on
MetaMapper. This method allows you to specify query parameters to control which entities are deleted. We will cover query parameters in Section
8.1.8↓ (an example is in Listing
8.1.9 on page 1↓).
8.1.8 Querying for Entities
There are a variety of methods on
MetaMapper for querying for instances of a given entity. The simplest method is
findAll↓ called with no parameters. The “bare”
findAll returns a
List of all of the instances of a given entity loaded from the database. Note that each
findAll... method has a corresponding method that takes a database connection for sharding or multiple database usage (see sharding in Section
8.3.1↓). Of course, for all but the smallest datasets, pulling the entire model to get one entity from the database is inefficient and slow. Instead, the
MetaMapper provides “flag” objects to control the query.
The ability to use fine-grained queries to select data is a fundamental feature of relational databases, and Mapper provides first-class support for constructing queries in a manner that is not only easy to use, but type-safe. This means that you can catch query errors at compile time instead of runtime. The basis for this functionality is the QueryParam trait, which has several concrete implementations that are used to construct the actual query. The QueryParam implementations can be broken up into two main groups:
-
Comparison - These are typically items that would go in the where clause of an SQL query. They are used to refine the set of instances that will be returned
-
Control - These are items that control things like sort order and pagination of the results
Although Mapper provides a large amount of the functionality in SQL, some features are not covered directly or at all. In some cases we can define helper methods to make querying easier, particularly for joins (Section
8.1.11↓).
8.1.9 Comparison QueryParams
The simplest
QueryParam to refine your query is the
By↓ object and its related objects.
By is used for a direct value comparison of a given field: essentially an “=” in SQL. For instance, Listing
8.1.9↓ shows how we can get all of the expenses for a given account.
val myEntries = Expense.findAll(By(Expense.account, myAccount.id))
Note that our By criterion is comparing the Expense.account field to the primary key (id field) of our account instead of to the account instance itself. This is because the Expense.account field is a MappedForeignKey field, which uses the type of the key instead of the type of the entity as its underlying value. In this instance, that means that any queries using Expense.account need to use a Long to match the underlying type. Besides By, the other basic clauses are:
-
NotBy↓ - Selects entities whose queried field is not equal to the given value
-
By_>↓- Selects entities whose queried field is larger than the given value
-
By_<↓- Selects entities whose queried field is less than the given value
-
ByList↓ - Selects entities whose queried field is equal to one of the values in the given List. This corresponds to the “field IN (x,y,z)” syntax in SQL.
-
NullRef↓ - Selects entities whose queried field is NULL
-
NotNullRef↓ - Select entities whose queried field is not NULL
-
Like↓ - Select entities whose queried field is like the given string. As in SQL, the percent sign is used as a wildcard
In addition to the basic clauses there are some slightly more complex ways to control the query. The first of these is
ByRef↓, which selects entities whose queried field is equal to the value of another query field
on the same entity. A contrived example would be if we define a tree structure in our table and root nodes are marked as having themselves as parents:
// select all root nodes from the forest
TreeNode.findAll(ByRef(TreeNode.parent,TreeNode.id))
The related NotByRef tests for inequality between two query fields.
Getting slightly more complex, we come to the
In↓ QueryParameter, which is used just like an “IN” clause with a subselect in an SQL statement. For example, let’s say we wanted to get all of the entries that belong to tags that start with the letter “c”. Listing
8.1.9↓ shows the full breakdown.
val cExpenses =
  ExpenseTag.findAll(
    In(ExpenseTag.tag,
       Tag.id,
       Like(Tag.name, "c%"))).map(_.expense.obj.open_!).removeDuplicates
Note that we use the
List.removeDuplicates method to make sure that the List contains unique entities. This requires overriding the
equals and
hashCode methods on the Expense class, which we show in Listing
8.1.9↓. In our example we’re using the primary key (
id field) to define object “identity”.
Overriding
equals and
hashcode on the Expense entity
class Expense ... {
...
override def equals (other : Any) = other match {
case e : Expense if e.id.is == this.id.is => true
case _ => false
}
override def hashCode = this.id.is.hashCode
...
}
We use the
ByRef params to do the join between the many-to-many entity on the query. Related to
In is
InRaw↓, which allows you to specify your own SQL subquery for the “IN” portion of the where clause. Listing
8.1.9↓ shows an example of how we could use
InRaw to find
Tags for expense entries made in the last 30 days.
def recentTags = {
  val joins = ExpenseTag.findAll(
    InRaw(ExpenseTag.expense,
          "select id from Expense where dateOf > (CURRENT_DATE - interval ’30 days’)",
          IHaveValidatedThisSQL("dchenbecker", "2008-12-03"))
  joins.map(_.expense.obj.open_!).removeDuplicates
}
Here things are starting to get a little hairy. The
InRaw only allows us to specify the subquery for the IN clause, so we have to do some postprocessing to get unique results. If you want to do this in the query itself you’ll have to use the
findAllByInsecureSql or
findAllByPreparedStatement methods, which are covered later in this section on page number
1↓. The final parameter for
InRaw,
IHaveValidatedThisSQL acts as a code audit mechanism that says that someone has checked the SQL to make sure it’s safe to use. The query fragment is added to the master query as-is: no escaping or other filtering is performed on the string. That means that if you take user input. then you need to be very careful about it or you run the risk of an SQL injection attack on your site.
The next
QueryParam we’ll cover is
BySql, which lets you use a complete SQL fragment that gets put into the where clause. An example of this would be if we want to find all expense entries within the last 30 days, as shown in Listing
8.1.9↓. Again, the
IHaveValidatedThisSQL↓ case class is required as a code audit mechanism to make sure someone has verified that the SQL used is safe.
val recentEntries = Expense.findAll(
  BySql("dateOf > (CURRENT_DATE - interval ’30 days’)",
        IHaveValidatedThisSQL("dchenbecker","2008-12-03"))
The tradeoff with using
BySql is that you need to be careful with what you allow into the query string.
BySql supports parameterized queries as shown in Listing
8.1.9↓, so use those if you need to have dynamic queries. Whatever you do, don’t use string concatenation unless you really know what you’re doing.
val amountRange = Expense.findAll(
  BySql("amount between ? and ?", lowVal, highVal))
As we mentioned in Section
3 on page 1↑, we can use the query parameters to do bulk deletes in addition to querying for instances. Simply use the
QueryParam classes to constrain what you want to delete. Obviously, the control params that we’ll cover next make no sense in this context, but the compiler won’t complain. Listing
8.1.9↓ shows an example of deleting all entries older than a certain date.
def deleteBefore (date : Date) =
  Expense.bulkDelete_!!(By_<(Expense.dateOf, date))
8.1.10 Control QueryParams
Now that we’ve covered the selection and comparison
QueryParams, we can start to look at the control params. The first one that we’ll look at is
OrderBy. This operates exactly like the order by clause in SQL, and allows you to sort on a given field in either ascending or descending order. Listing
8.1.10↓ shows an example of ordering our
Expense entries by amount. The
Ascending and
Descending case objects are in the net.liftweb.mapper package. The
OrderBySql case class operates similarly, except that you provide your own SQL fragment for the ordering, as shown in the example. Again, you need to validate this SQL.
val cheapestFirst =
  Expense.findAll(OrderBy(Expense.amount,Ascending))
// or
val cheapestFirst =
  Expense.findAll(OrderBySql("amount asc"),
    IHaveValidatedThisSQL("dchenbecker", "2008-12-03"))
Pagination of results is another feature that people often want to use, and Mapper provides a simple means for controlling it with two more
QueryParam classes:
StartAt and
MaxRows, as shown in Listing
8.1.10↓. In this example, we take the offset from a parameter passed to our snippet, with a default of zero.
val offset = S.param("offset").map(_.toLong) openOr 0
Expense.findAll(StartAt(offset), MaxRows(20))
An important feature of the methods that take
QueryParams is that they can take multiple params, as shown in this example. A more complex example is shown in Listing
8.1.10↓. In this example, we’re querying with a
Like clause, sorting on the date of the entries, and paginating the results, all in one statement!
Expense.findAll(Like(Expense.description, "Gift for%"),
                OrderBy(Expense.dateOf,Descending),
                StartAt(offset),
                MaxRows(pageSize))
Another useful
QueryParam is the
Distinct case class, which acts exactly the same way as the DISTINCT keyword in SQL. One caveat is that Mapper doesn’t support explicit joins, so this restricts the situations in which you can use
Distinct. The final “control”
QueryParam that we’ll cover is
PreCache↓. It’s used when you have a mapped foreign key field on an entity. Normally, when Mapper loads your main entity it leaves the foreign key field in a lazy state, so that the query to get the foreign object isn’t executed until you access the field. This can obviously be inefficient when you have many entities loaded that you need to access, so the
PreCache parameter forces Mapper to preload the foreign objects as part of the query. Listing
8.1.10↓ shows how we can use
PreCache to fetch an
Expense entry as well as the account for the entry.
def loadExpensePlusAccount (id : Long) =
  Expense.findAll(By(Expense.id, id),
                    PreCache(Expense.account))
8.1.11 Making Joins a Little Friendlier
If you prefer to keep your queries type-safe, but you want a little more convenience in your joins between entities, you can define helper methods on your entities. One example is finding all of the tags for a given
Expense, as shown in Listing
1↓. Using this method in our example has an advantage over using
HasManyThrough:
hasManyThrough is a lazy value that will only retrieve data from the database once per request. Using a
findAll will retrieve data from the database every time. This may be important if you add data to the database during a request, or if you expect things to change between queries.
def tags =
  ExpenseTag.findAll(By(ExpenseTag.expense, this.id)).map(_.tag.obj.open_!)
8.2 Utility Functionality
In addition to the first-class persistence support in Mapper and Record, the frameworks provide additional functionality to make writing data-driven applications much simpler. This includes things such as automatic XHTML representation of objects and support for generating everything from simple forms for an individual entity to a full-fledged CRUD implementation for your entities.
8.2.1 Display Generation
If you want to display a Mapper instance as XHTML, simply call the
asHtml method (
toXHtml in Record) on your instance. The default implementation turns each field’s value into a
Text node via the
toString method and concatenates the results separated by newlines. If you want to change this behavior, override the
asHtml on your field definitions. For example, if we wanted to control formatting on our
dateOf field, we could modify the field as shown in Listing
8.2.1↓.
import _root_.java.text.DateFormat
...
object dateOf extends MappedDateTime(this) {
  final val dateFormat =
    DateFormat.getDateInstance(DateFormat.SHORT)
  override def asHtml = Text(dateFormat.format(is))
}
Note that in Record, dateOf contains a java.util.Calendar instance and not a
java.util.Date, so we would need to use the getTime method on the value. Two similar methods, asJSON and asJs, will return the JSON and JavaScript object representation of the instance, respectively.
8.2.2 Form Generation ↓
One of the biggest pieces of functionality in the Mapper framework is the ability to generate entry forms for a given record. The
toForm↓ method on Mapper is overloaded so that you can control how your form is created. All three
toForm methods on Mapper take a
Box[String] as their first parameter to control the submit button; if the Box is Empty, no submit button is generated, otherwise, the String contents of the Box are used as the button label. If you opt to skip the submit button you’ll need to provide it yourself via binding or some other mechanism, or you can rely on implicit form submission (when the user hits enter in a text field, for instance). The first
toForm method simply takes a function to process the submitted form and returns the XHTML as shown in Listing
8.2.2↓:
myEntry.toForm(Full("Save"), { _.save })
As you can see, this makes it very easy to generate a form for editing an entity. The second
toForm method allows you to provide a URL which the Mapper will redirect to if validation succeeds on form submission (this is not provided in Record). This can be used for something like a login form, as shown in Listing
8.2.2↓:
myEntry.toForm (Full("Login"), "/member/profile")
The third form of the toForm method is similar to the first form, with the addition of “redo” snippet parameter. This allows you to keep the current state of the snippet when validation fails so that the user doesn’t have to re-enter all of the data in the form.
The Record framework allows for a little more flexibility in controlling form output. The MetaRecord object allows you to change the default template
↓ that the form uses by setting the formTemplate
↓ var. The template may contain any XHTML you want, but the
toForm method will provide special handling for the following tags:
<lift:field_label name=“...” /> The label for the field with the given name will be rendered here.
<lift:field name=“...” /> The field itself (specified by the given name) will be rendered here. Typically this will be an input field, although it can be anything type-appropriate. For example, a BooleanField would render a checkbox.
<lift:field_msg name=“...” /> Any messages, such as from validation, for the field with the given name will be rendered here.
As an example, if we wanted to use tables to lay out the form for our ledger entry, the row for the description field might look like that in Listing
8.2.2↓:
<!-- Example description field row for Record’s toForm method -->
<tr>
  <th><lift:field_label name="description" /></th>
  <td><lift:field name="description" />
      <lift:field_msg name="description" /></td>
</tr>
Technically, the
field_msg binding looks up Lift messages (Chapter
B↓) based on the field’s
uniqueId, so you can set your own messages outside of validation using the S.{error, notice, warning} methods as shown in Listing
8.2.2↓:
S.warning(myEntry.amount.uniqueFieldId,
          "You have entered a negative amount!")
S.warning("amount_id", "This is brittle")
For most purposes, though, using the validation mechanism discussed in the next section is the appropriate way to handle error checking and reporting.
Validation is the process of checking a field during form processing to make sure that the submitted value meets requirements. This can be something as simple as ensuring that a value was submitted, or as complex as comparing multiple field values together. Validation is achieved via a
List of functions on a field that take the field value as input and return a
List[FieldError] (
Box[Node] in Record). To indicate that validation succeeded, simply return an empty List, otherwise the list of
FieldErrors you return are used as the failure messages to be presented to the user. A
FieldError is simply a case class that associates an error message with a particular field. As an example, let’s say we don’t want someone to be able to add an
Expense entry for a date in the future. First, we need to define a function for our
dateOf field that takes a
Date as an input (For Record,
java.util.Calendar↓, not
Date, is the actual value type of
DateTimeField) and returns the proper
List. We show a simple function in Listing
8.2.3↓. In the method, we simply check to see if the millisecond count is greater than “now” and return an error message if so.
import _root_.java.util.Date
class Expense extends LongKeyedMapper[Expense] with IdPK {
...
object dateOf extends MappedDateTime(this) {
def noFutureDates (time : Date) = {
if (time.getTime > System.currentTimeMillis) {
List(FieldError(this, "You cannot make future expense entries"))
} else {
List[FieldError]()
}
}
}
...
}
The first argument for the FieldError is the field itself, so you could use the alternate definition shown in Listing
8.2.3↓ if you would prefer to define your validation functions elsewhere (if they’re common to more than one entity, for example).
Alternate Date Validation
import _root_.java.util.Date
import _root_.net.liftweb.http.FieldIdentifier
object ValidationMethods {
def noFutureDates (field : FieldIdentifier)(time : Date) = {
if (time.getTime > System.currentTimeMillis) {
List(FieldError(field, "You cannot make future expense entries"))
} else {
List[FieldError]()
}
}
...
}
The next step is to tie the validation into the field itself. We do this by slightly modifying our field definition for
date to set our list of validators as shown in Listing
8.2.3↓:
object dateOf extends MappedDateTime(this) {
def noFutureDates (time : Date) = { ... }
override def validations = noFutureDates _ :: Nil
}
// Using the alternate definition:
object dateOf extends MappedDateTime(this) {
override def validations = ValidationMethods.noFutureDates(dateOf) _ :: Nil
}
Note that we need to add the underscore for each validation function to be partially applied on the submitted value. When our form is submitted, all of the validators for each field are run, and if all of them return Empty then validation succeeds. If any validators return a Full Box, then the contents of the Box are displayed as error messages to the user.
8.2.4 CRUD Support
Adding CRUD support to your Mapper classes is very simple. We just mix in the
net.liftweb.mapper.CRUDify trait to our meta object and it provides a full set of add, edit, list, delete and view pages automatically. Listing
8.2.4↓ shows our
Expense meta object with
CRUDify mixed in.
object Expense extends Expense LongKeyedMetaMapper[Expense]
    with CRUDify[Long,Expense] {
  ... normal def here ...
  // disable delete functionality
  override def deleteMenuLoc = Empty
}
The CRUDify behavior is very flexible, and you can control the templates for pages or whether pages are shown at all (as we do in our example) by overriding defs that are provided on the CRUDify trait. In our example Listing
8.2.4↑, we disable the delete menu by overriding the
deleteMenuLoc method to return
Empty. As an added bonus, CRUDify automatically creates a set of menus for SiteMap (Chapter
7↑) that we can use by appending them onto the rest of our menus as shown in Listing
8.2.4↓.
class Boot {
  def boot {
    ...
    val menus = ... Menu(Loc(...)) :: Expense.menus
    LiftRules.setSiteMap(SiteMap(menus : _*))
  }
}
8.2.5 Lifecycle Callbacks
Mapper and Record provide for a set of callbacks that allow you to perform actions at various points during the lifecycle of a given instance. If you want to define your own handling for one of the lifecycle events, all you need to do is override and define the callback because
MetaMapper already extends the
LifecycleCallbacks trait. Note that there is a separate
LifecycleCallbacks trait in each of the record and mapper packages, so make sure that you import the correct one. For example, if we want to notify a Comet actor whenever a new
Expense entry is saved, we can change our
Expense class as shown in Listing
8.2.5↓:
object Expense extends LongKeyedMapper[Expense] with LifecycleCallbacks {
  ...
  override def afterSave { myCometActor ! this }
}
The lifecycle hooks are executed at the main operations in an instance lifecycle:
Create When a fresh instance is first saved (corresponding to a table insert).
Delete When an instance is deleted.
Save When a new or existing instance is inserted or updated. beforeSave is always called before beforeCreate or beforeUpdate. Similarly, afterSave is always called after afterCreate or afterUpdate.
Update When an instance that already exists in the database is updated (corresponding to a table update).
Validation When form validation occurs.
For each of these points you can execute your code before or after the operation is run.
8.2.6 Base Field Types
The Record and Mapper frameworks define several basic field types. The following table shows the corresponding types between Mapper and Record, as well as a brief description of each type.
|
MappedBinary
|
BinaryField
|
Represents a byte array. You must provide your own overrides for toForm and asXHtml/asHtml for input and display
|
|
MappedBirthYear
|
N/A
|
Holds an Int that represents a birth year. The constructor takes a minAge parameter that is used for validation
|
|
MappedBoolean
|
BooleanField
|
Represents a Boolean value. The default form representation is a checkbox
|
|
MappedCountry
|
CountryField
|
Represents a choice from an enumeration of country phone codes as provided by the net.liftweb.mapper.Countries.I18NCountry class. The default form representation is a select
|
|
MappedDateTime
|
DateTimeField
|
Represents a timestamp (java.util.Calender for Record, java.util.Date for Mapper). The default form representation is a text input
|
|
MappedDouble
|
DoubleField
|
Represents a Double value
|
|
MappedEmail
|
EmailField
|
Represents an email address with a maximum length
|
|
MappedEnum
|
EnumField
|
Represents a choice from a given scala.Enumeration. The default form representation is a select
|
|
MappedEnumList
|
N/A
|
Represents a choice of multiple Enumerations. The default form representation is a set of checkboxes, one for each enum value
|
|
MappedFakeClob
|
N/A
|
Fakes a CLOB value (really stores String bytes to a BINARY column)
|
|
MappedGender
|
N/A
|
Represents a Gender enumeration. Display values are localized via the I18NGenders object. Internationalization is covered in appendix D↓
|
|
MappedInt
|
IntField
|
Represents an Int value
|
|
MappedIntIndex
|
N/A
|
Represents an indexed Int field (typically a primary key). In Record this is achieved with the KeyField trait
|
|
MappedLocale
|
LocaleField
|
Represents a locale as selected from the java.util.Locale.getAvailableLocales method. The default form representation is a select
|
|
MappedLong
|
LongField
|
Represents a Long value
|
|
MappedLongForeignKey
|
N/A
|
Represents a mapping to another entity via the other entities Long primary key. This functionality in Record is not yet supported
|
|
MappedLongIndex
|
N/A
|
Represents an indexed Long field (typically a primary key). In Record this is achieved with the KeyField trait
|
|
MappedPassword
|
PasswordField
|
Represents a password string. The default form representation is a password input (obscured text)
|
|
MappedPoliteString
|
N/A
|
Just like MappedString, but the default value is an empty string and the input is automatically truncated to fit the database column size
|
|
MappedPostalCode
|
PostalCodeField
|
Represents a validated postal code string. The field takes a reference to a MappedCountry (CountryField in Record) at definition and validates the input string against the selected country’s postal code format
|
|
MappedString
|
StringField
|
Represents a string value with a maximum length and optional default value
|
|
MappedStringForeignKey
|
N/A
|
Represents a mapping to another entity via the other entities String primary key. This functionality in Record is not yet supported
|
|
MappedStringIndex
|
N/A
|
Represents an indexed String field (typically a primary key). In Record this is achieved with the KeyField trait
|
|
MappedText
|
N/A
|
Represents a String field that stores to a CLOB column in the database. This can be used for large volumes of text.
|
|
MappedTextarea
|
TextAreaField
|
Represents a String field that will use an HTML textarea element for its form display. When you define the field you can override the textareaCols and textareaRows defs to control the dimensions of the textarea.
|
|
MappedTimeZone
|
TimeZoneField
|
Represents a time zone selected from java.util.TimeZone.getAvailableIDs. The default form representation is a select
|
|
MappedUniqueId
|
N/A
|
Represents a unique string of a specified length that is randomly generated. The implementation doesn’t allow the user to write new values to the field. This can be thought of as a GUID
|
8.2.7 Defining Custom Field Types in Mapper
The basic
MappedField types cover a wide range of needs, but sometimes you may find yourself wanting to use a specific type. In our example, we would like a decimal value for our expense amount and account balance. Using a double would be inappropriate due to imprecision and rounding errors, so instead we base it on
scala.BigDecimal. We’re going to provide an abridged version of the code that will end up in the Lift library. Feel free to examine the source to see the constructors and methods that we’ve omitted. Our first task is to specify the class signature and constructors, as shown in Listing
8.2.7↓. Note that the
BigDecimal we’re using here is
scala.BigDecimal, not
java.math.BigDecimal. We’ll cover how we make this work with JDBC (which doesn’t support scala.BigDecimal) in a moment.
MappedDecimal Constructors
import _root_.java.math.{MathContext, RoundingMode}
class MappedDecimal[T <: Mapper[T]] (val fieldOwner : T,
val context : MathContext,
val scale : Int) extends MappedField[BigDecimal,T] {
// ... constructor taking initial value ...
def this(fieldOwner : T, value : BigDecimal, context: MathContext) = {
this(fieldOwner, context, value.scale)
setAll(value) // we’ll cover this later in this section
}
def this(fieldOwner : T, value : BigDecimal) = {
this(fieldOwner, MathContext.UNLIMITED, value.scale)
setAll(value)
}
The first part of the class definition is the type signature; basically the type [T <: MappedField[T]] indicates that whatever type “owns” this field must be a Mapper subclass (<: specifies an upper type bound). With our primary constructor we specify the owner mapper as well as the MathContext (this controls rounding and precision, or the total number of digits) and scale of the decimal value. The scale in BigDecimal essentially represents the number of digits to the right of the decimal point. In addition, we specify ancillary constructors to take an initial value with or without and explicit MathContext.
Now that we have the constructors in place, there are several abstract methods on
MappedField that we need to define. The first of these is a method to provide a default value. The default value is used for uninitialized fields or if validation fails. We also need to specify the class for our value type by implementing the
dbFieldClass method. Listing
8.2.7↓ shows both of these methods. In our case, we default to a zero value, with the scale set as specified in the contructor. Note that
BigDecimal instances are generally immutable, so the
setScale method returns a new instance. We also provide the vars and methods that handle the before and after values of the field. These values are used to handle persistence state. If you change the value of the field, then the original value is held until the instance is saved to the database. The
st method is used internally to set the value of the field when instances are “rehydrated” from the database.
private val zero = BigDecimal("0")
def defaultValue = zero.setScale(scale)
def dbFieldClass = classOf[BigDecimal]
// The data and orgData variables are used so that
// we know when the field has been modified by the user
private var data : BigDecimal = defaultValue
private var orgData : BigDecimal = defaultValue
private def st (in : BigDecimal) {
data = in
orgData = in
}
// The i_is_! and i_was_! methods are used internally to
// keep track of when the field value is changed. In our
// instance they delegate directly to the data and orgData
// variables
protected def i_is_! = data
protected def i_was_! = orgData
override def doneWithSave() {
orgData = data
}
The next set of methods we need to provide deal with when and how we can access the data. Listing
8.2.7↓ shows the overrides that set the read and write permissions to true (default to false for both) as well as the
i_obscure_! and
real_i_set_! methods. The
i_obscure_! method returns the a value that is used when the user doesn’t have read permissions. The
real_i_set_! method is what actually stores the internal value and sets the dirty flag when the field is updated.
  override def readPermission_? = true
  override def writePermission_? = true
  protected def i_obscure_!(in : BigDecimal) = defaultValue
  protected def real_i_set_!(value : BigDecimal): BigDecimal = {
    if (value != data) {
      data = value
      dirty_?(true)
    }
    data
  }
The next two methods that we need to provide deal with actually setting the value of the field. The first is
setFromAny, which takes an
Any parameter and must convert it into a
BigDecimal. The second,
setFromString is a subset of
setFromAny in that it takes a
String parameter and must return a
BigDecimal. Our implementation of these two methods is shown in Listing
8.2.7↓. We’ve also added a
setAll and
coerce method so that we have a common place to properly set scale and rounding modes on the value of the field.
def setFromAny (in : Any) : BigDecimal =
in match {
case bd : BigDecimal => setAll(bd)
case n :: _ => setFromString(n.toString)
case Some(n) => setFromString(n.toString)
case Full(n) => setFromString(n.toString)
case None | Empty | Failure(_, _, _) | null => setFromString("0")
case n => setFromString(n.toString)
}
def setFromString (in : String) : BigDecimal = {
this.setAll(BigDecimal(in))
}
protected def setAll (in : BigDecimal) = set(coerce(in))
// Make a separate method for properly adjusting scale and rounding.
// We’ll use this method later in the class as well.
protected coerce (in : BigDecimal) =
new BigDecimal(in.bigDecimal.setScale(scale, context.getRoundingMode))
Our implementations are relatively straightforward. The only special handling we need for setFromAny is to properly deal with Lists, Boxes, Options and the null value. The BigDecimal constructor takes Strings, so the setFromString method is easy. The only addition we make over the BigDecimal constructor is to properly set the scale and rounding on the returned value.
Our final step is to define the database-specific methods for our field, as shown in Listing
8.2.7↓. The first method we implement is
targetSQLType. This method tells Mapper what the corresponding SQL type is for our database column. The
jdbcFriendly method returns a value that can be used in a JDBC statement. Here’s where we need to use the
bigDecimal val on our
scala.BigDecimal to obtain the real
java.math.BigDecimal instance. Similarly, the
real_convertToJDBCFriendly method needs to return a java
BigDecimal for a given
scala.BigDecimal input. The
buildSet... methods return functions that can be used to set the value of our field based on different input types. These are essentially conversion functions that are used by Lift to convert data retrieved in a
ResultSet into actual field values. Finally, the
fieldCreatorString specifices what we would need in a CREATE TABLE statement to define this column. In this instance, we need to take into account the precision and scale. We use default precision if we’re set to unlimited, but it’s important to understand that actual precision for the default DECIMAL type varies between RDBMS vendors.
Database-Specific Methods
def targetSQLType = Types.DECIMAL
def jdbcFriendly(field : String) = i_is_!.bigDecimal
def real_convertToJDBCFriendly(value: BigDecimal): Object = value.bigDecimal
// The following methods are used internally by Lift to
// process values retrieved from the database.
// We don’t convert from Boolean values to a BigDecimal, so this returns null
def buildSetBooleanValue(accessor : Method, columnName : String) :
(T, Boolean, Boolean) => Unit = null
// Convert from a Date to a BigDecimal. Our assumption here is that we can take
// The milliseconds value of the Date.
def buildSetDateValue(accessor : Method, columnName : String) :
(T, Date) => Unit =
(inst, v) =>
doField(inst, accessor,{
case f: MappedDecimal[T] =>
f.st(if (v == null) defaultValue else coerce(BigDecimal(v.getTime)))
})
// Convert from a String to a BigDecimal. Since the BigDecimal object can
// directly convert a String, we just pass the String directly.
def buildSetStringValue(accessor: Method, columnName: String) :
(T, String) => Unit =
(inst, v) =>
doField(inst, accessor,{
case f: MappedDecimal[T] =>
f.st(coerce(BigDecimal(v)))
})
// Convert from a Long to a BigDecimal. This is slightly more complex than
// for a String, since we need to check for null values.
def buildSetLongValue(accessor: Method, columnName : String) :
(T, Long, Boolean) => Unit =
(inst, v, isNull) =>
doField(inst, accessor, {
case f: MappedDecimal[T] =>
f.st(if (isNull) defaultValue else coerce(BigDecimal(v)))
})
// Convert from an AnyRef (Object). We simply use the String value
// of the input here.
def buildSetActualValue(accessor: Method, data: AnyRef, columnName: String) :
(T, AnyRef) => Unit =
(inst, v) =>
doField(inst, accessor, {
case f: MappedDecimal[T] => f.st(coerce(BigDecimal(v.toString)))
})
def fieldCreatorString(dbType: DriverType, colName: String): String = {
val suffix = if (context.getPrecision == 0) "" else {
"(" + context.getPrecision + "," + scale + ")"
}
colName + " DECIMAL" + suffix
}
8.2.8 ProtoUser and MegaProtoUser
In addition to all of the database-related features, Mapper contains an extra goody to help you quickly set up small sites.
ProtoUser and
MegaProtoUser are two built-in traits that define a simple user account. The
ProtoUser trait defines some basic fields for a user:
email,
firstName,
lastName,
password and
superUser (a boolean to provide basic permissions). There are also a number of defs used to format the fields for display or to provide form labels. Listing
8.2.8↓ shows an example of a ProtoUser-based Mapper class that overrides some of the formatting defs.
class User extends ProtoUser[User] {
  override def shortName = firstName.is
  override lastNameDisplayName = "surname"
}
The MegaProtoUser trait, as its name implies, extends the ProtoUser trait with a whole suite of functionality. The main thrust of MegaProtoUser (and its associated meta object,
MetaMegaProtoUser) is to automatically handle all of the scaffolding for a complete user management system, with:
-
A user registration page with configurable validation via email
-
A login page that automatically handles authentication
-
A lost password page that does reset via email
-
A change password page
-
A user edit page
-
A simple method to generate SiteMap menus for all of these pages
Of course, you can customize any of these by overriding the associated methods on the MetaMegaProtoUser object. Listing
2.1 on page 1↑ shows an example of sprucing up the signup and login pages by overriding the
loginXHtml and
signupXHtml methods. Listing
8.2.8↓ shows how easy it is to then hook the MetaMegaProtoUser menus into SiteMap.
Hooking MetaMegaProtoUser into Boot
// in Boot.scala
LiftRules.setSiteMap(SiteMap((... :: User.sitemap) :_*))
8.3 Advanced Features
In this section we’ll cover some of the advanced features of Mapper
8.3.1 Using Multiple Databases ↓
It’s common for an application to need to access data in more than one database. Lift supports this feature through the use of overrides on your MetaMapper classes. First, we need to define the identifiers for the various databases using the
ConnectionIdentifier trait and overriding the
jndiName def. Lift comes with one pre-made:
DefaultConnectionIdentifier. It’s jndiName is set to “lift”, so it’s recommended that you use something else. Let’s say we have two databases: sales and employees. Listing
8.3.1↓ shows how we would define the
ConnectionIdentifier objects for these.
Defining Connection Identifiers
object SalesDB extends ConnectionIdentifier {
def jndiName = "sales"
}
object EmployeeDB extends ConnectionIdentifier {
def jndiName = "employees"
}
Simple enough. Now, we need to create connection managers for each one, or we can combine the functionality into a single manager. To keep things clean we’ll use a single manager, as shown in Listing
8.3.1↓. Scala’s match operator allows us to easily return the correct connection.
Multi-database Connection Manager
object DBVendor extends ConnectionManager {
  Class.forName("org.postgresql.Driver")

  def newConnection(name : ConnectionIdentifier) = {
    try {
      name match {
        case SalesDB =>
          Full(DriverManager.getConnection(
            "jdbc:postgresql://localhost/sales",
            "root", "secret"))
        case EmployeeDB =>
          Full(DriverManager.getConnection(
            "jdbc:postgresql://server/employees",
            "root", "hidden"))
    } catch {
      case e : Exception => e.printStackTrace; Empty
    }
  }
  def releaseConnection (conn : Connection) { conn.close }
}
Now that we’ve defined our connection identifiers, we need to be able to use them in our
Mapper instances. There are several ways to do this. The first (simplest) way is to override the
dbDefaultConnectionIdentifier method on your
MetaMapper object, as shown in Listing
8.3.1↓. In this example we’re setting the
MetaMapper to always use the
EmployeeDB connection for all persistence operations.
Defining the Default Connection Identifier
object EmployeeMeta extends Employee with LongKeyedMetaMapper[Employee] {
  ...
  override def dbDefaultConnectionIdentifier = EmployeeDB
  ...
}
The second way to utilize more than one DB is to use the “DB” version of the persistence methods, as we mentioned in Section
8.1.7↑. Listing
8.3.1↓ shows how we can perform a
findAll with a specific connection.
Using a Connection Identifier Directly
val employees = EmployeeMeta.findAllDb(EmployeeDB)
8.3.2 Database Sharding
A special case of using multiple databases is sharding. Sharding is a means to scale your database capacity by associating entities with one database instance out of a federation of servers based on some property of the entity. For instance, we could distribute user entites across 3 database servers by using the first character of the last name: A-H goes to server 1, I-P goes to server 2, and Q-Z goes to server 3. As simple as this sounds, there are some important factors to remember:
-
Sharding increases the complexity of your code.
-
To get the most benefit out of sharding, you need to carefully choose and tune your “selector.” If you’re not careful, you can get an uneven distribution where some servers handle significantly more load than others, defeating the purpose of sharding. The example we’ve given here of using the last name is, in practice, a very poor choice. We recommend reading http://startuplessonslearned.blogspot.com/2009/01/sharding-for-startups.html for a good overview of the pros and cons of various selector strategies.
-
When you use sharding, you can’t just use normal joins anymore because the data isn’t all within one instance. This means more work on your part to properly retrieve and associate data
Mapper provides a handy feature for sharding that allows you to choose which database connection you want to use for a specific entity. There are two methods we can use to control the behavior:
dbSelectDBConnectionForFind and
dbCalculateConnectionIdentifier. dbSelect... is used to find an instance by primary key, and takes a partial function (typically a match clause) to determine which connection to use. dbCalculate... is used when a new instance is created to decide where to store the new instance. As an example, say we’ve defined two database connections, SalesA and SalesB. We want to place new instances in SalesA if the amount is > $100 and SalesB otherwise. Listing
8.3.2↓ shows our method in action.
class Expense extends LongKeyedMapper[Expense] {
... fields, etc ...
override def dbCalculateConnectionIdentifier = {
case n if n.amount.is > 100 => SalesA
case _ => SalesB
}
}
8.3.3 SQL-based Queries
If, despite all that Mapper covers, you find yourself still wanting more control over the query, there are two more options available to you:
findAllByPreparedStatement and
findAllByInsecureSql. The
findAllByPreparedStatement method allows you to, in essence, construct your query completely by hand. The added benefit of using a
PreparedStatement means that you can easily include user-defined data in your queries. The
findAllByPreparedStatement method takes a single function parameter. This function takes a
SuperConnection and returns a
PreparedStatement instance. Listing
8.3.3↓ shows our previous example in which we looked up all
Tags for recent
Expense entries, but here using
findAllByPreparedStatement instead. The query that you provide must at least return the fields that are mapped by your entity, but you can return other columns as well (they’ll just be ignored), so you may choose to do a “select *” if you prefer.
Using findAllByPreparedStatement
def recentTags = Tag.findAllByPreparedStatement({ superconn =>
  superconn.connection.prepareStatement(
    "select distinct Expense.id, Tag.name" +
    "from Tag" +
    "join ExpenseTag et on Tag.id = et.tag " +
    "join Expense ex on ex.id = et.expense " +
    "where ex.dateOf > (CURRENT_DATE - interval ’30 days’)")
})
The findAllByInsecureSql method goes even further, executing the string you submit directly as a statement without any checks. The same general rules apply as for
findAllByPreparedStatement, although you need to add the IHaveValidatedThisSQL parameter as a code audit check. In either case, the ability to use full SQL queries can allow you to do some very powerful things, but it comes at the cost of losing type safety and possibly making your app non-portable.
As a last resort, Mapper provides support for non-entity SQL queries through a few methods on the DB object. The first method we’ll look at is
DB.runQuery. This method allows you to provide a full SQL query string, and is overloaded to take a parameterized query. It returns a
Pair[List[String],List[List[String]], with the first
List[String] containing all of the column names and the second
List corresponding to each row in the result set. For example, let’s say we wanted to compute the sums of each tag for a given account. Listing
8.3.3↓ shows how we could accomplish this using a parameterized query against the database.
DB.runQuery("select Tag.name, sum(amount) from Expense ex " +
            "join ExpenseTag et on et.expense = ex.id " +
            "join Tag on et.tag = Tag.id " +
            "join Account on Account.id = ex.account " +
            "where Account.id = ? group by Tag.name order by Tag.name",
            myAccount.id)
// might return:
(List("tag", "sum"]),
 List(List("food","42.00"),
      List("home","75.49"),
      List("work","2.00")))
If you need full control over the query and full access to the result set, DB provides some low-level utility methods. The most basic is
DB.use, which takes a connection identifier as well as a function that takes a
SuperConnection (a thin wrapper on JDBC’s connection). This forms a loan pattern that lets Mapper deal with all of the connection open and release details. The
DB.exec method takes a provided connection and executes an arbitrary SQL statement on it, then applies a provided function to the result set. Similarly, the
DB.prepareStatement method allows you to create a prepared statement and then apply a function to it. You can combine these methods to run any arbitrary SQL, as shown in Listing
8.3.3↓.
// recompute an account balance from all of the transactions
DB.use(DefaultConnectionIdentifier) { conn =>
  val balance =
    // Should use a prepared statement here. This is for example only
    DB.exec(conn,
      "select sum(ex.amount) from Expense ex where ex.account = "
      + myAccount.id) {
      rs =>
       if (!rs.next) BigDecimal(0)
       else (new BigDecimal(rs.getBigDecimal(1)))
    }
  DB.prepareStatement("update Account set balance = ? where Account.id = ",
                      conn) { stmt =>
    stmt.setBigDecimal(1, balance.bigDecimal)
    stmt.setLong(2, resetAccount.id)
    stmt.executeUpdate()
  }
}
8.4 Logging
8.5 Summary
In this chapter, we discussed the two major ORMs included in Lift: Mapper and Record. We’ve shown how you can define entities using the Mapper field types and how to coordinate between the entity and its Meta-object. We’ve shown how you can customize the display and schema of your behavior with custom form control, CRUD support, and indexing. And we’ve show you how to query for entities using Mapper’s type-safe query support. Finally, we showed you how you can do in-depth customization of Mapper behavior by writing your own field types, using multiple databases, and using raw SQL queries.
9 Advanced Lift Architecture
This chapter is still under active development. The contents will change.
Congratulations! You’ve either made it through the introduction to Lift, or maybe you’ve just skipped Basics and jumped right to here to Advanced; either way, the next group of chapters will be exciting.
In this chapter we’re going to dive into some of the advanced guts of Lift so that you have a thorough understanding of what’s going on before we explore further.
9.1 Architectural Overview
Before we jump into the specific details of the architecture, let’s refresh our memories. Figure
9.1↓ highlights the main Lift components and where they live in the ecosystem. Scala compiles down to Java bytecode, so we sit on top of the JVM. Lift Applications are typically run in a J(2)EE web container, such as Jetty or Tomcat. As we explained in section
3.1↑, Lift is set up to act as a Filter that acts as the entry point. Usage of the rest of the framework varies from application to application, depending on how simple or complex you make it.
The major components outlined in the diagram are:
LiftCore The engine of the framework responsible for request/response lifecycle, rendering pipeline, invoking user’s functions etc. We don’t directly cover the core in this book since essentially all of the functionality that we do cover sits on top of the core
SiteMap Contains the web pages for a Lift application (chapter
7↑)
LiftRules Allows you to configure Lift. We cover this in various sections throughout the book
LiftSession The session state representation (section
9.5↓)
S The stateful object impersonating the state context for a given request/response lifecycle (section
9.7↓)
SHtml Contains helper functions for XHtml artifacts (chapters
6↑ and
11↓)
Views LiftView objects impersonating a view as a XML content. Thus pages can be composed from other sources not only from html files. (section
4.4↑)
LiftResponse Represents the abstraction of a response that will be propagated to the client. (section
9.4↓)
Comet Represents the Comet Actors layer which allows the sending of asynchronous content to the browser (section
11.5↓)
ORM - Either Mapper or Record - The lightweight ORM library provided by Lift. The Mapper framework is the proposed ORM framework for Lift 1.0 and the Record framework will be out for next releases. (chapter
8↑)
HTTP Auth - You can use either Basic or Digest HTTP authentication in your Lift application. This provides you more control as opposed to web-container’s HTTP authentication model. (section
9.9↓)
JS API The JavaScript abstraction layer. These are Scala classes/objects that abstract JavaScript artifacts. Such objects can be combined to build JavaScript code (chapter
10↓)
Utils Contains a number of helper functions that Lift uses internally and are available to your application
9.2 The Request/Response Lifecycle
We briefly discussed the Request/Response Liftcycle in section
3.5↑, and now we’re going to cover it in depth. This will serve not only to familiarize you with the full processing power of Lift, but also to introduce some of the other advanced topics we’ll be discussing in this and later chapters.
One important thing we’d like to mention is that most of the configurable properties are in LiftRules, and are of type RulesSeq. With a RulesSeq you essentially have a list of functions or values that are applied in order. RulesSeq defines a prepend and append method that allows you to add new configuration items at the beginning or end of the configuration, respectively. This allows you to prioritize things like partial functions and compose various methods together to control Lift’s behavior. You can think of a RulesSeq as a Seq on steroids, tweaked for Lift’s usage.
The following list outlines, in order, the process of transforming a Request into a Response. We provide references to the sections of the book where we discuss each step in case you want to branch off.
-
Execute early functions: this is a mechanism that allows a user function to be called on the HttpServletRequest before it enters the normal processing chain. This can be used for, for example, to set the XHTML output to UTF-8. This is controlled through LiftRules.early
-
Perform URL Rewriting, which we already covered in detail in section 3.7↑. Controlled via LiftRules.rewrite, this is useful for creating user-friendly URLs, among other things. The result of the transformation will be checked for possible rewrites until there are no more matches or it is explicitly stopped by setting the stopRewriting val in ReqwriteResponse to true. It is relevant to know that you can have rewriter functions per-session hence you can have different rewriter in different contexts. These session rewriters are prended to the LiftRules rewriters before their application.
-
Call LiftRules.onBeginServicing hooks. This is a mechanism that allows you to add your own hook functions that will be called when Lift is starting to process the request. You could set up logging here, for instance.
-
Check for user-defined stateless dispatch in LiftRules.statelessDispatchTable. If the partial functions defined in this table match the request then they are used to create a LiftResponse that is sent to the user, bypassing any further processing. These are very useful for building things like REST APIs. The term stateless refers to the fact that at the time the dispatch function is called, the stateful object, called S, is not available and the LiftSession is not created yet. Custom dispatch is covered in section 3.8↑
-
Create a LiftSession. The LiftSession holds various bits of state for the request, and is covered in more detail in section 9.5↓.
-
Call LiftSession.onSetupSession. This is a mechanism for adding hook functions that will be called when the LiftSession is created. We’ll get into more details when we discuss Lift’s session management in section 9.5↓.
-
Initialize the S object (section 3.4.1↑). The S object represents the current state of the Request and Response.
-
Call any LoanWrapper instances that you’ve added through S.addAround. A LoanWrapper is a way to insert your own processing into the render pipeline, similar to how Filter works in the Servlet API. This means that when your LoanWrapper implementation is called, Lift passes you a function allowing you to chain the processing of the request. With this functionality you can execute your own pre- and post-condition code. A simple example of this would be if you need to make sure that something is configured at the start of processing and cleanly shut down when processing terminates. LoanWrappers are covered in section 9.6.1↓
-
Process the stateful request
-
Check the stateful dispatch functions defined in LiftRules.dispatch. This is similar to the stateless dispatch in step #4 except that these functions are executed in the context of a LiftSession and an S object (section 3.4.1↑). The first matching partial function is used to generate a LiftResponse that is returned to the client. If none of the dispatch functions match then processing continues. Dispatch functions are covered in section 3.8↑. This flow is wrapped by LiftSession.onBeginServicing/onEndServicing calls
-
If this is a Comet request, then process it and return the response. Comet is a method for performing asynchronous updates of the user’s page without a reload. We cover Comet techniques in chapter 11↓
-
If this is an Ajax request, execute the user’s callback function; the specific function is mapped via a request parameter (essentially a token). The result of the callback is returned as the response to the user. The response can be a JavaScript snippet, an XML construct or virtually any LiftResponse. For an overview of LiftResponse please see section 9.4↓. This flow is wrapped by LiftSession.onBeginServicing/onEndServicing calls.
-
If this is a regular HTTP request, then:
-
Call LiftSession.onBeginServicing hooks. Mostly “onBegin”/”onEnd” functions are used for logging. Note that the LiftRules object also has onBeginServicing and onEndServicing functions but these are “wrapping” more Lift processing and not just statefull processing.
-
Check the user-defined dispatch functions that are set per-session (see S.addHighLevelSessionDispatcher). This is similar to LiftRules.dispatch except that you can have different functions set up for a different session depending on your application logic. If there is a function applicable, execute it and return its response. If there is no per-session dispatch function, process the request by executing the Scala function that user set up for specific events (such as when clicking a link, or pressing the submit button, or a function that will be executed when a form field is set etc.). Please see SHtml obejct 3.4.2↑.
-
Check the SiteMap and Loc functions. We cover SiteMap extensively in chapter 7↑.
-
Lookup the template based on the request path. Lift will locate the templates using various approaches:
-
Check the partial functions defined in LiftRules.viewDispatch. If there is a function defined for this path invoke it and return an Either[() ⇒ Can[NodeSeq],LiftView]. This allows you to either return the function for handling the view directly, or delegate to a LiftView subclass. LiftView is covered in section 4.4↑
-
If no viewDispatch functions match, then look for the template using the ServletContext’s getResourceAsStream.
-
If Lift still can’t find any templates, it will attempt to locate a View class whose name matches the first component of the request path under the view folder of any packages defined by LiftRules.addToPackages method. If an InsecureLiftView class is found, it will attempt to invoke a function on the class corresponding to the second component of the request path. If a LiftView class is found, it will invoke the dispatch method on the second component of the request path.
-
Process the templates by executing snippets, combining templates etc.
-
Merge <head> elements, as described in section e↓
-
Update the internal functions map. Basically this associates the user’s Scala functions with tokens that are passed around in subsequent requests using HTTP query parameters. We cover this mechanism in detail in section 9.3↓
-
Clean up notices (see S.error, S.warning, S.notice) since they were already rendered they are no longer needed. Notices are covered in section B↓.
-
Call LiftRules.convertResponse. Basically this glues together different pieces if information such as the actual markup, the response headers, cookies, etc into a LiftResponse instance.
-
Check to see if Lift needs to send HTTP redirect. For an overview please see 3.9↑
-
Call LiftSession.onEndServicing hooks, the counterparts to LiftSession.onBeginServicing
-
Call LiftRules.performTransform. This is actually configured via the LiftRules.responseTransformers RulesSeq. This is a list of functions on LiftResponse ⇒ LiftResponse that allows the user to modify the response before it’s sent to the client
-
Call LiftRules.onEndServicing hooks. These are the stateless end-servicing hooks, called after the S object context is destroyed.
-
Call any functions defined in LiftRules.beforeSend. This is the last place where you can modify the response before it’s sent to the user
-
Convert the LiftResponse to a raw byte stream and send it to client as an HTTP response.
-
Call any functions defined in LiftRules.afterSend. Typically these would be used for cleanup.
We realize that this is a lot of information to digest in one pass, so as we continue to cover the specific details of the rendering pipeline you may want to keep a bookmark here so that you can come back and process the new information in the greater context of how Lift is working.
Tyler Weir has created a set of diagrams on the following two pages that outline Lift’s processing at the global level and also for HTTP requests in particular. For the visually-oriented these may explain things a bit better.
The “Process HTTP request” step is expanded on the following page.
9.3 Lift Function Mapping
As we mentioned in section
6.1↑, lift utilizes scala closures and functions for almost all processing of client data. Because of this, Lift’s ability to associate functions with specific form elements, AJAX calls, etc, is critical to its operation. This association of functions, commonly known as “mapping” is handled through a combination of request parameters, Scala closures and Session data. We feel that understanding how mapping works is important if you want to work on advanced topics.
At its most basic, mapping of functions is just that; a map of the user’s currently defined functions. To simplify things, Lift actually uses one of four subclasses of AFuncHolder:
BinFuncHolder used for binding functions for file uploading. It will hold a
FileParamHolder ⇒ Any function, which is used to process the file data after upload (section
6.4↑)
SFuncHolder used for binding String ⇒ Any functions. This function corresponds to a single HTTP query parameter, except that the parameter name is unique to this request (we’ll cover naming shortly)
LFuncHolder used for binding List[String] ⇒ Any functions. This is essentially the same as SFuncHolder but for multiple values
NFuncHolder used for binding () ⇒ Any functions. Typically these are used for event callabcks (such as form submission)
Wherever Lift takes a function callback it is converted to one of these types behind the scenes. Also on the backend, each function is assigned a token ID (generated by Helpers.nextFuncName), which is then added to the session, typically via S.addFunctionMap or S.mapFunc. The token is generally used as the form element name so that the tokens for a given form are passed back to Lift when the form is submitted; in AJAX, the token is used as an HTTP query parameter of the AJAX callback from the client JavaScript code. In either case, Lift processes the query parameters within LiftSession.runParams and executes each associated function in the function mapping.
As a concrete example, let’s look at a simple binding in a form. Listing
9.3↓ shows a small example snippet that will request a person’s name and print it out when the person clicks the submit button.
def greet (xhtml : NodeSeq) : NodeSeq = {
  var name = ""
  def process() = {
    println(name)
  }
  bind("form", xhtml, "name" -> SHtml.text(name, name = _),
                      "greet" -> SHtml.submit("Greet", process))
}
Listing
9.3↓ shows the corresponding template using our sample snippet.
Function binding template
<lift:surround with="default" at="content">
  <lift:Test.greet form="GET">
    <form:name /> <form:greet />
  </lift:Test.greet>
</lift:surround>
Finally, listing
9.3↓ shows an example of the resulting HTML that’s generated when a user views the template. As you can see, each of the elements with callbacks has a corresponding form element with a token ID for the name value. Since we’ve used the GET CGI method here (we usually recommend using POST in the real world), when we submit the form our URL would look like
/greet.html?F541542594358JE2=...&F541542594359PM4=Greet. For SFuncHolder mappings the value of the request parameter is passed directly. For NFuncHolders the presence of the token in the query parameter list is enough to fire the function. For BinFuncHolder and LFuncHolder mappings some additional processing is performed to coerce the submitted values into proper values for the functions to handle.
<form method="get" action="/greet.html">
  <input name="F541542594358JE2" type="text" value=""/>
  <input name="F541542594359PM4" type="submit" value="Greet"/>
</form>
Normally you do not have to directly deal with the function holder classes, since the generator functions in SHtml handle that internally. However, if you’re in a situation when you need to bind functions by yourself (such as building your own widget where SHtml doesn’t provided needed elements), you can use the previously mentioned S.addFunctionMap or S.mapFunc to do the “registration” for you.
9.4 LiftResponse in Detail
In some cases, particularly when using dispatch functions (section
3.8↑), you may want explicit control over what Lift returns to the user. The LiftResponse trait is the base of a complete hierarchy of response classes that cover a wide variety of functionality, from simply returning an HTTP status code to returning a byte stream or your own XML fragments. In this section we’ll cover some of the more common classes.
9.4.1 InMemoryResponse
The
InMemoryResponse allows you to return an array of bytes directly to the user along with a set of HTTP headers, cookies and a response code. An example of using
InMemoryResponse was given in section
3.8↑, showing how we can directly generate a chart PNG in memory and send it to the user. This is generally useful as long as the data you need to generate and send is relatively small; when you start getting into larger buffers you can run into memory constraints as well as garbage collection pressure if you’re serving a large number of requests.
9.4.2 StreamingResponse
The
StreamingResponse class is similar to the
InMemoryResponse, except that instead of reading from a buffer, it reads from an input object. The input object is not required to be a subclass of
java.io.InputStream, but rather is only required to implement the method “def read(buf: Array[Byte]): Int”. This allows you to essentially send back anything that can provide an input stream. Additionally, you can provide a
() ⇒ Unit function (cleanup, if you will) that is called when the input stream is exhausted. As an example, let’s look at how we could stream a file from our WAR back to the client. Listing
9.4.2↓ shows how we can retrieve the input stream from our classloader and then send it directly to the user. Note that you
must know the size of the file you’re streaming before sending it.
Streaming download method
def sendFile () : Box[LiftResponse] = {
  // Locate the file and process it
  LiftRules.getResource("/some-file.txt").map { url =>
    val input = url.openStream()
    val filesize = ... // must compute or predetermine this.
    StreamingResponse(inPipe,
                      () => { input.close },
                      filesize,
                      (Content-Type -> "text/plain") :: Nil,
                      Nil,
                      200)
  }
}
Note that we use the cleanup function to close the input stream once we’re done so that we make sure to release resources.
The Lift framework makes a lot of things really easy and it provides extremly useful abstractions as you may have already discovered. Responses to clients are also abstacted by LiftResponse trait. There are numerous response types and here is the simplified view of the class hierarchy:
-
LiftResponse
-
BasicResponse
-
InMemoryResponse
-
StreamingResponse
-
JSonResponse
-
RedirectResponse
-
ToResponse
-
XhtmlRespomse
-
XmlResponse
-
XmlMimeResponse
-
AtomResponse
-
OpenSearchResponse
-
AtomCreatedResponse
-
AtomCategoryResponse
-
AtomServiceResponse
-
CreatedResponse
-
OkResponse
-
PermRedirectResponse
-
BadResponse
-
UnauthorizedResponse
-
UnauthorizedDigestResponse
-
NotFoundResponse
-
MethodNotAllowedResponse
-
GoneResponse
We won’t get into details right now on what exactly each and every class/object does, although their purpose is given away by their names. It is important to know that whenever you need to return a LiftResponse reference from one of your functions, for example LiftRules.dispatch you can you can use one of these classes. Lift doesn’t really provide the HttpServletResponse object, instead all responses are impersonated by a LiftResponse instance and it content (the actual payload, http headers, content-type, cookies etc.) is written internally by Lift to the container’s output stream.
Still let’s take a look at a few examples
9.4.4 RedirectWithState
RedirectWithState example
// Assume you boot function
import MessageState._
...
def boot = {
LiftRules.dispatch.prepend {
case Req("redirect1" :: _, _, _) => () =>
Full(RedirectWithState("/page1", "My error" -> Error))
case Req("redirect2" :: _, _, _) => () =>
Full(RedirectWithState("/page2",
RedirectState(() => println("Called on redirect!"),
"My error" -> Error)))
}
First of all we added a DispatchPF function that pattern matches for paths starting with redirect1 and redirect2. Let’s see what happens in each case.
-
redirect1 - We are returning a RedirectWithState response. It will do HTTP redirect towards /page1 and the state is impersonated by the tuple “MyError” -> Error. Because MessageState object holds an implicit conversion function from Tuple2 to MessageState it suffices to just provide the tuple here. Essentially we are saying here that when the browser sends the redirect request to server we already have an Error notice set up and the <lift:msgs> tag from your /page1 will show this “My error” error message.
-
redirect2 - Similarly it does an HTTP redirect to browser towards your /page2. But we are passing now a RedirectState object. This object holds a () => Unit function that will be executed when browser send the redirect request and the Notices impersonated by a repeated parameter (String, NoticeType.Value)*. In fact the mapping between the actual message and its type: Notice, Warning or Error.
9.4.5 XmlResponse
XmlResponse example
// Assume you boot function
def boot = {
LiftRules.dispatch.prepend {
case Req("rest" :: Nil, _, _) => () => Full(XmlResponse(
<persons>
<name>John</name>
<name>Jane</name>
</persons>
))
}
When you are receiving a request with the path /rest the code is returning an XML response. The content-type and everything else is taken care of by XmlResponse. You can build much more complex REST API’s an return XML response which is probably mot commonly used.
9.5 Session Management
Lift is a stateful framework and naturally this state needs to be managed. You may already be familiar with HttpSession and and how a J(2)EE web container identifies an HttpSession; either by a JSESSIONID cookie or by a JSESSIONID URI sequence (in case of URL rewriting). Similarly, Lift uses a LiftSession reference which is not actually “persisted” in HttpSession. As a matter of fact Lift does not really use the HttpSession provided by the web container to maintain conversational state, but rather uses a bridge between the HttpSession and the LiftSession. This bridge is impersonated by SessionToServletBridge class which implements javax.servlet.http.HttpSessionBindingListener and javax.servlet.http.HttpSessionActivationListener and works like this:
-
When receiving an HTTP Request and there was no stateless dispatch function to execute, Lift does the stateful processing. But before doing that it checks to see if there is a LiftSession associated with this HTTP session ID. This mapping is kept on a SessionMaster Scala actor.
-
If there is no associated LiftSession in the SessionMaster actor, create it and add a SessionToServletBridge attribute on HttpSession. This will make Lift aware of the session when the container terminates the HttpSession or when the HTTP session is about to be passivated or activated.
-
When the container terminates the HTTP session, SessionToServletBridge sends a message to the SessionMaster Actor to terminate the LiftSession, which includes the following steps:
-
Call any defined LiftSession.onAboutToShutdownSession hooks
-
Send a ShutDown message to all Comet Actors pertaining to this session
-
Clean up any internal LiftSession state
-
Call LiftSession.onShutdownSession hooks
The SessionMaster Actor is also protected by another watcher Actor. This watcher Actor receives the Exit messages of the watched Actors. When it receives an Exit message it will call the users’ failure functions and restart the watched actor (Please see ActorWatcher.failureFuncs).
Even while Lift is handling session management you still have the ability to manually add attributes to the HttpSession object. We do not recommend this unless you really must. A simpler way to keep your own session variables, is to use
SessionVars. For more details about SessionVar please see the fundamental chapter
3.11↑
The next question would probably be “So we have internal session management, how do we cope with that in a clustered environment? ... how are sessions replicated?” the answer is, they aren’t. There is no intention to use the web container’s session replication as these technologies appears to be inferior to other solutions on the market. Relying on Java serialization brings a lot of performance concerns and alternative technologies have been investigated and they are still under investigation. Until there is a standard session replication technology you can still cluster you application using “sticky session”. This meas that all requests pertaining to a HTTP session must be processed by the same cluster node. This can be done by software or hardware load balancers, as they would dispatch the requests based on JSESSIONID cookie. Another approach is that the dispatching is done based on some URI or query parameters. For example, a query parameter like serverid=1 is configured in the load balancer to always be dispatched to the node 1 of the cluster, and so on. There are some downsides for the sticky session approach. For instance you are logged in the application and do your stuff. Suddenly the node designated to your session crashes. At this moment you lost your session. The next subsequent request would be automatically dispatched by the load balancer to another cluster node and depending how your application is built this may mean that you need to log in again or if part of the state was persisted in DB you may resume your work from some point avoiding re-login ... but this is application specific behavior that is beyond the scope of this discussion. The advantages of sticky sessions are related with application performance since in this model the state does not need to be replicated in all cluster nodes which for significant state information can be quite time/resources consuming.
9.5.1 Lift garbage collection
As you have seen, Lift tailors Scala functions with client side artifacts (XHTML input elements, Ajax requests etc.). Naturally these functions are kept into the session state. Also for every rendered page, a page ID is generated and functions bound for these pages as asociated with this page ID. In order to prevent accumulation of such mappings, Lift has a mechanism of purging unused functions. Basically the idea is
-
On client side, a script periodically sends to the server an Ajax request impersonating a lift GC request.
-
On service side Lift updates the timestamps of the functions associated with this page ID. The functions older then LiftRules.unusedFunctionsLifeTime (default value is 10 minutes) become eligible for garbage collection as they are de-referenced from the current session. The frequency of such Ajax requests is given by LiftRules.liftGCPollingInterval. By default it is set to 75 seconds.
-
Each Ajax request contains includes the page ID as new function may be bound as a result of processing the Ajax request, dependin on the application code. Such function that are dynamically bound are automatically associated with the same page ID.
You can of course turn off this garbage collection mechanism by setting LiftRules.enableLiftGC = false typically in your Boot. You can also fine tune the garbage collection mechanims to fit your application needs, by changing the default LiftRules variables.
LiftRules gabage collection variables
/**
* By default lift uses a garbage-collection mechanism of removing
* unused bound functions from LiftSesssion
* Setting this to false will disable this mechanims and there will
* be no Ajax polling request attempted.
*/
var enableLiftGC = true;
/**
* If Lift garbage collection is enabled, functions that are not seen
* in the page for this period of time (given in milliseonds) will be
* discarded, hence eligible for garbage collection. The default value
* is 10 minutes.
*/
var unusedFunctionsLifeTime: Long = 10 minutes
/**
* The polling interval for background Ajax requests to prevent
* functions of being garbage collected.
* Default value is set to 75 seconds.
*/
var liftGCPollingInterval: Long = 75 seconds
/**
* The polling interval for background Ajax requests to prevent functions
* of being garbage collected.
* This will be applied if the Ajax request will fail. Default value is
* set to 15 seconds.
*/
var liftGCFailureRetryTimeout: Long = 15 seconds
9.6 Miscellaneous Lift Features
In this section we will discuss various features that can prove helpful in building rich Lift applications.
9.6.1 Wrapping Lift’s processing logic
Lift provides the ability to allow user functions to be part of processing lifecycle. In these cases Lift allows you to provide your own functions and the actual Lift’s processing function is passed to your function. Hence your own function is responsible of calling the actual Lift’s processing logic.
But let’s see how exactly you can do this.
LoanWrapper example
class Boot {
def boot {
...
S.addAround(new LoanWrapper { // Y
def apply[T](f: => T): T = {
println("Y -> hello to the request!")
val result = f // Let Lift do normal request processing.
println("Y -> goodbye!")
result
}
})
S.addAround(new LoanWrapper { // X
def apply[T](f: => T): T = {
println("X -> hello to the request!")
val result = f // Let Lift do normal request processing.
println("X -> goodbye!")
result
}
})
}
The code looks pretty straight-forward in the sense that we add two
LoanWrapper instances to the
S object. (Note that we’re using the
S object not
LiftRules meaning that
LoanWrappers are applicable only for stateful processing. See
9.2↑ for when exactly
LoanWrappers are invoked.)
So let’s see what happens when the above code processess a request from a client. You can think of the invocation sequence as X(Y(f)) where f is the Lift function that impersonates the core processing. Therefore you’ll see the following output in the console:
X -> hello to the request!
Y -> hello to the request!
<Lift’s logic ... whatever is printed here>
Y -> goodbye!
X -> goodbye!
This feature allows you use a resource before Lift does and release them after Lift has finished processing the stateful request and before the LiftResponse object is constructed.
9.6.2 Passing Template Parameters to Snippets↓↓
In addition to the standard attributes for snippets, outlined in Section
5.1↑, you can set your own attributes on the snippet element. Attributes used in this manner are called “parameters”. Listing
9.6.2↓ shows us setting a
default parameter on our
Ledger.balance snippet.
Defining a Snippet Parameter
<lift:Ledger.balance default="10">
  <ledger:balance/> as of <ledger:time />
</lift:Ledger.balance>
The
S.attr function allows us to access all parameters defined on the snippet element itself, as shown in Listing
9.6.2↓.
Accessing a Snippet Parameter
class Ledger {
def balance (content : NodeSeq ) : NodeSeq = {
val dflt = S.attr("default") openOr "0";
bind ("ledger", content,
"balance" -> Text(currentLegdger.formattedBalance),
"time" -> Text((new java.util.Date).toString))
}
}
9.6.3 Computing Attributes with Snippets↓
You can use snippets to compute tag attributes, as shown in Listing
9.6.3↓:
Using a Snippet to Compute an Attribute
// In your page you can have
<div lift:snippet="MyDivThing:calcDir"> ... </div>
...
// Your snippet
class MyDivThing {
def calcDir = new UnprefixedAttribute("dir", "rtl", Null)
}
9.6.4 Processing Element Attributes↓
Now we have seen how we can pass xml parameters to snippets but what if we want to pass parameters on the nodes that will be bound? For instance, we may want to pass the am/pm information on the time element such as:
<ledger:time ampm=”true”/>
to control the time display format. Listing
9.6.4↓ shows how we can use the
BindHelpers object to retrieve the current element’s attributes.
Retrieving Element Attributes with BindHelpers
class Ledger {
def balance (content : NodeSeq ) : NodeSeq = {
val dflt = S.attr("default") openOr "0";
bind ("ledger", content,
"balance" -> Text(currentLegdger.formattedBalance),
"time" -> {
node: NodeSeq => println(BindHelpers.attr("ampm"));
Text((new java.util.Date).toString))
})
}
}
You can use the BindHelpers object for obtaining information about node attributes. This context is maintained internally using ThreadLocals and closures. Note that the context is cleared after the bind method is executed. In our example above for “time” node we are actually binding a function that takes the child nodes of the <ledger:time> node. When our function is called by Lift we can access the BindHelpers, such ass the attributes of the current node. The sequence <string> -> <right-hand-side-expression> is turned into a BindParam object using implicit conversions. It is important to note that BindParam.calcValue function is called in the correct context so that BindHelpers can be safely used.
9.7 Advanced S Object Features
The
S, or Stateful, object is a very important part of Lift. The S context is created when a client request is recieved that needs to be handled as a stateful reuest. Please see
9.2↑ for more details on the state creation and handling. The actual state information is kept inside the S object using ThreadLocal variables since
S is a singleton. This means that if you have any code that is executed in the stateful context you can safely use any
S object goodies, which include:
9.7.1 Managing cookies
You can retrieve cookies from the request or set cookies to be sent in the response. Cookies are covered in section
3.10↑.
9.7.2 Localization and Internationalization
Localization (also called L10N) and Internationalization (also called I18N) are very important aspects of many web applications that deal with different languages. These topics are covered in chapter
D↓.
9.7.3 Managing the Timezone
The S.timeZone function returns the current timezone as computed by the
LiftRules.timeZoneCalculator function. By default, the LiftRules method simply executes TimeZone.getDefault, but you can provide your own Box[HttpServletRequest] ⇒ TimeZone partial function to define your own behavior. Examples would include allowing users to choose their own timezone, or to use geographic lookup of the user’s IP address.
9.7.4 Per-session DispatchPF functions
You can set DispatchPF functions that operate in the context of a current session. Essentially you can bind DispatchPF functions with a given name. Relevant functions are:
-
S.highLevelSessionDispatcher - returns a List[LiftRules.DispatchPF]
-
S.highLevelSessionDispatchList - returns a List[DispatchHolder]
-
S.addHighLevelSessionDispatcher - maps a name with a given DispatchPF
-
S.removeHighLevelSessionDispatcher - removes the DispatchPF given its name
-
S.clearHighLevelSessionDispatcher - removes all DispatchPF associations
9.7.5 Session re-writers
Session re-writers are per session functions that allow you to modify a HTTP request (URI, query parameters etc.) before the request is actually processed. This is similar with LiftRules.rewrite variable but you can apply rewriters per a given session. Hence you can have different rewrites in diferent contexts. The relevant functions are:
-
S.sessionRewriter - returns a List[RewriteHolder]
-
S.addSessionRewriter - maps a LiftRules.RewritePF with a given name
-
S.removeSessionRewriter - removes a rewriter by a name
-
S.clearSessionRewriter - remove all session rewriters.
9.7.6 Access to HTTP headers
Accessing HTTP header parameters from the request and adding HTTP header parameters to the HTTP response represent very common operations. You can easily perform these operations using the following functions:
-
S.getHeaders - returns a List[(String, String)] containing all HTTP headers grouped by name and value pair
-
S.setHeader - sets a HTTP header parameter by specifying the name and value pair
9.7.7 Manage the document type
You can also read and write the XML document type set for the current response. You can use the following functions:
-
S.getDocType - returns the doc type that was set forthe current response
-
S.setDocType - sets a document type for the curent response object.
9.7.8 Other functions
-
Access to the raw HttpServletRequest and HttpSession if you really need it.
-
Managing the function map. The function map generates an association between a String and a function. This string represents a query parameter that when Lift receives upon a HTTP request, it will execute your function. Normally these names are auto-generated by Lift but you can also provide you own name. Please see 9.3↑ for more details.
-
Managing wrappers - see 9.6.1↑
-
Managing notices - see 3.6↑
-
Managing HTTP redirects - see S.redirectTo functions and 9.4↑
-
Using XML attibutes of a snippet - see ↓
9.8 ResourceServer
ResourceServer is a Lift component that manages the serving of resources like JS, CSS etc. Well the web container can do that right? ... still container does not serve these resources if they are inside jar files. The default URI path for serving such resources is given by LiftRules.resourceServerPath variable which by default it is set to “classpath”. The folder location where the resource is looked up inside jar files is given by ResourceServer.baseResourceLocation variable which by default it is set to “toserve”. Let’s assume the following folder structure inside you Lift project:
lift-proj/src/main/resources/toserve/css/mystyle.css
Maven will create the toserver folder in the jar/war file generated. Then in your web page you add something like:
<link rel="stylesheet" href="/classpath/css/mystyle.css" type="text/css"/>
Because the first URI part matches with LiftRules.resourceServerPath Lift will tell ResouceServer to load this resource from ’toserve’ folder. But it will fail. There is one thing left to do. We need to tell ResouceServer to allow the loading of mystyle.css resource. We can do this from Boot by calling:
ResourceServer.allow {
case "css" :: _ => true
}
We basically told Lift here to allow any resource found in css folder under toserve. Note that toserver comes from ResourceServer.baseResourceLocation which can be changed.
9.9 HTTP Authentication ↓↓
HTTP authentication is described by RFC 2617 . It describes the means of protecting server resources and allowing access only to authorized entities. As you may know, any J(2)EE web container provides HTTP authentication support using JAAS
↓. However, this approach has limitations. For example, if you provide your own
LoginModule or
CallbackHandler implementation this will not be loaded by the web application classloader but instead by the container classloader (at least in tomcat). This can lead to dependency loading issues since the web application classloader sits below the container’s classloader in the delegation chain. Lift, however, provides supports for both basic and digest authentications via a simplified, scala-oriented API that you can use directly. This API provides not only direct support for the HTTP authentication mechanisms, but also a path and role based authorization mechanism. The following sections show how we use basic authentication to protect our REST API (Chapter
15 on page 1↓).
9.9.1 Determining which Resources to Protect
The first thing we need to do is tell Lift which resources are protected by authentication. This is done by configuring
LiftRules.httpAuthProtectedResources↓ with one or more
PartialFunction[Req,Box[Role]] to match on the request. Listing
9.9.1↓ shows the PartialFunction defined in our
DispatchRestAPI object (Section
15.4.1 on page 1↓) used to protect our REST API from unauthorized access.
Defining Protected Resources
  // We explicitly protect GET and PUT requests in our REST API
  import net.liftweb.http.auth.AuthRole
  def protection : LiftRules.HttpAuthProtectedResourcePF = {
    case Req(List("api", "account", accountId), _, PutRequest) =>
       Full(AuthRole("editAcct:" + accountId))
    case Req(List("api", "account", accountId), _, GetRequest) =>
       Full(AuthRole("viewAcct:" + accountId))
    // If the account is public, don’t enforce auth
    case Req(List("api", "expense", Expense(e, true)), _, GetRequest) => Empty
    case Req(List("api", "expense", Expense(e, _)), _, GetRequest) =>
      Full(AuthRole("viewAcct:" + e.account.obj.open_!.id))
  }
The
PartialFunction matches on the
Req and can either return an
Empty, indicating that the given request does not require authentication, or a
Full[Role], that indicates which R
ole a user requires to be authorized to access the given resource. One important thing to remember is that HTTP authentication and SiteMap access control (Section
7.3 on page 1↑) are synergistic, so make sure that you configure both properly. We will discuss
Roles further in Section
9.9.3↓, but for now you can simply consider them as
String attributes associated with the current session. Once we’ve defined which resources are to be protected, we need to hook our
PartialFunction into
LiftRules in the
Boot.boot method, shown in Listing
9.9.1↓.
Hooking Resource Protection
// Hook in our REST API auth
LiftRules.httpAuthProtectedResource.append(DispatchRestAPI.protection)
9.9.2 Providing the Authentication Hook
After we’ve defined what resources we want to protect, we need to configure the LiftRules.authentication function to perform the actual authentication. Lift supports both HTTP Basic and Digest authentication schemes, which we’ll cover in the next two sections.
Note that in these examples we use stateful dispath (Section
3.8 on page 1↑) since the
User.logUserIn method utilizes a backing
SessionVar. If you use stateless dispatch you will need to provide your own
RequestVars to store the current user and roles.
9.9.2.1 HTTP Basic Authentication
HTTP Basic authentication is provided by the
net.liftweb.http.auth.HttpBasicAuthentication implementation class, constructed using the authentication realm name as well as a
PartialFunction[(String, String, Req), Boolean] that actually does the authentication. The tuple passed to the
PartialFunction consists of the attempted username password, and the request object (
Req). It’s your responsibility to return
true or
false to indicate whether the provided credentials succeed. Listing
9.9.2.1↓ shows the code in
Boot.boot that PocketChange uses to perform authentication based on the user’s email address and password. Note that when authentication succeeds for a given user not only do we return true, but we set the user as logged in (via
User.logUserIn) and we compile a set of all of the
Roles that the user so that Lift knows which protected resources the user may access. The
net.liftweb.http.auth.userRoles RequestVar is a built-in construct in Lift that the authentication backend uses for bookkeeping.
Performing Basic Authentication
import net.liftweb.http.auth.{AuthRole,HttpBasicAuthentication,userRoles}
LiftRules.authentication = HttpBasicAuthentication("PocketChange") {
case (userEmail, userPass, _) => {
logger.debug("Authenticating: " + userEmail)
User.find(By(User.email, userEmail)).map { user =>
if (user.password.match_?(userPass)) {
logger.debug("Auth succeeded for " + userEmail)
User.logUserIn(user)
// Compute all of the user roles
userRoles(user.editable.map(acct => AuthRole("editAcct:" + acct.id)) ++
user.allAccounts.map(acct => AuthRole("viewAcct:" + acct.id)))
true
} else {
logger.warn("Auth failed for " + userEmail)
false
}
} openOr false
}
}
9.9.2.2 HTTP Digest Authentication
HTTP Digest authentication is provided by the
net.liftweb.http.auth.HttpDigestAuthentication implementation class. Like Basic authentication, the
HttpDigestAuthentication instance is constructed with a realm name and a
PartialFunction, but in this case the
PartialFunction uses a tuple of
(String,Req,(String) ⇒ Boolean). The first parameter is still the username, and the second parameter is the request instance, but the third parameter is a function that will compute and compare the digest for authentication based on a
plaintext password. This means that if we want to use Digest authentication, we need to be able to retrieve a plaintext password for the user from the database somehow. Listing
9.9.2.2↓ shows how we could do this in PocketChange if we modified the
User.password field to simply be a
MappedString.
Performing Digest Authentication
import net.liftweb.http.auth.{AuthRole,HttpBasicAuthentication,userRoles}
LiftRules.authentication = HttpBasicAuthentication("PocketChange") {
case (userEmail, _, authenticates) => {
logger.debug("Authenticating: " + userEmail)
User.find(By(User.email, userEmail)).map { user =>
if (authenticates(user.password.is)) {
logger.debug("Auth succeeded for " + userEmail)
User.logUserIn(user)
// Compute all of the user roles
userRoles(user.editable.map(acct => AuthRole("editAcct:" + acct.id)) ++
user.allAccounts.map(acct => AuthRole("viewAcct:" + acct.id)))
true
} else {
logger.warn("Auth failed for " + userEmail)
false
}
} openOr false
}
}
Another important factor with Digest authentication is that it uses nonces for authenticating the client, and the nonces have a limited lifetime. The default nonce lifetime is 30 seconds, but you can configure this by overriding the HttpDigestAuthentication.nonceValidityPeriod method.
9.9.3 Role Hierarchies
So far we’ve discussed
Roles as essentially flat constructs. A
Role, however, is an n-ary tree structure, meaning that when we assign a
Role to a protected resource we can actually provide a hierarchy. Figure
9.4↓ shows an example of one such hierarchy. In this example, the Admin is the “superuser” role for admins, and can do what any sub-role can do and more. The Site-Admin can monitor the application, the User-Admin can manage users, and then we specify a set of location-specific roles: the Romania-Admin that can manage users from Romania, US-Admin that can manage users from US and UK-Admin that can only manage users from UK. With this hierarchy a User-Admin can manage users from anywhere but a Site-Admin can not manage any users. A Romania-Admin can’t monitor the site, nor it can manage the US or UK users.
Given this Role hierarchy, Listing
9.9.3↓ shows how we can implement this in our code by creating our Role hierarchy and then using the Role.getRoleByName method to locate the proper Role when we perform authentication. In this example we’re restricting access to the
/users/ro path to only users with the “Romania-Admin” role. However, our fictional “John” user is assigned the “User-Admin” role, so he will be able to access that path.
import auth._
class Boot {
def boot = {
...
val roles =
AuthRole("Admin",
AuthRole("Site-Admin"),
AuthRole("User-Admin",
AuthRole("Romania-Admin"),
AuthRole("US-Admin"),
AuthRole("UK-Admin")
)
)
LiftRules.protectedResource.append {
case (ParsePath("users" :: "ro" :: _, _, _, _)) =>
roles.getRoleByName("Romania-Admin")
}
LiftRules.authentication = HttpBasicAuthentication("lift") {
case ("John", "12test34", req) =>
println("John is authenticated !")
userRoles(AuthRole("User-Admin"))
true
}
...
}
}
10 Lift and JavaScript
In this chapter we’ll be discussing some of the techniques that Lift provides for simplifying and abstracting access to JavaScript on the client side. Using these facilities follows Lift’s model of separating code from presentation by allowing you to essentially write JavaScript code in Scala. Lift also provides a layer that allows you to use advanced JavaScript functionality via either the JQuery or YUI user interface libraries.
10.1 JavaScript high level abstractions
You may have noticed that Lift already comes with rich client side functionality in the form of AJAX and COMET support (chapter
11↓). Whenever you use this support, Lift automatically generates the proper
<script> elements in the returned page so that the libraries are included. Lift goes one step further, however, by providing a class hierarchy representing JavaScript expressions. For example, with an AJAX form element in Lift the callback method must return JavaScript code to update the client side. Instead of just returning a raw JavaScript string to be interpreted by the client, you return an instance of the
JsCmd trait (either directly or via implicit conversion) that is transformed into the proper JavaScript for the client.
JsCmd represents a JavaScript command that can be executed on the client. There is an additional “base” trait called JsExp that represents a JavaScript expression.The differences between them are not usually important to the developer, since a JsExp instance is implicitly converted to a JsCmd. Also note that while Lift’s JavaScript classes attempt to keep things type-safe there are some limitations; in particular, Lift can’t check semantic things like whether the variable you’re trying to access from a given JsCmd actually exists. Besides the obvious use in techniques like AJAX and COMET, Lift also makes it simple to attach JavaScript to regular Scala XML objects, such as form fields.
As a simple example, let’s look at how we might add a simple alert to a form if it doesn’t validate. In this example, we’ll assume we have a
name form field that shouldn’t be blank. Listing
10.1↓ shows a possible binding from our form snippet. Let’s break this down a bit: the first thing is that in order to reference form elements (or any elements for that matter) from JavaScript, they need to have an
id attribute. We add the id attribute
↓ to our text field by passing a
Pair[String,String]. Next, we need to define our actual validation. We do this by adding some javascript to the
onclick attribute of our submit button. The onclick attribute evaluates whatever javascript is assigned when the button is clicked; if the javascript evaluates to true then submission continues. If it evaluates to false then submission is aborted. In our case, we use the JsIf case class to check to see if the value of our myName field is equal to an empty string. In this case the JE object holds an implicit conversion from a Scala string to a Str (JavaScript string) instance. The second argument to JsIf is the body to be executed if the condition is true. In our case we want to pop up an alert to the user and stop form submission. The JsCmd trait (which Alert mixes in) provides a “&” operator which allows you to chain multiple commands together. Here we follow the Alert with a JsReturn, which returns the specified value; again, there’s an implicit conversion from Boolean to JsExp, so we can simply provide the “false” value.
import JsCmds._
import JE._
var myName = ""
bind(...
"name" -> text(myName, myName = _, "id" -> "myName"),
"submit" -> submit("Save", ..., "onclick" ->
JsIf(JsEq(ValById("myName"), ""),
Alert("You must provide a name") & JsReturn(false))
)
)
10.1.1 JsCmd and JsExp overview
If you peruse the Lift API docs you’ll find a large number of traits and classes under the JsCmds and JE objects; these provide the vast majority of the functionality you would need to write simple JavaScript code directly in Lift. Having said that, however, it’s important to realize that the Lift classes are intended to be used for small code fragments. If you need to write large portions of JavaScript code for your pages, we recommend writing that code in
pure JavaScript in an external file and then including that file in your pages. In particular, if you write your code as JavaScript functions, you can use the
JE.Call class to execute those functions from your Lift code. Table
10.1↓ gives a brief overview of the available JsCmds, while table
10.2↓ shows the JE expression abstractions.
|
After
|
Executes the given JsCmd fragment after a given amount of time
|
|
Alert
|
Corresponds directly to the JavaScript alert function
|
|
CmdPair
|
Executes two JsCmd fragments in order
|
|
FocusOnLoad
|
Forces focus on the given XML element when the document loads
|
|
Function
|
Defines a JavaScript function with name, parameter list, and JsCmd body
|
|
JsBreak, JsContinue, JsReturn
|
Corresponds directly to the JavaScript “break”, “continue”, and “return” keywords
|
|
JsFor, JsForIn, JsDoWhile, JsWhile
|
These define loop constructs in JavaScript with conditions and execution bodies
|
|
JsHideId, JsShowId
|
Hides or shows the HTML element with the given Id. This is actually handled via the LiftArtifacts’ hide and show methods
|
|
JsIf
|
Corresponds to the JavaScript “if” statement, with a condition, body to execute if the condition is true, and optional “else” body statement
|
|
JsTry
|
Defines a try/catch block tha can optionally alert if an exception is caught
|
|
JsWith
|
Defines a with statement to reduce object references
|
|
OnLoad
|
Defines a JavaScript statement that is executed on page load
|
|
Noop
|
Defines an empty JavaScript statement
|
|
RedirectTo
|
Uses window.location to redirect to a new page
|
|
ReplaceOptions
|
Replaces options on a form Select with a new list of options.
|
|
Run
|
Executes the given string as raw javascript
|
|
Script
|
Defines a <script> element with proper CDATA escaping, etc to conform to XHTML JavaScript support
|
|
SetElemById
|
Assigns a statement to a given element by id. Optional parameters allow you to specify properties on the element
|
|
SetExp
|
Defines an assignment to an arbitrary JavaScript expression from another JavaScript expression
|
|
SetHtml
|
Sets the contents of a given HTML node by Id to a given NodeSeq. This is especially useful in Ajax calls that update parts of the page
|
|
SetValById
|
Defines an assignment to a given element’s “value” property
|
Table 10.1 Basic JsCmds
|
AnonFunc
|
Defines an anonymous JavaScript function
|
|
Call
|
Calls a JavaScript function by name, with parameters
|
|
ElemById
|
Obtains a DOM element by its Id, with optional property access
|
|
FormToJson
|
Converts a given form (by Id) into a JSON representation
|
|
Id, Style, Value
|
Represents the “id”, “style” and “value” element attributes
|
|
JsArray
|
Constructs a JavaScript array from a given set of JavaScript expressions
|
|
JsEq, JsNotEq, JsGt, JsGtEq, JsLt, JsLtEq
|
Comparison tests between two JavaScript expressions. JsExp instances also have a “===” operator which is equivalent to JsEq
|
|
JsTrue, JsFalse, JsNull
|
Represents the “true”, “false”, and “null” values
|
|
JsFunc
|
Similar to Call; executes a JavaScript function
|
|
JsObj
|
Represents a JavaScript object with a Map for properties
|
|
JsRaw
|
Represents a raw JavaScript fragment. You can use this if Lift doesn’t provide functionality via abstractions
|
|
JsVal
|
Represents an abritrary JavaScript value
|
|
JsVar
|
Represents a JavaScript variable, with optional property access
|
|
Num
|
Represents a JavaScript number. JE contains implicit conversions from Scala numeric types to Num
|
|
Str
|
Represents a Javascript String. JE contains implicit conversions from a Scala String to Str
|
|
Stringify
|
Calls JSON.stringify to convert a JavaScript object into a JSON string representation
|
|
ValById
|
Represents the “value” property of a given element by Id
|
Table 10.2 Basic JE abstractions
10.1.2 JavaScript Abstraction Examples
As you can see, Lift provides a large coverage of JavaScript functionality through its abstraction layer. Even if you’ve done a lot of JavaScript, however, the abstractions don’t always map one-to-one and it can take some effort to wrap your head around it. We’re going to provide a few examples to help you understand how it works. We’ll start off with a simple example of an Ajax callback (Ajax is covered in chapter
11↓). Listing
10.1.2↓ shows how we can update an HTML element with new content via the Ajax call. In this case, we’re changing a chart image based on some passed parameters. Our HTML needs to contain an element with an id of “tx_graph”; this element will have its children
replaced with whatever NodeSeq we pass as the second argument.
def updateGraph() = {
  val dateClause : String = ...
  val url = "/graph/" + acctName + "/" + graphType + dateClause
  JsCmds.SetHtml("tx_graph", <img src={url} />)
}
As a more complex example, we could add some JavaScript behavior combining Ajax with some client-side state, as shown in listing
10.1.2↓.
import js.JE._ // for implicit conversions
def moreComplexCallback (value : String) = {
  JsIf(ValById("username") === value.toLowerCase, {
    JsFunc("logAccess", "Self-share attempted").cmd & Alert("You can’t share with yourself!")
  })
}
10.2 JQuery and other JavaScript frameworks
We’ve mentioned earlier that Lift uses the JQuery JavaScript framework by default. Lift wouldn’t be Lift, however, if it didn’t provide a mechanism for using other frameworks. The way that lift determines which JavaScript framework to use is via the JSArtifacts trait along with the LiftRules.jsArtifacts var. Lift comes with two default implementations of JSArtifacts: JQueryArtifacts and YUIArtifacts. If you want to use a different framework, you must provide a concrete implementation of the JSArtifacts trait specific to that framework. The JQuery support in Lift extends beyond just the JSArtifacts, support; there are also a number of JSExp and JsCmd traits and classes in the net.liftweb.http.js.jquery package that provide JQuery specific implementations for standard expressions and commands.
Changing one implementation or another can be done from LiftRules.jsArtifacts variable, which by default points to JQueryArtifacts. Typically this is done in Boot, as shown in listing
10.2↓.
 import net.liftweb.http.js.yui.YUIArtifacts

 class Boot {
   def boot = {
     ...
     LiftRules.jsArtifacts = YUIArtifacts
     ...
 }
In addition to changing LiftRules, you also need to take into account that other frameworks have their own scripts and dependencies that you’ll need to include in your pages. For YUI you would need to include the following scripts (at minimum):
 <script src="/classpath/yui/yahoo.js" type="text/javascript"/>
 <script src="/classpath/yui/event.js" type="text/javascript"/>
 <script src="/classpath/yui/dom.js" type="text/javascript"/>
 <script src="/classpath/yui/connection.js" type="text/javascript"/>
 <script src="/classpath/yui/json.js" type="text/javascript"/>
 <script src="/classpath/liftYUI.js" type="text/javascript"/>
Of course, to keep things simple you could either place all of these items in a template that you could embed, or you could combine the files into a single JavaScript source file.
We have some simple recommendations on using different JavaScript frameworks from within Lift:
-
If you don’t necessarily need YUI widgets or if you can find similar functionality in JQuery plugins, we recommend using the JQuery framework. Lift provides much better support out-of-the-box for JQuery
-
Do not mix JQuery and YUI unless you really know what you are doing. Getting both of them together leads to a number of collisions.
10.3 XML and JavaScript
What we’ve covered so far is pretty much standard JavaScript behind some Lift facades. There are situations, however, when you want to do things that are complicated or outside the scope of typical JavaScript functionality. One example of this is when you need to build dynamic DOM elements from JavaScript code, say to build an HTML list. Lift has a very nice way of dealing with such situation; with a few lines of code you can achieve quite a lot. The main functionality for this is provided via the Jx* classes, which you can use to transform a scala.xml.NodeSeq into javascript code that generates the corresponding nodes on the client side. Listing
10.3↓ shows a simple example of emitting a div on a page via JavaScript.
import net.liftweb.http.js._
import JE._
val div = Jx(<div>Hi there</div>)
This code generates the following JavaScript code:
function(it) {
  var df = document.createDocumentFragment();
  var vINIJ1YTZG5 = document.createElement(’div’);
  df.appendChild(vINIJ1YTZG5);
  vINIJ1YTZG5.appendChild(document.createTextNode(’Hi there’));
  return df;
}
As you can see, Lift took our XML code and transformed it into a JavaScript function that dynamically creates a document fragment containing the given NodeSeq. The it parameter can be any JavaScript object; we’ll cover how you use it in a moment. The name of the var is automatically and randomly generated to ensure uniqueness.
Of course, if that was all Lift was doing that’s not much help. At this point we’ve only generated a function that generates XML. Let’s take a look on a more complex example that shows the real power of the Jx classes. Assume we have a JSON structure that contains an array of objects containing firstName and lastName properties. This JSON structure could look something like:
var list = {
    persons: [
        {name: "Thor", race: "Asgard"},
        {name: "Todd", race: "Wraith"},
        {name: "Rodney", race: "Human"}
    ]
}
// Guess what I’ve been watching lately ?
Now we can use a combination of Jx classes to render this content as an HTML dynamic list:
Rendering a JSON List Via Jx
def renderPerson =
  Jx(<li class="item_header"> {JsVar("it", "name")}
       is {JsVar("it", "race")}</li>)
Jx(<ul>{JxMap(JsVar("it.persons"), renderPerson)}</ul>)
Well what this code does is this:
-
Construct an <ul> list that contains a bunch of elements
-
JxMap takes a JavaScript object, in this case it.persons (remember it is the parameter of the generated function), and iterate for each element of the array and apply the renderPerson function. Of course each element of the array will be a JSON object containing name and race properties.
-
The renderPerson function generates a JavaScript function as we’ve already shown, and renders the JavaScript code that generates the <li> elements containing the name value followed by “is” followed by the race value.
-
If we send this generated JavaScript function to client and calling it by pass the list variable above It will create the following document fragment:
<ul>
 <li class="item_header">Thor is Asgard</li>
 <li class="item_header">Todd is Wraith</li>
 <li class="item_header">Rodney is Human</li>
</ul>
With a couple of lines of code we’ve managed to generate the JavaScript code that creates document fragments dynamically. Here is the list of JX classes that you may find interesting:
|
Class
|
Description
|
|
JxBase
|
The parent trait for all other Jx classes
|
|
JxMap
|
Iterates over a JavaScript array and applies a function on each element
|
|
JxMatch
|
Match a JsExp against a sequence of JsCase
|
|
JxCase
|
Contains a JsExp for matching purposes and the NodeSeq to be applied in case the matching succeeds
|
|
JxIf
|
Contains a JsExp and a NodeSeq to be applied only if JsExp is evaluated to true
|
|
JxIfElse
|
Similar with JxIf but it contains the else branch
|
|
Jx
|
The basic application of the transformation from a NodeSeq to the JavaScript code
|
JSON is a way of structuring information in JavaScript code. One of its most common uses is to represent structured information on the wire. One example would be a JavaScript AJAX API where the server response is in fact a JSON construct. Let’s look at an example first in listing
10.4↓:
class SimpleSnippet {
def ajaxFunc() : JsCmd = {
JsCrVar("myObject", JsObj(("persons", JsArray(
JsObj(("name", "Thor"), ("race", "Asgard")),
JsObj(("name", "Todd"), ("race", "Wraith")),
JsObj(("name", "Rodney"), ("race", "Human"))
)))) & JsRaw("alert(myObject.persons[0].name)")
}
def renderAjaxButton(xhtml: Group): NodeSeq = {
bind("ex", xhtml,
"button" -> SHtml.ajaxButton(Text("Press me"), ajaxFunc _))
}
}
Your template would look like listing
10.4↓:
    ...
    <lift:SimpleSnippet.renderAjaxButton>
        <ex:button/>
    </lift:SimpleSnippet.renderAjaxButton>
    ...
First off, we have a simple snippet function called renderAjaxButton. Here we’re binding the ex:button tag and render a XHTML button tag that when pressed will send an Ajax request to server. When this request is received, the ajaxFunc is executed and the JsCmd response is turned into a JavaScript content type response. In ajaxFunc we construct a JSON object (the same one we used previously for the persons object). We assign the JSON structure to the JavaScript variable myObject and them call alert on the first element on the persons object. The rendered JavaScript code that will be send down the wire will be:
var myObject = {’persons’: [{’name’: ’Thor’, ’race’: ’Asgard’},
                            {’name’: ’Todd’, ’race’: ’Wraith’} ,
                            {’name’: ’Rodney’, ’race’: ’Human’}]};
alert(myObject.persons[0].name);
So in your page when you press the button you’ll get an alert dialog saying “Thor”. Here we used the JsRaw class which basically renders the exact thing you passed to it: raw JavaScript code.
Now that we’ve covered sending JSON from the server to the client, let’s look at going in the opposite direction. Lift provides a mechanism for sending form data to the server encapsulated in a JSON object. In and of itself sending the data in JSON format is relatively simple; where Lift really adds value is via the JsonHandler class. This class provides a framework for simplifying processing of submitted JSON data. To start, let’s look at some example template code for a JSON form:
<lift:surround with="default" at="content">
    <lift:JSONForm.head />
    <lift:JSONForm.show>
      <input type="text" name="name" />
      <br />
      <input type="text" name="value" />
      <br />
      <input type="radio" name="vehicle" value="Bike" />
      <input type="radio" name="vehicle" value="Car" />
      <input type="radio" name="vehicle" value="Airplane" />
      <br />
      <select name="cars">
        <option value="volvo">Volvo</option>
        <option value="saab">Saab</option>
        <option value="opel">Opel</option>
        <option value="audi">Audi</option>
      </select>
      <button type="submit">Submit</button>
    </lift:JSONForm.show>
    <div id="json_result"></div>
</lift:surround>
A you can see, the XHTML template is relatively straightforward. The Snippet code is where things really get interesting:
JSON Form Snippet Code
class JSONForm {
def head =
<head>
<script type="text/javascript"
src={"/" + LiftRules.resourceServerPath + "/jlift.js"} />
{Script(json.jsCmd)}
</head>
def show(html: Group): NodeSeq = {
SHtml.jsonForm(json, html)
}
import JsCmds._
object json extends JsonHandler {
def apply(in: Any): JsCmd = SetHtml("json_result", in match {
case JsonCmd("processForm", _, p: Map[String, _], _) => {
// process the form or whatever
println("Cars = " + urlDecode(p("cars")))
println("Name = " + urlDecode(p("name")))
<b>{p}</b>
}
case x => <b>Problem... didn’t handle JSON message {x}</b>
})
}
}
The first thing we define is the head function. Its purpose is simply to generate the JavaScript functions that set up the form handling on the client side. That means that when the submit button is clicked, the contents of the form are turned into JSON and submitted via an Ajax call to the server. The show function defines the connection between the concrete JsonHandler instance that will process the form and the template HTML that contains the form. We perform this binding with the SHtml.jsonForm method. This wraps the HTML with a <form> tag and sets the onsubmit event to do JSON bundling.
The key part of the equation is our JsonHandler object. The apply method is what will be called when the JSON object is submitted to the server. If the JSON is properly parsed then you’ll get a JsonCmd instance which you can use Scala’s matching to pick apart. The apply function needs to return a JsCmd (JavaScript code), which in this case sets the HTML content of the json_result div element. When the form is stringified into its JSON representation Lift uses a command property indicating the action that needs to be done on server and the actual JSON data. In the case of JSON forms the command is always “processForm” as this is important for pattern matching as seen above. The actual form content is a Map object that can be easily use to obtain the values for each form field.
10.5 JqSHtml object
SHtml generated code is independent on the JavaScript framework used. However
net.liftweb.http.jquery.JsSHtml object contains artifacts that are bound with JQuery framework. For instance it contains the autocomplete function that renders an input type text element but when start typing it will suggest words starting with what you typed already. Please see
http://www.pengoworks.com/workshop/jquery/autocomplete.htm for examples.
We’ve seen so far how we can abstract JavaScript code at Scala level using Lift’s JS abstraction. You can model endless cases by using these abstractions. But let’s take a look on another example a bit more complex. It is about a fast search where you have a text box and when you hit enter it will return the list of items that contain that sequence. The list of items will be rendered in a DIV real estate.
Example template
<lift:surround with="default" at="content">
<lift:Hello.ajaxian>
<text:show/>
</lift:Hello.ajaxian>
<div id="items_list" style="width: 300px; height: 100px; overflow: auto; border: 1px solid black;">
</div>
</lift:surround>
So we just have a really simple snippet and the div placeholder.
Example snippet
import JE._
import net.liftweb.http.js.jquery.JqJE._
import net.liftweb.http.SHtml._
import net.liftweb.util.Helpers._
import JsCmds._
val names = "marius" :: "tyler" :: "derek" :: "dave" :: "jorge" :: "viktor" :: Nil
def ajaxian(html: Group) : NodeSeq = {
bind("text", html,
"show" -> ajaxText("Type something", {value => {
val matches = names.filter(e => e.indexOf(value) > -1)
SetHtml("items_list", NodeSeq.Empty) &
JsCrVar("items", JsArray(matches.map(Str(_)):_*)) &
JsCrVar("func", Jx(<ul>{
JxMap(JsVar("it"), Jx(<li><a href="">{JsVar("it")}</a></li>)) } </ul>).toJs) &
(ElemById("items_list") ~> JsFunc("appendChild", Call("func", JsVar("items"))))
}})
)
}
The part with the snippet is probably already familiar to you. We are calling the ajaxText function which renders an input text element. When you hit enter an Ajax request will be sent and the anonymous function that we bound here will be executed. Here is what happens:
-
First filter out the names that contain the provided value in the input text. So all element that contain that sequence.
-
Then return a JsExp that we are building:
-
SetHtml is clearing out the div element that we’re using as a real estate for our search results list
-
Then we re declaring a JavaScript variable which is an array containing the resulting items that matched the search criteria.
-
Then we are declaring thr func variable which obviously is a function. We’ve seen above how to use the Jx artifacts. Now we are building a html list (<ul>) that for each element from the it variable will build the <li> sequences. The it variable is actually the paramter that this function takes which is the items array that we declared above.
-
After that we are obtaining the HTML node denominated by “items_list” id and call appendChild function of the Node object. The ~> function is use to call functions of objects. Of course to the appendChild function we need to provide a parameter. This parameter is the document fragment returned by func function. When we are caling the func function we are passing items variable decalred above.
As you noticed already we composed a small JavaScript code by chainin multiple JS expressions/commands using the & function.
11 AJAX and Comet in Lift
In this chapter we’re going to discuss AJAX and Comet, two approaches to improving the user experience through dynamic web pages. While a full treatment of the techniques and technologies behind these approaches is beyond the scope of this book, we’re going to cover the basics of how AJAX and Comet work. In particular, we’re going to look at how Lift handles them behind the scenes to simplify your work.
11.1 What are AJAX and Comet, really?
AJAX and Comet are variations on the traditional model of the web application request/response lifecycle. In the traditional model, the user starts by making a request for a page. The server receives this request, performs processing, then sends a response back to the user. The response is then rendered by the user’s browser. At this point there are no further interactions between the user and the server until the user clicks on a link or performs some other action that starts a completely new request/response lifecycle. AJAX and Comet extend this model to allow for asynchronous updates from either the user to the server (AJAX), or from the server back to the user (Comet).
If we take the example of adding a comment to a blog post, the traditional model has the user fill in a form, hit the submit button, and send the request to the server. The server processes and adds the comment and then sends the updated blog post back to the user with the newly added comment. At the same time, if other people are viewing the blog post, they won’t see the new comment until they reload the page.
The AJAX model of this session changes such that the display of the new comment is not tied to the response from the server. When the user hits submit, the request to add the comment is sent to the server in the background. While it’s being processed by the server, a JavaScript fragment (the “J” in AJAX) updates the user’s page via DOM and adds the comment without the need for a full page reload.
Comet changes the traditional model by using a long-polling HTTP request in the background that allows the server to push data to the browser without requiring additional requests. Essentially this is like AJAX, except in the opposite direction.
While the AJAX model increases the richness of the User Experience for a single client at a time, Comet can do the same for multiple users. Going back to our example of a blog post, Comet would enable the server to notify anyone viewing the current blog post to automatically have their pages updated when the new comment is added.
Figures
a↓,
b↓, and
c↓ show graphical representations of how the models differ in terms of timeline and server interaction.
11.2 Using AJAX in Lift
In previous chapters we’ve shown how to synchronously process forms (chapter
6↑) and use JavaScript to perform client-side behavior (chapter
10↑). AJAX blends these Lift techniques to give you powerful support for asynchronous client-server interaction. As with standard form and link elements, Lift uses methods on the
SHtml object to generate AJAX components in a concise manner. We’ll cover each of the AJAX-specific
SHtml methods in a later section, but for now we want to cover the high-level aspects of using AJAX in Lift.
The first thing we want to point out is that AJAX generators take callback methods just like regular element generators. The major difference is that while standard
SHtml generator callbacks return
scala.Any, AJAX callbacks must return a
net.liftweb.http.js.JsCmd. The reason is that the return from the callback is itself a client-side callback that can be used to update the client content. An example is shown in Listing
11.2↓. In this example we generate a button, that when clicked, will log a message and then set the contents of the div named
my-div to a
Text element. As you can see, adding client-side content changes is trivial.
import _root_.net.liftweb.http.SHtml._
// The next two imports are used to get some implicit conversions
// in scope.
import _root_.net.liftweb.http.JE._
import _root_.net.liftweb.http.JsCmds._
// Use logging facilities
import _root_.net.liftweb.util.Log
// define a snippet method
def myFunc(html: NodeSeq) : NodeSeq = {
bind("hello", html, "button" -> ajaxButton(Text("Press me"), {() =>
Log.info("Got an AJAX call")
SetHtml("my-div", Text("That’s it"))
})
}
The second important aspect of Lift’s AJAX support is that behind the scenes Lift provides a robust mechanism for AJAX submission. For example, Lift provides its own JavaScript that handles retrying when the submission times out. You can control the timeout duration and retry count through LiftRule’s ajaxPostTimeout (in milliseconds) and ajaxRetryCount variables, respectively.
The third aspect of Lift’s AJAX support is that it’s so easy to enable. Lift automatically takes care of adding the proper JavaScript libraries to your templates when they’re rendered, and sets up the proper callback dispatch for you. By default, dispatch is done relative to the /ajax_request path in your web context, but Lift allows you change this via the LiftRules.ajaxPath variable.
The final aspect is the flexibility the library provides. Besides standard form elements and links that can be AJAXified, Lift also provides the SHtml.ajaxCall method which constructs a JsExp that you can use directly on any element. In addition, it allows you to construct a String argument to your callback function via JavaScript so that you have full access to client-side data.
11.3 A more complex AJAX example
Let’s take a look on a comparison example. We’ve seen how to use
SHtml.ajaxButton, so let’s see in Listing
11.3↓ how can we achieve the same effect using
SHtml.ajaxCall and
SHtml.ajaxInvoke:
class SimpleSnippet {
import _root_.net.liftweb.http.js.{JE,JsCmd,JsCmds}
import JsCmds._ // For implicits
import JE.{JsRaw,Str}
def ajaxFunc1() : JsCmd = JsRaw("alert(’Button1 clicked’)")
def ajaxFunc2(str: String) : JsCmd = {
println("Received " + str)
JsRaw("alert(’Button2 clicked’)")
}
def ajaxFunc3() : JsCmd = JsRaw("alert(’Button3 clicked’)")
def renderAJAXButtons(xhtml: Group): NodeSeq = {
bind("ex", xhtml,
"button1" -> SHtml.ajaxButton("Press me", ajaxFunc1 _),
"button2" ->
// ajaxCall and ajaxInvoke actually returns a pair (String, JsExp).
// The String is used for garbage collection, so we only need
// to use the JsExp element (_2).
<button onclick={SHtml.ajaxCall(Str("Button-2"), ajaxFunc2 _)._2}>
Press me 2</button>,
"button3" ->
<button onclick={SHtml.ajaxInvoke(ajaxFunc3 _)._2}>
Press me 3</button>)
}
}
Basically, in Listing
11.3↑, we created three AJAX buttons using three different SHtml functions. The difference between
ajaxCall and
ajaxInvoke is that for
ajaxCall you can specify a
JsExp parameter that will be executed on the client side. The result of this
JsExp will be sent to the server. In our case this parameter is simply a static String,
Str(“Button-2”), but you can provide any
JsExp code here to calculate a client-side value to be passed to your callback. For an overview of the rest of the
SHtml generator functions please see Chapter
6↑.
11.4 AJAX Generators in Detail
The following table provides a brief synopsis of the AJAX generator methods on the
net.liftweb.http.SHtml object:
|
Function name
|
Description
|
|
ajaxButton
|
Renders a button that will submit an AJAX request to server
|
|
a
|
Renders an anchor tag that when clicked will submit an AJAX request
|
|
makeAJAXCall
|
Renders the JavaScript code that will submit an AJAX request
|
|
span
|
Renders a span element that when clicked will execute a JsCmd
|
|
ajaxCall
|
Renders the JavaScript code that will submit an AJAX request but it will also send the value returned by the JsExp provided.
|
|
ajaxInvole
|
Similar to ajaxCall but there is no value to be computed and sent to the server
|
|
toggleKids
|
Provides the toggle effect on an element. When clicked it will also send an AJAX call
|
|
ajaxText
|
Renders an input text element that will send an AJAX request on blur.
|
|
jsonText
|
Renders an input type text element the will send a JSON request on blur.
|
|
ajaxCheckbox
|
Renders a checkbox element that when clicked will send an AJAX call
|
|
ajaxSelect
|
Renders a select element then sends an AJAX call when the value changes
|
|
ajaxForm
|
Wraps a NodeSeq that represents the form’s content and makes an AJAX call when the form is submitted.
|
|
jsonForm
|
Similar to ajaxForm, but on the client side, the form is JSONified and the JSON content sent to the server and processed by JsonHandler
|
|
swappable
|
Renders a span that contains one visible element and the other hidden. When the visible element is clicked it will be hidden and the other one will be shown
|
11.5 Comet and Lift
Figure
c↑ diagrams the interaction between client and server in the Comet. model. There are several resources on the web that explain the history and specific techniques related to Comet, so we won’t get too detailed here. In essence Comet is not a technology but a technique which allows a web application to push messages from server to client. There are a couple of approaches used to make this work, but the approach that Lift uses is long polling, so that’s what we’ll be covering here. As an example, consider a web chat application where you can chat real-time with friends. Let’s take a quick look at how receiving a message using Comet works in Lift:
-
The client sends an AJAX request to the server asking for any new messages.
-
The server does not respond immediately but waits until there is a message that needs to be sent for that client.
-
When a message is available, the server responds to the initial request from the client with the new message(s).
-
The client receives the response, processes it, and issues another AJAX request, and the process continues.
Of course, things are more complicated then that. For instance, it may take a while until the response is actually returned to the client. During this delay, the connection could be dropped for any number of reasons. The client should be smart enough to re-establish the connection automatically. But there is another problem - scalability. If we have these long-running connections, the server would typically put the processing threads into a waiting state until messages are available to send back to the client. Having many waiting threads is a scalability killer because numerous threads from the web container’s thread pool will lie in the wait state doing nothing until, before you know it, your entire thread pool is empty. The immediate consequence is that your server can not do any other request processing. Because of this, a thread-per-connection approach combined with long-running connections is totally unacceptable.
The key to scalability is NON-BLOCKING IO. Most operating systems support non-blocking I/O, which actually means that when you utilize an I/O resource for reading or writing (say the streams from a socket) there is no blocking operation. So if you read from a stream your read function would immediately return regardless of whether there is data available or not. In Java, non-blocking I/O is provided by the Java New I/O (NIO) library using Selectors and perhaps the Reactor pattern. This has a major impact on scalability because the threads are only held as long as there is work to do. Once they’re finished with the available data, they are returned to the thread pool so that they may be reused for processing other requests. In this model the threads are allocated to connections only when data is available for processing, which inherently leads to better resource utilization.
Note: This is somewhat off-topic, but if you’re looking to do a lot of work with NIO and networking, we recommend looking at the Apache MINA project at
http://mina.apache.org/. MINA provides some nice abstractions for NIO that allows you use a stateful approach to developing NIO applications without having to deal with a lot of the underlying details of using NIO.
Having nonblocking I/O enabled by the web container also has a major impact on application scalability with regard to long-lived connections from client to server. In addition, the Lift framework has support for Jetty Continuations, which work like this:
-
You application receives a request and wants to wait to respond, as there is no message yet.
-
You call suspend on the Jetty Continuation object. Here, Jetty will throw a special exception that will be caught in the container. The current thread is immediately returned to the thread pool, so it can process other requests.
-
Assume that, after a while, you have a message for that particular client. You call resume on the same Continuation object. This time, Jetty will actually replay the initial HTTP request, and your servlet behaves like that request was just received from the client and, of course, returns the appropriate response.
If you run your Lift application in a Jetty container, Lift will automatically detect that and utilize the Continuation mechanism. Currently, on other containers, Comet in Lift will still work but won’t scale as well because Continuations aren’t supported. However, the Servlet 3.0 spec contains a more generic facility, called Suspended Requests, that will make this feature usable across a variety of containers.
11.5.1 Actors in Scala
It is important to understand that Comet support in Lift is primarily driven via Scala Actors. We won’t go into too much detail regarding Scala Actors, as you can find very detailed information in the paper by Philipp Haller, Actors that Unify Threads And Events.
Scala Actors are based on the concepts of the Erlang Actors model where an Actor is an asynchronous component that receives messages and sends or replies to messages. In Erlang, processes communicate via a very simple and effective messaging system built into the VM.
In Scala, however, Actors are supported at the library level and not at the language level. While less integrated, this does provide greater flexibility as the Actors library evolution does not impact the language itself. Since Scala typically sits on top of the JVM, Scala Actors are not bound to processes but rather to JVM threads. The key to understanding the scalability of Scala Actors is that there is no one-to-one relationship between Actors and Threads. For instance, when an Actor is waiting for a message we don’t end up having a thread waiting for a lock. Instead, the Actor body is impersonated by a closure that captures the rest of the computation. This closure is ’cached’ internally until a message is designated for this Actor to consume. In particular, Scala’s Actor library leverages the match construct to allow very fine-grained selection of messages for processing. Another interesting note is that the Actor body (react function) never returns normally; in fact, the return type of the react function is Nothing.
Let’s take a look on a simple Actor-based example in Listing
11.5.1↓:
import scala.actors._
import scala.actors.Actor._
object PingPong extends Application {
var count = 0;
val pong = actor {
loop {
react {
case Ping => println("Actor Pong Received Ping")
sender ! Pong
case Stop => println("Stopping Pong")
exit()
}
}
}
val ping = actor {
pong ! Ping
loop {
react {
case Pong => println("Actor Ping Received Pong")
count = count + 1;
if (count < 3) {
sender ! Ping
} else {
sender ! Stop
println("Stopping Ping")
exit()
}
}
}
}
}
case object Ping
case object Pong
case object Stop
This is a trivial example in which we have two Actors exchanging Ping, Pong and Stop messages (note that the messages are case objects for pattern matching purposes). Also note that we did not explicitly used threads anywhere. We also did not use any thread blocking technique such as synchronized blocks. The reason is that we don’t have to. Actors’ message-passing mechanism is generally thread-safe (although deadlock is still possible due to dependent Actors). Note that threads are used internally and in this specific example the execution may even occur on the same thread. The reason is that internally the Actors library uses a thread pool, and when an Actor receives a message the execution occurs in a thread from the thread pool. This is also a key to Actors’ scalability, because they allow threads to be used very efficiently and returned to the pool as soon as the Actor consumes the message.
Getting deeper into the details of actions is beyond the scope of this book, but we recommend that you read other materials in order to fully understand Scala actors. In particular, Philipp Haller has a nice page summarizing papers and tutorials on actors at
http://lamp.epfl.ch/~phaller/actors.html.
11.5.2 Building a Comet Application in Lift
As we have seen, Comet support in Lift is provided by Scala Actors. Lift greatly simplifies the use of Actors by providing a CometActor trait that does almost all the work. You simply extend CometActor with your own class and fill in some implementation methods.
Note that your CometActor classes needs to exist in a comet subpackage as configured by LiftRules.addToPackages. For example, if you call LiftRules.addToPackages(“com.myapp”) in your boot method, your comet actors must exist in the com.myapp.comet package.
Let’s take a look at a simple example. Let’s say that we want to build a Clock snippet where the server will update the client page with the current server time every 10 seconds. First, we need a template, as shown in Listing
11.5.2↓.
Comet Clock markup example
<lift:surround with="default" at="content">
<lift:comet type="Clock" name="Other">
Current Time: <clk:time>Missing Clock</clk:time>
</lift:comet>
</lift:surround>
In our template, we use the
<lift:comet> tag to bind the
CometActor to the portion of the template where it will render content, and the body of the
<lift:comet> tag is quite similar to the body of a snippet. The
<clk:time> tag will be bound by the
Clock actor. The
type attribute tells Lift which
CometActor to call, and the
name attribute is the name of this
CometActor. The
name attribute is a discriminator that allows you to have more then one
CometActor of the same type on a given page. Next, we need to define our actor as shown in Listing
11.5.2↓.
Clock Comet Actor example
package com.myapp.comet
class Clock extends CometActor {
override def defaultPrefix = Full("clk")
def render = bind("time" -> timeSpan)
def timeSpan = (<span id="time">{timeNow}</span>)
// schedule a ping every 10 seconds so we redraw
ActorPing.schedule(this, Tick, 10000L)
override def lowPriority : PartialFunction[Any, Unit] = {
case Tick => {
println("Got tick " + new Date());
partialUpdate(SetHtml("time", Text(timeNow.toString)))
// schedule an update in 10 seconds
ActorPing.schedule(this, Tick, 10000L)
}
}
}
case object Tick
First, our actor defines the default prefix, which should be used for all nodes that will be bound inside <lift:comet> tag. In our case, we’re using the clk prefix.
Next, we have the render function where we do the binding between the <clk:time> node and the result of the timespan function. Basically, the <clk:time> node will be replaced by the span element returned by the timespan function. It is important to note that Comet content rendered by the <lift:comet> tag is a <span> tag by default. This default can be changed by overriding the parentTag function in your comet actor.
timeNow is a function from the net.liftweb.util.TimeHelpers trait that returns the current system time. We use the net.liftweb.util.ActorPing.schedule method to send a Tick message back to our actor after 10 seconds. This method is part of the the Clock class default constructor, and therefore will be called when the Clock class is instantiated.
Finally, we have the lowPriority function that returns a PartialFunction. To process messages in your CometActor, you can override the following functions: highPriority,
mediumPriority, and lowPriority. This multiplicity of functions is just a way of prioritizing application messages. The only thing that we do here is to pattern match the messages. In this simple example, we have only the Tick object. When a Tick is sent by the ActorPing, our code gets executed and the following actions occur:
-
We print the current time to the console (just for fun)
-
We call partialUpdate function. With a partial update we can update specific fragments on the client side and not actually re-render the entire content that the CometActor may produce. This optimization allows us to send something very specific to be updated on the client side. If we call reRender(true) instead, the entire real estate on the client side will be re-rendered. Getting back to our partialUpdate call, we are basically sending a JsCmd that we use to set the XHTML content for the element that has the id “time”. This is the span element returned by the timeSpan function. Since partialUpdate takes a JsCmd, you can use it to do just about anything on the client side accessible from JavaScript.
-
We tell ActorPing to send another Tick message after 10 seconds.
As you have seen, with just a few lines of code, we were able to create a Clock application in which the server updates the client every 10 seconds. Of course, this is just a trivial example, but now, you should have a clear picture of how CometActor works, so you can build more complex cases for your Lift application.
Note: As described earlier It is also possible to use notices (notice/warning/error) from your comet actor. The CometActor trait already has notice, warning and error methods on it that will properly handle sending these messages to the client. Do not use the notice/warning/error methods on S, since they assume a stateful response and will not work from within a Comet callback.
11.6 Coordinating Between Multiple Comet Clients
So far, our example has only shown a self-contained
CometActor for the clock. But what if we want to have interaction between different clients? Scala’s actors are still the answer, but with a twist—we can use a singleton actor object that coordinates with the CometActor objects so that it can send messages to all of them. First, we define our singleton actor, as shown in Listing
11.6↓.
case class SubscribeClock(clock : Clock)
case class UnsubClock(clock : Clock)
object ClockMaster extends Actor {
private var clocks : List[Clock] = Nil
def act = loop {
react {
case SubscribeClock(clk) =>
clocks ::= clk
case UnsubClock(clk) =>
clocks -= clk
case Tick =>
clocks.foreach(_ ! Tick)
}
}
}
We’ve defined two case classes representing messages for subscribing and unsubscribing to the
ClockMaster actor. The
ClockMaster itself is a simple Actor (not a
CometActor) that defines a simple message loop. It can either subscribe a new clock, unsubscribe to an existing clock, or distribute a Tick to all subscribed clocks. The other half of this equation slightly modifies our Clock class (as shown in Listing
11.6↓) so that it subscribes and unsubscribes to the ClockMaster at initialization and shutdown, respectively.
...
override def localSetup {
ClockMaster ! SubscribeClock(this)
super.localSetup()
}
override def localShutdown {
ClockMaster ! UnsubClock(this)
super.localShutdown()
}
Now, we can add an AJAX button (to an administration page, of course) that would allow the administrator to update everyone’s clocks at once. Listing
11.6↓ shows how we would bind in the button.
bind("admin", xhtml, "tick" ->
SHtml.ajaxButton("Tock!", {
() => ClockMaster ! Tick
}))
Here’s what’s happening behind the scenes in our modified Clock application. Lift first identifies a Comet request by matching against the path given by the LiftRules.cometPath variable. Essentially the flow is as follows:
-
Lift gets a Comet request.
-
Lift checks the CometActors to see if there are any messages. If there are no messages to be sent to this client, and the application is running in a Jetty container, the Jetty continuation is suspended, but no response is actually sent to client.
-
Later, when your Comet actor is asked to render or partially update, the response is calculated, and the Jetty continuation is resumed.
-
When Lift gets the resumed request from the container it returns the response calculated by the CometActor to the client.
Note that CometActors work even if you are not using Jetty container; the only issue is that you won’t benefit from the improved scalability of the suspend/resume mechanism offered by the Jetty container.
In this chapter, we explored how easily you can create AJAX and Comet interfaces in Lift. We discussed the underlying techniques used for AJAX and Comet, as well as how Lift provides support functions and classes to simplify writing apps that utilize these techniques. We showed examples of how to use the SHtml object to create AJAX-enabled form elements and how to customize things like the AJAX request path in Lift. We reviewed Scala actors and how the CometActor trait is used to make a Comet event handler. We also discussed how Lift works to alleviate scalability issues with Comet on supported containers. Finally, we wrote a simple Clock application and showed how you can mix AJAX and Comet in the same application.
12 JPA Integration
This chapter is still under active development. The contents will change.
The Java Persistence API, or JPA
↓ for short, is the evolution of a number of frameworks in Java to provide a simple database access layer for plain java objects (and, transitively, Scala objects). JPA was developed as part of the Enterprise Java Beans 3 (EJB3) specification, with the goal of simplifying the persistence model. Prior versions had used the Container Managed Persistence (CMP
↓) framework, which required many boilerplate artifacts in the form of interfaces and XML descriptors. As part of the overarching theme of EJB3 to simplify and use convention over configuration, JPA uses sensible defaults and annotations
↓ heavily, while allowing for targetted overrides of behavior via XML descriptors. JPA also does away with many of the interfaces used in CMP and provides a single
javax.persistence.EntityManager↓ class for all persistence operations. An additional benefit is that JPA was designed so that it could be used both inside and outside of the Enterprise container, and several projects (Hibernate
↓, TopLink
↓, JPOX
↓, etc) provide standalone implementations of
EntityManager.
As we’ve seen in chapter
8↑, Lift already comes with a very capable database abstraction layer, so why would we want to use something else? There are a number of reasons:
-
JPA is easily accessible from both Java and Scala. If you are using Lift to complement part of a project that also contains Java components, JPA allows you to use a common database layer between both and avoid duplication of effort. It also means that if you have an existing project based on JPA, you can easily integrate it into Lift
-
JPA gives you more flexibility with complex and/or large schemas. While Lift’s Mapper provides most of the functionality you would need, JPA provides additional lifecycle methods and mapping controls when you have complex needs. Additionally, JPA has better support for joins and relationships between entities.
-
JPA can provide additional performance improvements via second-level object caching. It’s possible to roll your own in Lift, but JPA allows you to cache frequently-accessed objects in memory so that you avoid hitting the database entirely
12.1 Introducing JPA
In order to provide a concrete example to build on while learning how to integrate JPA, we’ll be building a small Lift app to manage a library of books. The completed example is available under the Lift Git
↓ repository in the sites directory, and is called “JPADemo”. Basic coverage of the JPA operations is in section
12.5 on page 1↓; if you want more detail on JPA, particularly with advanced topics like locking and hinting, there are several very good tutorials to be found online. Our first step is to set up a master project
↓ for Maven. This project will have two modules under it, one for the JPA library and one for the Lift application. In a working directory of your choosing, issue the following command:
mvn archetype:generate \
-DarchetypeRepository=http://scala-tools.org/repo-snapshots \
-DarchetypeGroupId=net.liftweb \
-DarchetypeArtifactId=lift-archetype-jpa-basic \
-DarchetypeVersion=1.1-SNAPSHOT \
-DgroupId=com.foo.jpaweb \
-DartifactId=JPADemo \
-Dversion=1.0-SNAPSHOT
This will use the JPA archetype to create a new project for you with modules for the persistence and web portions of the project.
Note: The reason we have split the module out into two projects is that it aids deployment on Jave EE servers to have the Persistence module be an independent JAR file. If you don’t need that, you can simply merge the contents of the two modules into a single project and it will work standalone. Note that you’ll need to merge the pom.xml file’s dependencies and plugin configurations from all three POMs. Lift comes with an archetype that handles this already, albeit without the demo code we show here. Simply use the lift-archetype-jpa-blank-single archetype and you’ll get a blank project (with minimal files for JPA and Lift) that you can use for your app. There’s also a blank archetype that uses two modules if you want that, called lift-archetype-jpa-blank.
You will get a prompt asking you to confirm the settings we’ve chosen; just hit <enter>. As of this writing we have to use the snapshot version of the archetype because it didn’t make the Lift 1.0 deadline, but otherwise it’s a stable archetype. You will also see some Velocity warnings about invalid references; these can be safely ignored and will hopefully be fixed by 1.1. After the archetype is generated, you should have the following tree structure:
JPADemo
|-- README
|-- pom.xml
|-- spa
| |-- pom.xml
| ‘-- src ...
‘-- web
|-- pom.xml
‘-- src ...
If you look at the source directories, you’ll see that our code is already in place! If you’re making your own application you can either use the previously mentioned blank archetypes to start from scratch, or use the basic archetype and modify the POMs, Scala code and templates to match your needs. For now, let’s go over the contents of the project.
12.1.1 Using Entity Classes↓ in Scala
The main components of a JPA library are the entity classes that comprise your data model. For our example application we need two primary entities: Author and Book. Let’s take a look at the Author class first, shown in listing
G.1.1 on page 1↓. The listing shows our import of the entire javax.persistence package as well as several annotations on a basic class. For those of you coming from the Java world in JPA, the annotations should look very familiar. The major difference between Java and Scala annotations is that each parameter in a Scala annotation is considered a val, which explains the presence of the val keyword in lines 12, 15 and 17-18. In line 17 you may also note that we must specify the target entity class; although Scala uses generics, the generic types aren’t visible from Java, so the Java JPA libraries can’t deduce the correct type. You may also notice that on line 18 we need to use the Java collections classes for Set, List, etc. With a little bit of implicit conversion magic (to be shown later), this has very little impact on our code. On final item item to note is that the Scala compiler currently does not support nested annotations , so where we would normally use them (join tables, named queries, etc), we will have to use the orm.xml descriptor, which we cover next.
12.1.2 Using the orm.xml↓ descriptor
As we stated in the last section, there are some instances where the Scala compiler doesn’t fully cover the JPA annotations (nested annotations in particular). Some would also argue that queries and other ancillary data (table names, column names, etc) should be separate from code. Because of that, JPA allows you to specify an external mapping descriptor to define and/or override the mappings for your entity classes
↓. The basic orm.xml file starts with the DTD type declaration, as shown in listing
G.1.2 on page 1↓. Following the preamble, we can define a package that will apply to all subsequent entries so that we don’t need to use the fully-qualified name for each class. In our example, we would like to define some named queries for each class. Putting them in the orm.xml allows us to modify them without requiring a recompile. The complete XML Schema Definition can be found at
http://java.sun.com/xml/ns/persistence/orm_1_0.xsd.
In this case we have used the orm.xml file to augment our entity classes. If, however, we would like to override the configuration, we may use that as well on a case-by-case basis. Suppose we wished to change the column name for the Author’s
name property. We can add (per the XSD) a section to the Author entity element as shown in listing
12.1.2↓. The
attribute-override element lets us change anything that we would normally specify on the
@Column annotation. This gives us an extremely powerful method for controlling our schema mapping outside of the source code. We can also add named queries
↓ in the orm.xml so that we have a central location for defining or altering the queries.
<entity class="Author">
<named-query name="findAllAuthors">
<query><![CDATA[from Author a order by a.name]]></query>
</named-query>
<attribute-override name="name">
<column name="author_name" length="30" />
</attribute-override>
</entity>
12.1.3 Working with Attached and Detached Objects
JPA operates with entities in one of two modes: attached and detached. An attached object is one that is under the direct control of a live JPA session. That means that the JPA provider monitors the state of the object and writes it to the database at the appropriate time. Objects can be attached either explicitly via the
persist and
merge methods (section
12.5.1↓), or implicitly via query results, the
getReference method or the
find method.
As soon as the session ends, any formerly attached objects are now considered detached. You can still operate on them as normal objects but any changes are not directly applied to the database. If you have a detached object, you can re-attach it to your current session with the merge method; any changes since the object was detached, as well as any subsequent changes to the attached object, will be applied to the database at the appropriate time. The concept of object attachment is particularly useful in Lift because it allows us to generate or query for an object in one request cycle and then make modifications and merge in a different cycle.
As an example, our library application provides a summary listing of authors on one page (
src/main/webapp/authors/list.html) and allows editing of those entities on another (
src/main/webapp/authors/add.html). We can use the
SHtml.link generator on our list page, combined with a
RequestVar, to pass the instance (detached once we return from the list snippet) to our edit snippet. Listing
12.1.3↓ shows excerpts from our library application snippets demonstrating how we hand off the instance and do a merge within our edit snippets submission processing function (
doAdd).
Passing Detached Instances Around an Application
// in src/main/scala/net/liftweb/jpademo/snippets/Author.scala
...package and imports ...
class AuthorOps {
def list (xhtml : NodeSeq) : NodeSeq = {
val authors = ...
authors.flatMap(author => bind("author", xhtml, ...
// use the link closure to capture the current
// instance for edit insertion
"edit" -> SHtml.link("add.html",
() => authorVar(author), Text(?("Edit")))))
}
...
// Set up a requestVar to track the author object for edits and adds
object authorVar extends RequestVar(new Author())
// helper def
def author = authorVar.is
def add (xhtml : NodeSeq) : NodeSeq = {
def doAdd () = {
...
// merge and save the detached instance
Model.mergeAndFlush(author)
...
}
// Hold a val here so that the closure grabs it instead of the def
val current = author
// Use a hidden element to reinsert the instance on form submission
bind("author", xhtml,
"id" -> SHtml.hidden(() => authorVar(current)), ...,
"submit" -> SHtml.submit(?("Save"), doAdd))
}
}
12.2 Obtaining a Per-Session EntityManager
Ideally, we would like our JPA access to be as seamless as possible, particularly when it comes to object lifecycle. In JPA, objects can be attached to a current persistence session, or they can be detached from a JPA session. This gives us a lot of flexibility (which we’ll use later) in dealing with the objects themselves, but it also means that we need to be careful when we’re accessing object properties. JPA can use lazy retrieval for instance properties; in particular, this is the default behavior for collection-based properties. What this means is that if we’re working on a detached object and we attempt to access a collection contained in the instance, we’re going to get an exception that the session that the object was loaded in is no longer live. What we’d really like to do is have some hooks into Lift’s request cycle that allows us to set up a session when the request starts and properly close it down when the request ends. We still have to be careful with objects that have been passed into our request (from form callbacks, for instance), but in general this will guarantee us that once we’ve loaded an object in our snippet code we have full access to all properties at any point within our snippets.
Fortunately for us, Lift provides just such a mechanism. In fact, Lift supports several related mechanisms for lifecycle management, but for now we’re going to focus on just one: the
RequestVar↓. A
RequestVar represents a variable associated with the lifetime of the request. This is in contrast to
SessionVar, which defines a variable for the lifetime of the user’s session.
RequestVar gives us several niceties over handling request parameters ourselves, including type safety and a default value. We go into more detail on
RequestVars and
SessionVars in section
3.11 on page 1↑. In addition to the Lift facilities, we also use the ScalaJPA project to handle some of the boilerplate of utilizing JPA. ScalaJPA provides some nice traits that “Scalafy” the JPA
EntityManager and
Query interfaces, as well as accessors that make retrieving an EM simple. To use ScalaJPA we simply add the following dependency to our POM.
<dependency>
<groupId>org.scala-tools</groupId>
<artifactId>scalajpa</artifactId>
<version>1.0-SNAPSHOT</version>
</dependency>
Note that at the time of writing the library is at 1.0-SNAPSHOT, but should be promoted to 1.0 soon.
We leverage ScalaJPA’s
LocalEMF and
RequestVarEM traits to provide a simple
RequestVar interface to obtain the EM via local lookup (i.e. via the
javax.persistence.Persistence class), as shown in listing
12.2 on page 1↓. It’s trivial to use JNDI instead by substituting the
JndiEMF trait for the
LocalEMF trait, but the details of setting up the JNDI persistence module are beyond the scope of this book.
Setting up an EntityManager via RequestVar
import _root_.org.scala_libs.jpa._
object Model extends LocalEMF("jpaweb") with RequestVarEM
Once we have this object set up, we can access all of the ScalaEntityManager methods directly on Model.
12.3 Handling Transactions↓
We’re not going to go into too much detail here; there are better documents available if you want to go into depth on how the Java Transaction API (JTA) or general transactions work. Essentially, a transaction is a set of operations that are performed atomically; that is, they either all complete successfully or none of them do. The classic example is transferring funds between two bank accounts: you subtract the amount from one account and add it to the other. If the addition fails and you’re not operating in the context of a transaction, the client has lost money!
In JPA, transactions are required. If you don’t perform your operations within the scope of a transaction you will either get an exception (if you’re using JTA), or you will spend many hours trying to figure out why nothing is being saved to the database. There are two ways of handling transactions under JPA: resource local and JTA. Resource local transactions are what you use if you are managing the EM factory yourself (corresponding to the LocalEMF trait). Similarly, JTA is what you use when you obtain your EM via JNDI. Technically it’s also possible to use JTA with a locally managed EM, but that configuration is beyond the scope of this book.
Generally, we would recommend using JTA where it’s free (i.e., when deploying to a Java EE container) and using resource-local when you’re using a servlet container such as Jetty or Tomcat. If you will be accessing multiple databases or involving resources like EJBs, it is much safer to use JTA so that you can utilize distributed transactions. Choosing between the two is as simple as setting a property in your persistence.xml file (and changing the code to open and close the EM). Listing
12.3↓ shows examples of setting the
transaction-type attribute to
RESOURCE_LOCAL and to JTA. If you want to use JTA, you can also omit the
transaction-type attribute since JTA is the default.
Setting the transaction type
<persistence-unit name="jpaweb" transaction-type="RESOURCE_LOCAL">
<non-jta-datasource>myDS</non-jta-datasource>
<persistence-unit name="jpaweb" transaction-type="JTA">
<jta-datasource>myDS</jta-datasource>
You must make sure that your EM setup code matches what you have in your
persistence.xml. Additionally, the database connection must match; with JTA, you
must use a
jta-data-source (obtained via JNDI) for your database connection. For resource-local, you can either use a
non-jta-datasource element or you can set the provider properties, as shown in listing
12.3 on page 1↓. In this particular example we’re setting the properties for Hibernate, but similar properties exist for TopLink, JPOX, and others.
If you’ll be deploying into a JEE container, such as JBoss or GlassFish, then you get JTA support almost for free since JTA is part of the JEE spec. If you want to deploy your application on a lightweight container like Jetty or Tomcat, we would recommend that you look into using an external JTA coordinator such as JOTM, Atomikos, or JBoss Transaction Manager, since embedding a JTA provider in your container is a nontrivial task.
Setting resource-local properties for Hibernate
<persistence>
<persistence-unit name="jpaweb" transaction-type="RESOURCE_LOCAL">
<properties>
<property name="hibernate.dialect" value="org.hibernate.dialect.PostgreSQLDialect"/>
<property name="hibernate.connection.driver_class" value="org.postgresql.Driver"/>
<property name="hibernate.connection.username" value="somUser"/>
<property name="hibernate.connection.password" value="somePass"/>
<property name="hibernate.connection.url" value="jdbc:postgresql:jpaweb"/>
</properties>
</persistence-unit>
</persistence>
One final note in regard to transactions is how they’re affected by Exceptions. Per the spec, any exceptions thrown during the scope of a transaction, other than
javax.persistence.NoResultException or javax.persistence.NonUniqueResultException, will cause the transaction to be marked for rollback.
12.4 ScalaEntityManager and ScalaQuery
Now that we’ve gone through setting up our
EntityManager, let’s look at how we actually use them in an application. As a convenience, ScalaJPA defines two thin wrappers on the existing
EntityManager and
Query interfaces to provide more Scala-friendly methods. This means that we get Scala’s collection types (i.e.
List instead of
java.util.List) and generic signatures so that we can avoid explicit casting. The
ScalaEntityManager trait provides a wrapper on the
EntityManager class, and is included as part of the
RequestVarEM trait that we’ve mixed into our
Model object. The API for
ScalaEntityManager can be found at
http://scala-tools.org/mvnsites/scalajpa/scaladocs/org/scala_libs/jpa/ScalaEntityManager.html.
Next, we have the
ScalaQuery trait, with API docs at
http://scala-tools.org/mvnsites/scalajpa/scaladocs/org/scala_libs/jpa/ScalaQuery.html. Like
ScalaEntityManager, this is a thin wrapper on the
Query interface. In particular, methods that return entities are typed against the
ScalaQuery itself, so that you don’t need to do any explicit casting in your client code. We also have some utility methods to simplify setting a parameter list as well as obtaining the result(s) of the query.
12.5 Operating on Entities
In this section we’ll demonstrate how to work with entities and cover some important tips on using JPA effectively.
12.5.1 Persisting, Merging and Removing Entities
The first step to working with any persistent entities is to actually persist them. If you have a brand new object, you can do this with the persist method:
val myNewAuthor = new Author; myNewAuthor.name = "Wilma"
Model.persist(myNewAuthor)
This attaches the
myNewAuthor object to the current persistence session. Once the object is attached it should be visible in any subsequent queries, although it may not be written to the database just yet (see section
12.5.6↓). Note that the
persist method is only intended for brand new objects. If you have a detached object and you try to use
persist you will most likely get an
EntityExistsException as the instance you’re merging is technically conflicting with itself. Instead, you want to use the
merge method to re-attach detached objects:
val author = Model.merge(myOldAuthor)
An important thing to note is that the merge method doesn’t actually attach the object passed to it; instead, it makes an attached copy of the passed object and returns the copy. If you mistakenly merge without using the returned value:
Model.merge(myOldAuthor)
myOldAuthor.name = “Fred”
you’ll find that subsequent changes to the object won’t be written to the database. One nice aspect of the merge method is that it intelligently detects whether the entity you’re merging is a new object or a detached object. That means that you can use merge everywhere and let it sort out the semantics. For example, in our library application, using merge allows us to combine the adding and editing functionality into a single snippet; if we want to edit an existing Author we pass it into the method. Otherwise, we pass a brand new Author instance into the method and the merge takes care of either case appropriately.
Removing an object is achieved by calling the remove method:
Model.remove(myAuthor)
The passed entity is detached from the session immediately and will be removed from the database at the appropriate time. If the entity has any associations on it (to collections or other entities), they will be cascaded as indicated by the entity mapping. An example of a cascade is shown in the
Author listing on page
1↓. The books collection has the cascade set to REMOVE, which means that if an author is deleted, all of the books by that author will be removed as well. The default is to not cascade anything, so it’s important that you properly set the cascade on collections to avoid constraint violations when you remove entities. It’s also useful to point out that you don’t actually need to have an entity loaded to remove it. You can use the
getReference method to obtain a proxy that will cause the corresponding database entry to be removed:
Model.remove(Model.getReference(classOf[Author], someId))
12.5.2 Loading an Entity
There are actually three ways to load an entity object in your client code: using find, getReference or a query. The simplest is to use the find method:
val myBook = Model.find(classOf[Book], someId)
The
find method takes two parameters: the class that you’re trying to load and the value of the ID field of the entity. In our example, the
Book class uses the
Long type for its ID, so we would put a
Long value here. It returns either a
Full Box (section
C.2 on page 1↓) if the entity is found in the database, otherwise it returns
Empty. With
find, the entity is loaded immediately from the database and can be used in both attached and detached states.
The next method you can use is the getReference method:
val myBook = Model.getReference(classOf[Book], someId)
This is very similar to the find method with a few key differences. First, the object that is returned is a lazy proxy for the entity. That means that no database load is required to occur when you execute the method, although providers may do at least a check on the existence of the ID. Because this is a lazy proxy, you usually don’t want to use the returned object in a detached state unless you’ve accessed its fields while the session was open. The normal use of getReference is when you want to set up a relationship between two (or more) entities, since you don’t need to query all of the fields just to set a foreign key. For example:
myBook.author = Model.getReference(classOf[Author], authorId)
When myBook is flushed to the database the EM will correctly set up the relationship. The final difference is in how unknown entities are handled. Recall that the find method returns Empty if the entity cannot be found; with getReference, however, we don’t query the database until the reference is used. Because of this, the javax.persistence.EntityNotFoundException is thrown when you try to access an undefined entity for the first time (this also marks the transaction for rollback).
The third method for loading an entity would be to use a query (named or otherwise) to fetch the entity. As an example, here’s a query equivalent of the find method:
val myBook =
Model.createQuery[Book]("from Book bk where bk.id = :id")
.setParams("id" -> someId).findOne
The advantage here is that we have more control over what is selected by using the query language to specify other properties. One caveat is that when you use the findOne method you need to ensure that the query will actually result in a unique entity; otherwise, the EM will throw a NonUniqueResultException.
12.5.3 Loading Many Entities
Corresponding to the findOne method is the findAll method, which returns all entities based on a query. There are two ways to use findAll; the first is to use the convenience findAll method defined in the ScalaEntityManager class:
val myBooks = Model.findAll("booksByYear", "year" -> myYear)
This requires the use of a named query for the first arg, and subsequent args are of the form (“paramName” -> value). Named queries
↓ can be defined in your orm.xml
↓, as shown in section
12.1.2 on page 1↑. Named queries are highly recommended over ad-hoc queries since they allow you to keep the queries in one location instead of being scattered all over your code. Named queries can also be pre-compiled by the JPA provider, which will catch errors at startup (or in your unit tests, hint hint) instead of when the query is run inside your code.
The second method is to create a ScalaQuery instance directly and then set parameters and execute it. In reality this is exactly what the Model.findAll method is doing. The advantage here is that with the ScalaQuery instance you can do things like set hinting, paging, and so on. For instance, if you wanted to do paging on the books query, you could do
val myBooks = Model.createNamedQuery(“booksByYear”)
.setParams(“year” -> myYear)
.setMaxResults(20)
.setFirstResult(pageOffset).findAll
12.5.4 Using Queries Wisely
In general we recommend that you use named queries throughout your code. In our experience, the extra effort involved in adding a named query is more than offset by the time it saves you if you ever need to modify the query. Additionally, we recommend that you use named parameters in your queries. Named parameters are just that: parameters that are inserted into your query by name, in contrast to positional parameters. As an example, here is the same query using named and positional parameters:
Named parametersselect user from User where (user.name like :searchString or user.email like :searchString) and user.widgets > :widgetCount
Positional parametersselect user from User where (user.name like ? or user.email like ?) and user.widgets > ?
This example shows several advantages of named parameters over positional parameters:
-
You can reuse the same parameter within the same query and you only set it once. In the example about we would set the same parameter twice using positional params
-
The parameters can have meaningful names.
-
With positional params you may have to edit your code if you need to alter your query to add or remove parameters
In any case, you should generally use the parameterized query types as opposed to hand constructing your queries; using things like string concatenation opens up your site to SQL injection attacks unless you’re very careful. For more information on queries there’s an excellent reference for the EJBQL on the Hibernate website at
http://www.hibernate.org/hib_docs/entitymanager/reference/en/html/queryhql.html.
12.5.5 Converting Collection Properties
The
ScalaEntityManager and
ScalaQuery methods are already defined so that they return Scala-friendly collections such as
scala.collection.jcl.BufferWrapper or
SetWrapper. We have to use Java Collections “under the hood” and then wrap them because JPA doesn’t understand Scala collections. For the same reason, collections in your entity classes must also use the Java Collections classes. Fortunately, Scala has a very nice framework for wrapping Java collections. In particular, the
scala.collection.jcl.Conversions class contains a number of implicit conversions
↓; all you have to do is import them at the top of your source file like so:
import scala.collection.jcl.Conversions._
Once you’ve done that the methods are automatically in scope and you can use collections in your entities as if they were real Scala collections. For example, we may want to see if our Author has written any mysteries:
val suspenseful = author.books.exists(_.genre = Genre.Mystery)
12.5.6 The importance of flush() and Exceptions
It’s important to understand that in JPA the provider isn’t required to write to the database until the session closes or is flushed. That means that constraint violations aren’t necessarily checked at the time that you persist, merge or remove and object. Using the flush method forces the provider to write any pending changes to the database and immediately throw any exceptions resulting from any violations. As a convenience, we’ve written the
mergeAndFlush,
persistAndFlush, and
removeAndFlush methods to do persist, merge and remove with a subsequent flush, as shown in listing
12.5.6↓, taken from the Author snippet code. You can also see that because we flush at this point, we can catch any JPA-related exceptions and deal with them here. If we don’t flush at this point, the exception would be thrown when the transaction commits, which is often very far (in code) from where you would want to handle it.
def doAdd () = {
if (author.name.length == 0) {
error("emptyAuthor", "The author’s name cannot be blank")
} else {
try {
Model.mergeAndFlush(author)
redirectTo("list.html")
} catch {
case ee : EntityExistsException => error("Author already exists")
case pe : PersistenceException =>
error("Error adding author"); Log.error("Error adding author", pe)
}
}
}
Although the combo methods simplify things, we recommend that if you will be doing multiple operations in one session cycle that you use a single flush at the end:
val container = Model.find(classOf[Container], containerId)
Model.remove(container.widget)
container.widget = new Widget("Foo!")
// next line only required if container.widget doesn’t cascade PERSIST
Model.persist(container.widget)
Model.flush()
12.5.7 Validating Entities
Since we’ve already covered the Mapper framework and all of the extra functionality that it provides beyond being a simple ORM, we felt that we should discuss one of the more important aspects of data handling as it pertains to JPA: validation of data.
JPA itself doesn’t come with a built-in validation framework, although the upcoming JPA 2.0 may use the JSR 303 (Bean Validation) framework as its default. Currently, Hibernate Validator is one of the more popular libraries for validating JPA entities, and can be used with any JPA provider. More information is available at the project home page:
http://www.hibernate.org/412.html.
The validation of entities with Hibernate Validator is achieved, like the JPA mappings, with annotations. Listing
12.5.7↓ shows a modified Author class with validations for the name. In this case we have added a NotNull validation as well as a Length check to ensure we are within limits.
Note: Unfortunately, due to the way that the validator framework extracts entity properties, we have to rework our entity to use a getter/setter for any properties that we want to validate; even the scala.reflect.BeanProperty annotation won’t work.
Validation can be performed automatically via the org.hibernate.validator.event.JPAValidateListener EntityListener, or programmatically via the org.hibernate.validator.ClassValidator utility class. In the listing we use ClassValidator and match on the array returned from getInvalidValues for processing. Further usage and configuration is beyond the scope of this book.
The Author class with Hibernate Validations
...
class Author {
...
var name : String = ""
@Column{val unique = true, val nullable = false}
@NotNull
@Length{val min = 3, val max = 100}
def getName() = name
def setName(nm : String) { name = nm }
...
}
// In the snippet class
class AuthorOps {
...
val authorValidator = new ClassValidator(classOf[Author])
def add (xhtml : NodeSeq) : NodeSeq = {
def doAdd () = {
authorValidator.getInvalidValues(author) match {
case Array() =>
try {
Model.mergeAndFlush(author)
...
} catch {
...
}
case errors => {
errors.foreach(err => S.error(err.toString))
}
}
...
}
}
12.6 Supporting User Types
JPA can handle any Java primitive type, their corresponding Object versions (java.lang.Long, java.lang.Integer, etc), and any entity classes comprised of these types . Occasionally, though, you may have a requirement for a type that doesn’t fit directly with those specifications. One example in particular would be Scala’s enumerations
↓. Unfortunately, the JPA spec currently doesn’t have a means to handle this directly, although the various JPA providers such as Toplink and Hibernate provide mechanisms for resolving custom user types. JPA does provide direct support for
Java enumerations, but that doesn’t help us here since Scala enumerations aren’t an extension of Java enumerations. In this example, we’ll be using Hibernate’s
UserType to support an enumeration for the
Genre of a
Book.
We begin by implementing a few helper classes besides the Genre enumeration itself. First, we define an
Enumv trait, shown in listing
G.1.3 on page 1↓. Its main purpose is to provide a
valueOf method that we can use to resolve the enumerations database value to the actual enumeration. We also add some extra methods so that we can encapsulate a description along with the database value. Scala enumerations can use either
Ints or
Strings for the identity of the enumeration value (unique to each val), and in this case we’ve chosen
Strings. By adding a map for the description (since Scala enumeration values must extend the
Enumeration#Value class and therefore can’t carry the additional string) we allow for the additional info. We could extend this concept to make the
Map carry additional data, but for our purposes this is sufficient.
In order to actually convert the
Enumeration class into the proper database type (
String,
Int, etc), we need to implement the Hibernate
UserType interface, shown in listing
G.1.4 on page 1↓. We can see on line 18 that we will be using a
varchar column for the enumeration value. Since this is based on the Scala
Enumeration’s
Value method, we could technically use either
Integer or character types here. We override the
sqlTypes and
returnedClass methods to match our preferred type, and set the
equals and
hashCode methods accordingly. Note that in Scala, the “==” operator on objects delegates to the
equals method, so we’re not testing reference equality here. The actual resolution of database column value to
Enumeration is done in the
nullSafeGet method; if we decided, for instance, that the null value should be returned as unknown, we could do this here with some minor modifications to the
Enumv class (defining the unknown value, for one).The rest of the methods are set appropriately for an immutable object (
Enumeration). The great thing about the
EnumvType class, is that it can easily be used for a variety of types due to the “et” constructor argument; as long as we mix in the
Enumv trait to our
Enumeration objects, we get persistence essentially for free. If we determined instead that we want to use
Integer enumeration IDs, we need to make minor modifications to the
EnumvType to make sure arguments match and we’re set.
package com.foo.jpaweb.model
object Genre extends Enumeration with Enumv {
val Mystery = Value("Mystery", "Mystery")
val Science = Value("Science", "Science")
val Theater = Value("Theater", "Drama literature")
// more values here...
}
class GenreType extends EnumvType(Genre) {}
Finally, the
Genre object and the associated
GenreType is shown in listing
12.6↑. You can see that we create a singleton
Genre object with specific member values for each enumeration value. The
GenreType class is trivial now that we have the
EnumvType class defined. To use the
Genre type in our entity classes, we simply need to add the proper
var and annotate it with the
@Type annotation, as shown in listing
12.6↓. We need to specify the type of the var due to the fact that the actual enumeration values are of the type
Enumeration.Val, which doesn’t match our
valueOf method in the
Enumv trait. We also want to make sure we set the enumeration to some reasonable default; in our example we have an
unknown value to cover that case.
Using the @Type annotation
@Type{val ‘type‘ = "com.foo.jpaweb.model.GenreType"}
var genre : Genre.Value = Genre.unknown
12.7 Running the Application
Now that we’ve gone over everything, it’s time to run the application. Because we’ve split up the app into separate SPA and WEB modules, we need to first run
mvn install
From the SPA module directory to get the persistence module added to your maven repository. Once that is done, you can go to the WEB module directory and run
mvn jetty:run
To get it started.
12.8 Summing Up
As we’ve shown in this chapter, the Java Persistence API provides a robust, flexibile framework for persisting data to your database, and does so in a manner that integrates fairly well with Lift. We’ve demonstrated how you can easily write entities using a combination of annotations and the orm.xml descriptor, how to define your own custom user types to handle enumerations, the intricacies of working with transactions in various contexts, and leveraging the ScalaJPA framework to simplify your persistence setup.
13 Third Party Integrations
In this chapter we’ll explore how you can integrate Lift with some well-known third party libraries and applications
13.1 OpenID Integration
The OpenID Foundation explain OpenID as:
“OpenID eliminates the need for multiple usernames across different websites, simplifying your online experience.
You get to choose the OpenID Provider that best meets your needs and most importantly that you trust. At the same time, your OpenID can stay with you, no matter which Provider you move to. And best of all, the OpenID technology is not proprietary and is completely free. For businesses, this means a lower cost of password and account management, while drawing new web traffic. OpenID lowers user frustration by letting users have control of their login. For geeks, OpenID is an open, decentralized, free framework for user-centric digital identity. OpenID takes advantage of already existing internet technology (URI, HTTP, SSL, Diffie-Hellman) and realizes that people are already creating identities for themselves whether it be at their blog, photostream, profile page, etc. With OpenID you can easily transform one of these existing URIs into an account which can be used at sites which support OpenID logins.
OpenID is still in the adoption phase and is becoming more and more popular, as large organizations like AOL, Microsoft, Sun, Novell, etc. begin to accept and provide OpenIDs. Today it is estimated that there are over 160-million OpenID enabled URIs with nearly ten-thousand sites supporting OpenID logins.”
Lift provides openId support using onepID4Java. It provides two fundamental traits net.liftweb.openId.OpenIdVendor and net.liftweb.openId.OpenIdConsumer. OpenIdVendor contains variables such as:
-
PathRoot - The path sequence for processing OpenID requests. The default value is “openid”
-
LoginPath - The path sequence for processing login requests. The default value is “login”. The login path will be /openid/login
-
LogoutPath - The path sequence for processing logout requests. The default value is “logout”. The login path will be /openid/logour
-
ResponsePath - The path sequence for processing login requests. The default value is “response”. The login path will be /openid/response
-
PostParamName - The form parameter name containing the OpeID identity URL entered by the user
Also the vendor trait contains the loginForm function that returns the login form containing an input text field for the OpenID identity and the submit button. The form will point to /<PathRoot>/<LoginPath> where PathRoot and LoginPath are the variables described above. Here is an example:
OpenID example
// Your template
<lift:OpenID.form>
<openId:renderForm/>
</lift:OpenID.form>
// Your snippet
class OpenID {
def renderForm(xhtml: NodeSeq) : NodeSeq = {
SimpleOpenIdVendor.loginForm
}
}
class Boot {
...
// This is needed in order to process the login and logout requests and also to process
// the response comming from OpenID provider
LiftRules.dispatch.append(SimpleOpenIdVendor.dispatchPF)
...
}
That is pretty much all you need to add into your Lift application. The authentication flow is:
-
User accesses your lift page that contains the OpenID form
-
User enters his/her OpenID identity URL and submits the form. Note that you don’t have to use the default login form asyou can construct your own as long as the form is submitted to the correct path and contains the correct input text parameter name.
-
The dispatchPF function that we appended above will process the /openid/login request and will send the authentication request to the Identity Provider site
-
Identity Provider will validate the user and redirect back to your Lift application to /openid/response path.
-
The response is validated using OpenId4Java library
-
OpenIdConsumer.postLogin gets called.
The SimpleOpenIDVendor looks like:
SimpleOpenIDVendor
trait SimpleOpenIdVendor extends OpenIdVendor {
type UserType = Identifier
type ConsumerType = OpenIdConsumer[UserType]
def currentUser = OpenIdUser.is
def postLogin(id: Box[Identifier],res: VerificationResult): Unit = {
id match {
case Full(id) => S.notice("Welcome "+id)
case _ => S.error("Failed to authenticate")
}
OpenIdUser(id)
}
def logUserOut() {
OpenIdUser.remove
}
def displayUser(in: UserType): NodeSeq = Text("Welcome "+in)
def createAConsumer = new AnyRef with OpenIDConsumer[UserType]
}
object SimpleOpenIdVendor extends SimpleOpenIdVendor
Note the postLogin implementation. Of course if you need a more complex post-login processing you can extend OpenIdVendor by yourself.
During this message exchange between the Identity Provider ans your Lift application, Lift utilizes a couple of SessionVars:
-
OpenIdObject - holds an OpenIdConsumer
-
OpenIdUser - holding an org.openid4java.discovery.Identifier
AMQP stands for Advanced Message Queuing Protocol. It is an open Internet protocol for messaging. It is concepted as a binary representation of messages. Lift facilitates the work with AMQP using the RabbitMQ Java implementation. There are two fundamental classes:
-
net.liftweb.amqp.AMQPSender - used for sending AMQP messages
-
net.liftweb.amqp.AMQPDispatcher - used for receiving AMQP messages
Let’s see how we can use Lift to send AMQP messages
AMQP sending messages example
import net.liftweb.amqp._
import com.rabbitmq.client._
val params = new ConnectionParameters
// All of the params, exchanges, and queues are all just example data.
params.setUsername("guest")
params.setPassword("guest")
params.setVirtualHost("/")
params.setRequestedHeartbeat(0)
val factory = new ConnectionFactory(params)
val amqp = new StringAMQPSender(factory, "localhost", 5672, "mult", "routeroute")
amqp.start
amqp ! AMQPMessage("hi")
As you can see the AMQSender is leveraging Scala actors to send messages. Scala actors and AMQP messaging concepts play very well together.
Now let’s see how we can receive and process AMQP messages:
AMQP receiving messages example
import net.liftweb.amqp._
import com.rabbitmq.client._
/**
* Example Dispatcher that listens on an example queue and exchange. Use this
* as your guiding example for creating your own Dispatcher.
*
*/
class ExampleSerializedAMQPDispatcher[T](factory: ConnectionFactory, host: String, port: Int)
extends AMQPDispatcher[T](factory, host, port) {
override def configure(channel: Channel) {
// Get the ticket.
val ticket = channel.accessRequest("/data")
// Set up the exchange and queue
channel.exchangeDeclare(ticket, "mult", "direct")
channel.queueDeclare(ticket, "mult_queue")
channel.queueBind(ticket, "mult_queue", "mult", "routeroute")
// Use the short version of the basicConsume method for convenience.
channel.basicConsume(ticket, "mult_queue", false, new SerializedConsumer(channel, this))
}
}
/**
* Example class that accepts Strings coming in from the
* ExampleSerializedAMQPDispatcher.
*/
class ExampleStringAMQPListener {
val params = new ConnectionParameters
params.setUsername("guest")
params.setPassword("guest")
params.setVirtualHost("/")
params.setRequestedHeartbeat(0)
val factory = new ConnectionFactory(params)
// thor.local is a machine on your network with rabbitmq listening on port 5672
val amqp = new ExampleSerializedAMQPDispatcher[String](factory, "thor.local", 5672)
amqp.start
// Example Listener that just prints the String it receives.
class StringListener extends Actor {
def act = {
react {
case msg@AMQPMessage(contents: String) => println("received: " + msg); act
}
}
}
val stringListener = new StringListener()
stringListener.start
amqp ! AMQPAddListener(stringListener)
}
First of all don’t get scared about this. The above classes are already existent so you can just reuse them. However the point of showing them here is to understand how to use a AMQP consumer, how to configure it to match the client settings from the Listing 1.3
13.2↑. The key here is to see how the actual messages are consumed. Note the StringListener actor is consumming the
AMQPMessage but the actor itself it provided to
AMQPDispatcher. What happens is that when a real AMQP message is received by
AMQPDispatcher it will just forward it to the user’sActor for actuall processing. SerializedConsumer class is actually doing the transformation of the raw data (array of byte-s) into
AMQPMessage messages.
Paypal is the notorious service that allows you to do online payment transactions. Lift supports both
PDT(Payment Data Transferr)as well as
IPN(Instant Payment Notification) API’ sprovided by PayPal. We won’t be getting into PayPal API details as this information can be found on PayPal site. However let’s see how we’d use PDT and IPN.
PDT Example
import net.liftweb.paypal._
object MyPayPalPDT extends PayPalPDT {
override def pdtPath = "paypal_complete"
def paypalAuthToken = Props.get("paypal.authToken") openOr "cannot find auth token from props file"
def pdtResponse: PartialFunction[(PayPalInfo, Req), LiftResponse] = {
case (info, req) => println("— in pdtResponse"); DoRedirectResponse("/account_admin/index");
}
}
// in Boot
def boot(){
...
LiftRules.statelessDispatchTable.append(MyPayPalPDT)
...
}
That is pretty much it. pdtResponse function allows you to determine the behavior of you application upon receiving the reponse from PayPal.
IPN Example
import net.liftweb.paypal._
object MyPayPalIPN extends PayPalIPN {
def actions = {
case (ClearedPayment, info, req) => // do your processing here
case (RefundedPayment, info, req) => // do refund processing
}
}
// in Boot
def boot(){
...
LiftRules.statelessDispatchTable.append(MyPayPalIPN)
...
}
As you can see everything is pretty strightforward. Just pattern match on the PaypalTransactionStatus. It is worth to note sthat IPN is a ’machine-to-machine’ API which happens in the background without the end user interraction.
13.4 Facebook
Facebook is the well known site that simply allows people to easily interract, build social graphs share photos etc. Facebook also exposes HTTP API’s that allows other applications to interract with it. Lift framework allows your application to easily interract with Facebook by providing an abstraction layer over the Facebook API. Here is an example:
Facebook example
import net.liftweb.ext_api.facebook._
FacebookRestApi.apiKey = <your API key>;
FacebookRestApi.secret = <your secret>;
// The api key is ontained from System.getProperty("com.facebook.api_key")
// The secreat is obtained from System.setProperty("com.facebook.secret", key)
// Invoke stateless calls
val respNode: Node = FacebookClient !? AuthCreateToken
val authToken = // extract authToken from respNode
// Obtain a stateful client based on the authToken
val faceBookClient = FacebookClient fromAuthToken(authToken)
faceBookClient !? GetFriendLists
Once you have the FacebookClient you can invoke numerous API methods described by FacebookMethod or SessionlessFacebookMethod. In the above examplewe are creating the FaceBook context by first obtaining an authToken and then obtaining a faceBookClient reference bound to the newly created session. After that we’re just ontaining the friends list.
XMPP stands for eXtensible Messaging and Presence Protocol. It is an XML-based protocol used for presence and realtime communication such as instant messaging (Jabber and GoogleTalk being two of the more famous users). It is developed by the Jabber open-source community. Lift provides an XMPP dispatcher implementation that your application can use to receive instant messages, manage rosters etc. This support relies on the Smack XMPP client library and utilizes Scala actors for the interface. Here is an example:
XMPP Example
import net.liftweb.xmpp._
/**
* An example Chat application that prints to stdout.
*
* @param username is the username to login to at Google Talk: format: something@gmail.com
* @param password is the password for the user account at Google Talk.
*/
class ConsoleChatActor(val username: String, val password: String) extends Actor {
def connf() = new ConnectionConfiguration("talk.google.com", 5222, "gmail.com")
def login(conn: XMPPConnection) = conn.login(username, password)
val xmpp = new XMPPDispatcher(connf, login)
xmpp.start
val chats: Map[String, List[Message]] = new HashMap[String, List[Message]]
val rosterMap: HashMap[String, Presence] = new HashMap[String, Presence]
var roster: Roster = null
def act = loop
def loop {
react {
case Start => {
xmpp ! AddListener(this)
xmpp ! SetPresence(new Presence(Presence.Type.available))
loop
}
case NewChat(c) => {
chats += (c.getParticipant -> Nil)
loop
}
case RecvMsg(chat, msg) => {
println("RecvMsg from: " + msg.getFrom + ": " + msg.getBody);
loop
}
case NewRoster(r) => {
println("getting a new roster: " + r)
this.roster = r
val e: Array[Object] = r.getEntries.toArray.asInstanceOf[Array[Object]]
for (entry <- e) {
val user: String = entry.asInstanceOf[RosterEntry].getUser
rosterMap += (user -> r.getPresence(user))
}
loop
}
case RosterPresenceChanged(p) => {
val user = StringUtils.parseBareAddress(p.getFrom)
println("Roster Update: " + user + " " + p)
// It’s best practice to ask the roster for the presence. This is because
// multiple presences can exist for one user and the roster knows which one
// has priority.
rosterMap += (user -> roster.getPresence(user))
loop
}
case RosterEntriesDeleted(e) => {
println(e)
loop
}
case RosterEntriesUpdated(e) => {
println(e)
loop
}
case RosterEntriesAdded(e) => {
println(e)
loop
}
case a => println(a); loop
}
}
def createChat(to: String) {
xmpp ! CreateChat(to)
}
def sendMessage(to: String, msg: String) {
xmpp ! SendMsg(to, msg)
}
/**
* @returns an Iterable of all users who aren’t unavailable along with their Presence
*/
def availableUsers: Iterable[(String, Presence)] = {
rosterMap.filter((e) => e._2.getType() != Presence.Type.unavailable)
}
}
object ConsoleChatHelper {
/**
* @param u is the username
* @param p is the password
*/
def run(u: String, p: String) = {
val ex = new ConsoleChatActor(u, p)
ex.start
ex ! Start
ex
}
}
// To start the dispatcher just call:
ConsoleChatHelper.run(userName, password);
...
The above is an example how you can integrate your application with an XMPP server and how messages are pocessed.
13.6 Lucene/Compass Integration
This chapter is still under active development. The contents will change.
14 Lift Widgets
In this chapter we’re going to discuss widgets in Lift. A widget is essentially a library of Scala and JavaScript code that together provide packaged XHTML fragments for display on the client browser. In other web frameworks (JSF, Struts, etc) these are sometimes called components. An example of a widget would be small library that automatically embeds a Calendar instance (section
14.1.2↓), or a helper library to sort HTML tables (section
14.1.1↓). Typically widgets embody dynamic behavior on the client side, which is what makes them so attractive; static client-side content is already dead simple to generate in Lift with snippets, so the extra sauce of JavaScript binding and Ajax callbacks really makes advanced functionality easy.
Lift’s widgets are intended to minimize effort on your part. Unlike some other frameworks where widgets/components require the use of specific traits or special XML binding, Lift (and Scala’s) inherent flexibility with XML, JavaScript abstraction, and snippet generators make using widgets as simple as dropping in a few lines of code to your existing snippets or views.
14.1 Current Lift Widgets
To start, we’ll cover the current set of widgets included in Lift at the time of writing this book. These widgets are contained in the lift-widgets module, which means you’ll need to add the dependency to your pom.xml if you want to use them (section
A.5.1↓). While this list will likely grow over time, remember that widgets are based on the fundamentals of Scala’s XML functionality as well as Lift’s JavaScript support (chapter
10↑), so the same general rules apply to all of them. At the end of the chapter we’ll cover writing your own widgets (section
14.2↓).
14.1.1 TableSorter widget
The TableSorter widget is based on the TableSorter jQuery plugin. Basically, the TableSorter widget allows you to take an existing HTML table (THEAD and TBODY tags are required) and add sorting to columns in the table. By default, the widget handles sorting of numeric, currency, and other value types automatically. The full capabilities of the plugin are beyond the scope of the widget, however; if you need more features you’ll have to set up the JavaScript yourself instead of using the widget.
The first step in using the widget is to call the TableSorter.init function in your Boot class to make Lift aware of the resources used by this widget. Then, you need to set up a table in your page (either statically in the template or via a snippet):
TableSorter Template
<lift:surround with="default" at="content">
<lift:TableSorterDemo/>
<table id="table-id" class="tablesorter"> ... </table>
</lift:surround>
Note that you need to have an id attribute on the table and add the tablesorter class to the table element. Next you simply call the TableSorter widget from a snippet:
TableSorter Snippet
class TableSorterDemo {
def render(xhtml: NodeSeq): NodeSeq = TableSorter("table-id")
}
The argument to TableSorter is the HTML element
id of the table you want sorted. The TableSorter code relies on head merge (section
↓) to put the appropriate JavaScript and jQuery functions into the returned page.
14.1.2 Calendar widgets
There are three calendar widgets corresponding to month, week and day views. These widgets display calendars with a similar look and feel to Microsoft Outlook or Google Calendar.They provide basic functionality for display, but you can easily customize CSS and JavaScript hooks for calendar items to fit your application requirements.
This widget allows you to create month view calendars in your web page, manage your calendar events etc. The first thing you need to do is call the
CalendarMonthView.init function in your Boot class; this performs initialization by telling Lift’s
ResourceServer about the paths to JavaScripts and stylesheets needed by this widget since these dependencies are embedded in the same jar file (we’ll cover this topic more in section
14.2↓).
The template for our widget example is relatively straightforward, as shown in listing
1↓. Basically, we provide a binding element where the calendar will be rendered.
<lift:surround with="default" at="content">
<h2>Calendar Month View Demo</h2>
<lift:CalendarMonthViewDemo>
<cal:widget/>
</lift:CalendarMonthViewDemo>
</lift:surround>
In our snippet code, listing
1↓, we first perform some setup of the widget. The Calendar widget takes a
java.util.Calendar instance telling it which month to display. Additionally, it takes a Seq[CalendarItem] of items to be displayed on the calendar. Finally, it takes three arguments containing optional JavaScript functions to be called when an item, day, or week is clicked, respectively. In our example we’re not showing any events or setting up any callbacks.
class CalendarMonthViewDemo {
def render(html: Group) : NodeSeq = {
val c = Calendar.getInstance;
c.set(MONTH, 0)
bind("cal", html,
"widget" -> CalendarMonthView(c, Nil, Empty, Empty, Empty)
)
}
In addition, CalendarMonthView can also take a MonthViewMeta instance as the second argument so that you can control the first day of the week and the locale used for formatting dates and times. For instance, we could set the calendar to use Monday as the first day of the week:
"widget" -> CalendarMonthView(c,
MonthViewMeta(Calendar.MONDAY, Locale.getDefault),
Nil, Empty, Empty, Empty)
Of course, without anything to display or do this isn’t very useful, so let’s look at how you create CalendarItems.
Listing
1↓ shows how we can create a calendar item for a meeting on June 5th at 2:30 pm. We have to set up another Calendar instance to hold the time of the meeting, then we use the CalendarItem helper object to set up the actual item instance. The first parameter is the id of the div that will be created for the item. This can be used from other scripts if needed. The second argument is the time of the event. The third argument is the CalendarType of the event, in this case, a meeting. The optional method on CalendarItem allows you to set optional attributes essentially via a sequence of
(CalendarItem) ⇒ CalendarItem functions. This technique is used since CalendarItems are immutable and modifying them returns new instances.
val time = Calendar.getInstance
time.setTime(DateFormat.pars("2009-06-05 2:30pm"))
val meeting = CalendarItem("4", time, CalendarType.MEETING) optional (
_ end(time),
_ subject("Important Meeting!"))
The widget renders not only the XHTML to display the calendar, but it generates the <script> and CSS tags using head merge to control display. One common customization of the widget would be to override the CSS used; to do this, provide your own style.css file under the WEB-INF/classes/calendars/monthview directory in your project. Because Lift uses the classpath to load resources, your style.css file will be “found” before the default one bundled in the lift-widgets jar file. You can use the default style.css as a starting point.
The final thing we’d like to cover for the Month view is the JavaScript callbacks. These callbacks are constructed using the AnonFunc JavaScript artifact, which essentially constructs an anonymous function on the client side. Listing
1↓ shows an example of using the callbacks to redirect to an event view page for the given event when the item is clicked. In this example we assume that the id of each calendar item is its unique id in the ORM (section
8.1.4↑) and that we have a rewrite rule set up to handle item viewing (section
3.7↑).
Calendar callback example
import JsCmds._
val itemClick = Full(
AnonFunc("elem, param", JsRaw("alert(elem);")
The CalendarWeekView widget provides a weekly view of the calendar. The same general principles apply as for month view. Again, you need to initialize the CalendarWeekView by calling the CalendarWeekView.init function in your Boot class.
Listing
2↓ shows a snippet returning a week view. As you can see, we still use a Calendar instance to set the time, and we also provide a WeekViewMeta in this example to set the first day of the week and the locale. The
list argument is a Seq[CalendarItem], constructed exactly the same as for a month view. Finally, we provide a JavaScript item callback. Note that there aren’t day or week callbacks available.
class CalendarWeekViewDemo {
def render(html: Group) : NodeSeq = {
val c = Calendar.getInstance
c.set(DAY_OF_MONTH, 17)
c.set(MONTH, 4)
bind("cal", html,
"widget" -> CalendarWeekView(c,
WeekViewMeta(MONDAY, Locale.getDefault()),
list,
itemClick))
}
}
The CalendarDayView widget renders a calendar for a single day. The usage is essentially the same as for the month and week views, as shown in listing
3↓:
class CalendarDayViewDemo {
def render(html: Group) : NodeSeq = {
val c = Calendar.getInstance
c.set(DAY_OF_MONTH, 17)
c.set(MONTH, 4)
bind("cal", html,
"widget" -> CalendarDayView(c,
DayViewMeta(Locale.getDefault()),
list, itemClick)
)
}
The parameters are essentially the same, except that the Calendar object represents the day that we want to render and we pass a DayViewMeta containing just the Locale for internationalization purposes. Again, only an item click callback is available.
14.1.3 RSS Feed widget
The RSS feed widget, like its name implies, simply renders RSS feeds. This widget does not need initialization in Boot since it has no dependencies on JavaScript, CSS, etc. In your snippet you simply use the RSSFeed helper object with the RSS feed URL:
RSSFeed example
class RSSFeedDemo {
def render(xhtml: NodeSeq): NodeSeq = {
RSSFeed("http://www.praytothemachine.com/evil/index.php/feed/")
}
}
Although the RSSFeed widget doesn’t provide its own CSS, the generated elements do have CSS classes attached to them that you can provide styling for:
rsswidget This class is attached to the outer div that contains all of the feed elements
rsswidgettitle This class is attached to the <li> that holds the title of the feed
rsswidgetitem This class is attached to each <li> element that holds an RSS item
14.1.4 Gravatar widget
Gravatars are
globally
recognized
avatars. You can add your picture at the Gravatar website and associate it with one or more email addresses. Sites that interact with Gravatar can fetch your picture and display it, which is what the Gravatar widget does. Listing
14.1.4↓ shows an example snippet that will render the Gravatar for the currentUser into a
<div>, if available. The default size of the Gravatar is 42x42 pixels, but you can override this with additional parameters on the Gravatar.apply method. Additionally, you can filter the Gravatar based on its rating (the default rating is “G” only).
class GravatarDemo {
def render(xhtml: NodeSeq) :NodeSeq = {
Gravatar(currentUser.email)
}
}
14.1.5 TreeView widget
The TreeView widget transforms an unordered list (
<ul>) into a tree-like structure using the TreeView JQuery plugin . Each nested unordered list gets decorated with a +/- sign that allows you to collapse or expand the entire sublist, as shown in figure
14.6↓.
To use this widget you first need to initialize the widget by calling the
TreeView.init function in your Boot class. For basic usage, your snippet looks like listing
14.1.5↓. The first argument is the id of the unordered list that you want transformed into a tree. The second argument is a JSON object that is used to configure the tree view. In our example, we’re setting the treeview to animate opening and closing of nodes with a 90 millisecond delay; for more options see the treeview jQuery documentation page.
class TreeViewDemo {
def render(xhtml: Group): NodeSeq = {
TreeView("example", JsObj(("animated" -> 90)))
}
}
In addition to transforming static lists into trees, the TreeView widget also supports asynchronous loading of trees and nodes via Ajax calls. In order to do this, you still need to provide an empty <ul> element with an id attribute; this is essentially modified in place as portions of the tree are loaded. Next, you provide two functions that are used to retrieve the Tree data:
-
A function () ⇒ List[Tree] to load the initial view of the tree. This is what will be displayed to the client when the page loads, so if you want some nodes to be available without having to make an Ajax call this is where you define it.We will explain the Tree class in a moment.
-
A function (String) ⇒ List[Tree] to load the children of a given node (the String argument is the node’s id)
The Tree class defines each node in the tree and contains several values that define the appearance and behavior of the node:
text The text to be displayed in the list item.
id The optional HTML id of the element
classes An optional string defining CSS classes to be assigned to the element
expanded A boolean controlling whether the element will be expanded initially (only valid if the haschildren is true or if the children list is populated)
hasChildren If this is set to true but the children value is Nil, then the TreeView widget will dynamically load the children of this node as described in item #2 above
children A List[Tree] defining the children of this element. Setting this value will prevent Ajax from being used to retrieve the list of children from the server on expansion
The Tree companion object has a number of overloaded apply methods that make it easy to set one or more of these values without having to set all of them.
To provide a concrete example, listing
14.1.5↓ shows implementations of the loadTree and loadNode functions corresponding to the two Ajax functions used to dynamically construct the tree.
def loadTree () = {
Tree("No children") ::
Tree("One static child", Tree("Lone child") :: Nil) ::
Tree("Dynamic node", "myDynamic", true) :: Nil
}
def loadNode (id : String) : List[Tree] = id match {
case "myDynamic" =>
Tree("Child one") ::
Tree("Child two") :: Nil
case _ => Nil
}
In this example the initial view will show three nodes; the third node (“Dynamic node”) will fetch its children via an Ajax call when expanded. The loadNode method will then handle this call by adding two static leaf nodes to the tree.
14.1.6 Sparklines widget
The Sparklines widget is based on Will Larson’s excellent Sparklines JavaScript library. Sparklines are essentially small, high resolution charts embedded in text that provide a wealth of information in a compact representation.
As with our other widgets, you need to initialize the widget in your Boot class by calling
Sparklines.init. Listing
14.1.6↓ shows a simple snippet utilizing the widget to produce the graph shown in figure
14.7↑. In your template you need to provide a canvas element with an
id attribute that will be used by the widget for its content. In our example we provide a JsArray (an abstracted JavaScript array) with our data, as well as a JSON object containing options for the chart. We’ve set our options to draw percentage lines for the bar chart as well as filling in the area between the percentage lines. Finally, we call the Sparklines.onLoad method to generate the chart drawing code (the chart will be drawn when the page is loaded). The Sparklines library currently handles bar and line charts, which are chosen via the SparklineStyle enumeration.
class SparklinesDemo {
def render(html: NodeSeq): NodeSeq = {
val data = JsArray(100,500,300,200,400,500,400,400,
100,200, 345, 412, 111, 234, 490);
val opts = JsObj(("percentage_lines" -> JsArray(0.5, 0.75)),
("fill_between_percentage_lines" -> true),
("extend_markings" -> false));
Sparklines.onLoad("bar", SparklineStyle.BAR, data, opts);
}
}
14.2 How to build a widget
As we explained in the introduction, there is no magic formula when building a widget since Lift and Scala provide so much base functionality without having to resort to restrictions like traits or static XML binding. However, there are a few items to note if you want to design your own widgets
Generally it’s useful to make your widget a self-contained JAR file to simplify dependency management and deployment. Including things like style sheets and javascript libraries in your package is quite straightforward if you’re using Maven, but the question then becomes how do you access these resources from a Lift application. Fortunately, Lift provides some very simple mechanisms for using class loaders to retrieve resources. The basic functionality is handled through the
ResourceServer object, which we cover in detail in section
9.8↑. This object controls resource loading, and in particular handles where resources can be loaded from. Listing
14.2↓ shows an example init method (similar to those that we’ve previously used for the existing widgets) that tells the ResourceServer that it can load resources from the path “/classpath/mywidget”. You would locate these resources under the
mywidget package in your widget project.
Adding ResourceServer permissions
import _root_.net.liftweb.http.ResourceServer
def init() {
ResourceServer.allow{
case "iframewidget" :: _ => true
}
}
Once you’ve set up the appropriate permissions, your widget can generate links or scripts that load from within the classpath, as shown in listing
14.2↓. In this example we’ve defined a simple (and slightly ridiculous) widget that renders a given URL into an IFrame element.
class IFrameWidget {
def render(url : String) =
<head>
<link type="text/css" rel="stylesheet"
href={LiftRules.resourceServerPath + "/iframewidget/style.css"/>
</head>
<div class="iframeDiv">
<iframe src={url}>
<p>Your browser doesn’t support IFrames</p>
</iframe>
</div>
}
Note the path that we used uses the LiftRules.resourceServerPath variable. It’s preferable to use this mechanism instead of hardcoding “/classpath” to allow for end-user flexibility. We also use head merge to make sure the proper stylesheet is loaded for the page.
As you can see, defining your own widget is not much different than writing a snippet. The major difference is in making resources accessible while bundling and making sure that you avoid hardcoding properties that are configurable by the end-users of your widget.
15 RESTful Web Services
Many web applications today offer an API that allows others to extend the functionality of the application. An API is a set of exposed functions that is meant to allow third parties to reuse elements of the application. There is a number of sites that catalog the available APIs, such as ProgrammableWeb (see
http://www.programmableweb.com/). An example of a site that has combined the GoogleMaps and Flickr APIs is FlickrVision.com. FlickrVision allows users to visualize where in the world recent photos have been taken by combining the geolocation information embedded in the photos and the mapping system of GoogleMaps. This is just one example of an API mashup, and there are countless other examples.
15.1 Some Background on REST
Before we dive into the details of building a RESTful API with Lift, let’s start by discussing a little about REST and the protocol that it sits atop: HTTP. If you’re already familiar with REST and HTTP, feel free to skip to the implementation in Section
15.2↓.
15.1.1 A Little Bit about HTTP
As we build our web service, it will to be helpful to know a few things about HTTP requests and responses. If you’re comfortable with the Request-Response cycle then feel free to jump to Section
15.1.2↓ to get down to business.
A simplification of how the web works is that clients, typically web browsers, send HTTP Requests to servers, which respond with HTTP Responses. Let’s take a look at an exchange between a client and a server.
We’re going to send a GET request to the URI
http://demo.liftweb.net/ using the
cURL utility. We’ll enable dumping the HTTP protocol header information so that you can see all of the information associated with the request and response. The cURL utility sends the output shown in Listing
15.1.1↓:
$ curl -v http://demo.liftweb.net/
* About to connect() to demo.liftweb.net port 80 (#0)
* Trying 64.27.11.183... connected
* Connected to demo.liftweb.net (64.27.11.183) port 80 (#0)
> GET / HTTP/1.1
> User-Agent: curl/7.19.0 (i386-apple-darwin9.5.0) libcurl/7.19.0 zlib/1.2.3
> Host: demo.liftweb.net
> Accept: */*
And gets the corresponding response, shown in Listing
15.1.1↓, from the server:
< HTTP/1.1 200 OK
< Server: nginx/0.6.32
< Date: Tue, 24 Mar 2009 20:52:55 GMT
< Content-Type: text/html
< Connection: keep-alive
< Expires: Mon, 26 Jul 1997 05:00:00 GMT
< Set-Cookie: JSESSIONID=5zrn24obipm5;Path=/
< Content-Length: 8431
< Cache-Control: no-cache; private; no-store;
must-revalidate; max-stale=0; post-check=0; pre-check=0; max-age=0
< Pragma: no-cache
< X-Lift-Version: 0.11-SNAPSHOT
<
<?xml version="1.0" encoding="UTF-8"?>
<!DOCTYPE html PUBLIC "-//W3C//DTD XHTML 1.0 Transitional//EN"
"http://www.w3.org/TR/xhtml1/DTD/xhtml1-transitional.dtd">
<html xmlns:lift="http://liftweb.net" xmlns="http://www.w3.org/1999/xhtml">
<head>....
This seems pretty straightforward: we ask for a resource, and the server returns it to us. Take a look at the HTTP request. We’d like to point out the method called, in this case a “GET”, and the URI, which is “http://demo.liftweb.net/”. Method calls and addresses are what make the web work. You can think of the web as a series of method calls on varying resources, where the URI (Uniform Resource Identifier) identifies the resource upon which the method will be called.
Methods are defined as part of the HTTP standard, and we’ll use them in our API. In addition to GET, the other HTTP methods are POST, DELETE, PUT, HEAD, and OPTIONS. You may also see methods referred to as actions or verbs. In this chapter, we will focus on using GET and PUT for our API.
As do Requests, Responses come with a few important pieces of information. Of note are the Response Code and the Entity Body. In the above example, the Response Code is “200 OK” and the Entity Body is the HTML content of the webpage, which is shown as the last two lines starting with “<!DOCTYPE.” We’ve truncated the HTML content here to save space.
This was a quick overview of HTTP, but if you’d like to learn more, take a look at the protocol definition found at. We wanted to point out a few of the interesting parts of the cycle before we got into building a REST API.
15.1.2 Defining REST
Roy Fielding defined REST in his dissertation and defined the main tenet of the architecture to be a uniform interface to resources. “Resources” refers to pieces of information that are named and have representations. Examples include an image, a Twitter status, or a timely item such as a stock quote or the current temperature. The uniform interface is supported by a set of constraints that include the following:
-
Statelessness of communication: This is built on top of HTTP, which is also stateless.
-
Client-server–style interaction: Again, just as the Web consists of browsers talking to servers, REST discusses machines or applications talking to servers in the same way.
-
Support for caching: REST uses the caching headers of HTTP to support the caching of resources.
These features are shared by both the web and by RESTful services. REST adds additional constraints regarding interacting with resources:
-
Naming: As we mentioned, a resource must be identified, and this is done using URLs.
-
Descriptive actions: Using the HTTP actions, GET, PUT, and DELETE makes it obvious what action is being performed on the resource.
-
URL addressability: URLs should allow for the addressing of representation of a resource.
Fielding’s goal was to define a method that allowed machine-to-machine communication to mimic that of browser-to-server communication and to take advantage of HTTP as the underlying protocol.
15.1.3 Comparing XML-RPC to REST Architectures
What, then, is the difference between a RESTful architecture and a traditional RPC architecture?
An RPC application follows a more traditional software development pattern. It ignores most of the features offered by HTTP, such as the HTTP methods. Instead, the scoping and data to be used by the call are contained in the body of a POST request. XML-RPC works similarly to the web for getting resources, but breaks from the HTTP model for everything else by overloading the POST request. You will often see the term SOAP when referring to an XML-RPC setup, because SOAP permits the developer to define the action and the resource in the body of the request and ignore the HTTP methods.
RESTful architectures embrace HTTP. We’re using the web; we may as well take advantage of it.
15.2 A Simple API for PocketChange
We’re going to start with a simple example, so we’ll only touch on some of the more complex steps of building a web service, such as authentication
↓↓ and authorization. If you would like to see the code involved in performing authentication and authorization for our REST API, see Section
9.9↑. For the purposes of this example, we’re going to model two calls to the server: a GET request that responds with the details of an expense, and a PUT to add a new expense.The URLs will be:
Note that a URL (Uniform Resource Locator) is a type of URI in which the URI also serves to locate the resource on the web. A URN (Uniform Resource Name) is another type of URI that provides a unique name to a resource without specifying an actual location, though it may look a lot like a URL. For more information on the distinctions among URIs, see
http://en.wikipedia.org/wiki/Uniform_Resource_Name.
We would like the REST API to support both XML and JSON for this data. Additionally, we would like to support an Atom feed on an account so that people can track expenses as they’re added. The URL for the Atom feed will be a GET of the form:
http://www.pocketchangeapp.com/api/account/<account id>
In the next few sections we’ll show how you can easily add support for these methods and formats using Lift.
15.3 Adding REST Helper Methods to our Entities
In order to simplify our REST handler code, we would like to add some helper methods for our
Expense entity to support generation of both XML and JSON for our consumers. We’ll add these to a new
RestFormatters object inside the
src/main/scala/com/pocketchangeapp/RestFormatters.scala source file. First, we add some common functionality in Listing
15.3↓ by adding several helper methods for computing REST header values.
Common Expense REST Helpers
/* The REST timestamp format. Not threadsafe, so we create
* a new one each time. */
def timestamp = new SimpleDateFormat("yyyy-MM-dd’T’HH:mm:ss’Z’")
// A simple helper to generate the REST ID of an Expense
def restId (e : Expense) =
"http://www.pocketchangeapp.com/api/expense/" + e.id
// A simple helper to generate the REST timestamp of an Expense
def restTimestamp (e : Expense) : String =
timestamp.format(e.dateOf.is)
Listing
15.3↓ shows a helper method for generating a proper JSON representation of a given
Expense using the Lift JSON DSL. Although
Expense is a
Mapper entity, we don’t use the
Expense.asJs↓ method inherited from
Mapper because we want to better control the format.
Expense Entity JSON Formatters
/**
* Generates the JSON REST representation of an Expense
*/
def toJSON (e : Expense) : JValue = {
import net.liftweb.json.JsonDSL._
import net.liftweb.json.JsonAST._
("expense" ->
("id" -> restId(e)) ~
("date" -> restTimestamp(e)) ~
("description" -> e.description.is) ~
("accountname" -> e.accountName) ~
("accountid" -> e.account.obj.open_!.id.is) ~
("amount" -> e.amount.is.toString) ~
("tags" -> e.tags.map(_.name.is).mkString(",")))
}
Finally, Listing
15.3↓ shows the
toXML method, which will generate properly formatted XML for a given
Expense. Like
toJSON, we don’t use the
Expense.toXml↓ method because we want more control over the generated format. Instead, we simply convert the result of
toJSON into XML using the
net.liftweb.json.Xml helper object.
Expense Entity XML REST Formatter
import net.liftweb.json.Xml
/**
* Generates the XML REST representation of an Expense
*/
def toXML (e : Expense) : Node = Xml.toXml(toJSON(e)).first
15.4 Multiple Approaches to REST Handling
As Lift has evolved, two main approaches have emerged that allow you to perform RESTful operations. In Lift 1.0 and up, you can add custom dispatch (Section
3.8 on page 1↑) on your API URLs to call custom handlers for your REST data. In Lift 2.0, the new
net.liftweb.http.rest.RestHelper was introduced that vastly simplifies not only the dispatch for given operations, but also assists with conversion of requests and responses to both XML and JSON. Because custom dispatch is still very much a first-class feature of Lift we will cover both approaches here.
Before we get into the details of each method, there are two last helpers we’d like to define. Listing
15.4↓ shows an
unapply method that we add to our
Expense MetaMapper so that we can use
Expense as an extractor in pattern matching. In this code we not only attempt to match by using a provided
String as the
Expense’s primary key, but we also compute whether the
Expense is in a public account. This assists us in determining authorization for viewing a given
Expense.
Adding an Extractor for Expense
import net.liftweb.util.ControlHelpers.tryo
/**
* Define an extractor that can be used to locate an Expense based
* on its ID. Returns a tuple of the Expense and whether the
* Expense’s account is public.
*/
def unapply (id : String) : Option[(Expense,Boolean)] = tryo {
find(By(Expense.id, id.toLong)).map { expense =>
(expense,
expense.account.obj.open_!.is_public.is)
}.toOption
} openOr None
Similarly, Listing
15.4↓ shows an extractor on the
Account MetaMapper that matches an
Account based on its primary key.
Adding an Extractor for Account
import net.liftweb.util.Helpers.tryo
/**
* Define an extractor that can be used to locate an Account based
* on its ID.
*/
def unapply (id : String) : Option[Account] = tryo {
find(By(Account.id, id.toLong)).toOption
} openOr None
15.4.1 Using Custom Dispatch
Now that we’ve discussed our design, let’s see the code that will handle the routing. In the package
com.pocketchangeapp.api, we have an object named
DispatchRestAPI, which we’ve defined in
src/main/scala/com/pocketchangeapp/api/RestAPI.scala. In
DispatchRestAPI, we define a custom dispatch function to pattern match on the request and delegate to a handler method. The custom dispatch function is shown in Listing
15.4.1↓. You can see that we use our extractors in the matching for both
Expenses and
Accounts. We’ll cover the processing of PUTs in Section
15.5↓, and the Atom processing in Section
15.7↓.
// Import our methods for converting things around
import RestFormatters._
def dispatch: LiftRules.DispatchPF = {
// Define our getters first
case Req(List("api", "expense", Expense(expense,_)), _, GetRequest) =>
() => nodeSeqToResponse(toXML(expense)) // default to XML
case Req(List("api", "expense", Expense(expense,_), "xml"), _, GetRequest) =>
() => nodeSeqToResponse(toXML(expense))
case Req(List("api", "expense", Expense(expense,_), "json"), _, GetRequest) =>
() => JsonResponse(toJSON(expense))
case Req(List("api", "account", Account(account)), _, GetRequest) =>
() => AtomResponse(toAtom(account))
// Define the PUT handler for both XML and JSON MIME types
case request @ Req(List("api", "account", Account(account)), _, PutRequest)
if request.xml_? =>
() => addExpense(fromXML(request.xml,account),
account,
result => CreatedResponse(toXML(result), "text/xml"))
case request @ Req(List("api", "account", Account(account)), _, PutRequest)
if request.json_? =>
() => addExpense(fromJSON(request.body,account),
account,
result => JsonResponse(toJSONExp(result), Nil, Nil, 201))
// Invalid API request - route to our error handler
case Req("api" :: x :: Nil, "", _) =>
() => BadResponse() // Everything else fails
}
Our
DispatchRestAPI object mixes in the
net.liftweb.http.rest.XMLApiHelper trait, which includes several implicit conversions to simplify writing our REST API. Remember that
LiftRules.DispatchPF must return a function
() ⇒ Box[LiftResponse] (Section
3.8 on page 1↑), so we’re using the implicit
putResponseInBox as well as explicitly calling
nodeSeqToResponse to convert our API return values into the proper format.
The server will now service GET requests with the appropriate formatter function and will handle PUT requests with the addExpense method (which we’ll define later in this chapter).
We hook our new dispatch function into LiftRules by adding the code shown in Listing
15.4.1↓ to our
Boot.boot method.
LiftRules.dispatch.prepend(DispatchRestAPI.dispatch)
15.4.2 Using the RestHelper Trait
New in Lift 2.0 is the net.liftweb.http.rest.RestHelper trait. This trait simplifies the creation of REST APIs that support both XML and JSON. For our example, we’ll define the RestHelperAPI object in our RestAPI.scala source file.
Before we get into the details of actual processing with RestHelper, we want to point out some useful parts of its API. First, RestHelper provides a number of built-in extractors for matching not only what HTTP verb a given request uses, but also the format of the request (JSON or XML). These extractors are:
-
Get, JsonGet, XmlGet - matches a raw GET, or a GET of the specified format
-
Post, JsonPost, XmlPost - matches a raw POST, or a POST of the specified format
-
Put, JsonPut, XmlPut - matches a raw PUT, or a PUT of the specified format
-
Delete - matches a DELETE request
-
JsonReq - matches a request with the Accept header containing “application/json”, or whose Accept header contains “*/*” and whose path suffix is “json”
-
XmlReq - matches a request with the Accept header containing “text/xml”, or whose Accept header contains “*/*” and whose path suffix is “xml”
We’ll demonstrate in the following sections how to use these extractors. Note that you can add additional rules for the
JsonReq and
XmlReq extractors by overriding the
RestHelper.suplimentalJsonResponse_? and
suplimentalXmlResponse_? (yes, those are spelled incorrectly) methods to perform additional tests on the request. For example, Listing
15.4.2↓ shows how we can use the existence of a given header to determine whether a request is XML or JSON.
Using a Cookie to Determine the Request Type
override def suplimentalJsonResponse_? (in : Req) =
in.header("This-Is-A-JSON-Request").isDefined
override def suplimentalXmlResponse_? (in : Req) =
in.header("This-Is-A-XML-Request").isDefined
One important difference between RestHelper and our DispatchRestAPI examples that we want to point out is that RestHelper determines whether a request is XML or JSON based on the Accept header and/or the suffix of the path (e.g. /api/expense/1.xml), whereas our DispatchRestAPI used the last component of the path (/api/expense/1/xml). Either approach is valid, just be aware if you’re copying this example code.
Next, like the XMLApiHelper trait, RestHelper provides a number of implicit conversions to LiftResponse from a variety of inputs. We’re not going to cover these directly here, but we’ll point out where we use them in this section.
Similar to our DispatchRestAPI handler, we need to define a set of patterns that we can match against. Unlike DispatchRestAPI, however, RestHelper defines four PartialFunction methods where we can add our patterns: serve, serveJx, serveJxa and serveType. These functions provide increasing automation (and control) over what gets served when the request matches a pattern. We won’t be covering serveType here, since it’s essentially the generalized version that serve, serveJx and serveJxa use behind the scenes.
15.4.2.1 The serve Method
Let’s start with the
serve method. This method essentially corresponds one-to-one with our
DispatchRestAPI.dispatch method. Listing
15.4.2.1↓ shows how we could handle Atom requests, as well as requests that don’t specify a format, using
RestHelper. Note our use of the
RestHelper extractors to match the HTTP Verb being used. Also note that we’re using an implicit conversion from a Box[T] to a Box[LiftResponse] when an implicit function is in scope that can convert T into a LiftResponse. In our example,
Full(toXML(expense)) is equivalent to
boxToResp(Full(toXML(expense)))(nodeToResp). Finally, the serve method can be invoked multiple times and the
PartialFunctions will be chained together.
// Service Atom and requests that don’t request a specific format
serve {
// Default to XML
case Get(List("api", "expense", Expense(expense,_)), _) =>
() => Full(toXML(expense))
case Get(List("api", "account", Account(account)), _) =>
() => Full(AtomResponse(toAtom(account)))
}
We use similar calls to hook our PUT handlers, shown in Listing
15.4.2.1↓.
Using serve to handle PUTs
// Hook our PUT handlers
import DispatchRestAPI.addExpense
serve {
case XmlPut(List("api", "account", Account(account)), (body, request)) =>
() => Full(addExpense(fromXML(Full(body),account),
account,
result => CreatedResponse(toXML(result), "text/xml")))
case JsonPut(List("api", "account", Account(account)), (_, request)) =>
() => Full(addExpense(fromJSON(request.body,account),
account,
result => JsonResponse(toJSON(result), Nil, Nil, 201)))
}
15.4.2.2 The serveJx Method
Like the serve method,
serveJx performs pattern matching on the request. However,
serveJx allows you to specify a conversion function that matches against the requested format
(
net.liftweb.http.rest.JsonSelect or
net.liftweb.http.rest.XmlSelect) and perform your conversion there. Then, all you need to do is match once against a given path and
serveJx will utilize your conversion function to return the proper result. Listing
15.4.2.2↓ shows how we can use a new implicit conversion to handle our format-specific GETs. The single match in our
serveJx call replaces two lines in our
DispatchRestAPI.dispatch method.
// Define an implicit conversion from an Expense to XML or JSON
import net.liftweb.http.rest.{JsonSelect,XmlSelect}
implicit def expenseToRestResponse : JxCvtPF[Expense] = {
case (JsonSelect, e, _) => toJSON(e)
case (XmlSelect, e, _) => toXML(e)
}
serveJx {
case Get(List("api", "expense", Expense(expense,_)), _) => Full(expense)
}
In addition to providing your own conversion function,
serveJx can utilize the
RestHelper autoconversion functionality. To use this, simply use the
auto method to wrap whatever you want to return. Listing
15.4.2.2↓ shows an example of returning a contrived data object with
auto.
Using auto to Convert Return Values
// Just an example of autoconversion
serveJx {
case Get(List("api", "greet", name),_) =>
auto(Map("greeting" ->
Map("who" -> name,
"what" -> ("Hello at " + new java.util.Date))))
}
The conversion is actually performed with the
net.liftweb.json.Extraction object
↓↓↓, so you can autoconvert anything that
Extraction can handle. This includes:
-
Primitives
-
Maps
-
Arrays
-
Collections
-
Options
-
Case classes
15.4.2.3 The serveJxa Method
The serveJxa method is basically the same as the serve and serveJx methods, except that anything that is returned will be automatically converted to JSON via the
net.liftweb.json.Extraction.decompose method.
15.5 Processing Expense PUTs
Now that we’re handling the API calls, we’ll need to write the code to process and respond to requests. The first thing we need to do is deserialize the Expense from the either an XML or JSON request.
In PocketChange our use of
BigDecimal values to represent currency amounts means that we can’t simply use the lift-json deserialization support (Section
C.10 on page 1↓). While lift-json is very good and would make this much simpler, it parses decimal values as doubles which can lead to rounding and precision issues when working with decimal values. Instead, we will need to write our own conversion functions.
To simplify error handling, we break this processing up into two format-specific methods that convert to a
Map representation of the data, and another method that converts the intermediate
Map/
List into an
Expense. Listing
15.5↓ shows the
fromXML method in the
RestFormatters object. This method performs some basic validation to make sure we have the required parameters, but otherwise doesn’t validate the values of those parameters. Note that we provide the
Account to
fromXML so that we can resolve tag names in the
fromMap method (which we’ll cover momentarily).
Deserializing XML to an Expense
def fromXML (rootNode : Box[Elem], account : Account) : Box[Expense] =
rootNode match {
case Full(<expense>{parameters @ _*}</expense>) => {
var data = Map[String,String]()
for(parameter <- parameters) {
parameter match {
case <date>{date}</date> => data += "date" -> date.text
case <description>{description}</description> =>
data += "description" -> description.text
case <amount>{amount}</amount> => data += "amount" -> amount.text
case <tags>{ tags }</tags> => data += "tags" -> tags.text
case _ => // Ignore (could be whitespace)
}
}
fromMap(data, account)
}
case other => Failure("Missing root expense element")
}
Similarly, Listing
15.5↓ shows our
fromJSON method.
Deserializing JSON to an Expense
def fromJSON (obj : Box[Array[Byte]], account : Account) : Box[Expense] =
obj match {
case Full(rawBytes) => {
// We use the Scala util JSON parser here because we want to avoid parsing
// numeric values into doubles. We’ll just leave them as Strings
import scala.util.parsing.json.JSON
JSON.perThreadNumberParser = { in : String => in }
val contents = new String(rawBytes, "UTF-8")
JSON.parseFull(contents) match {
case Some(data : Map[String,Any]) => {
fromMap(data.mapElements(_.toString), account)
}
case other => Failure("Invalid JSON submitted: \"%s\"".format(contents))
}
}
case _ => Failure("Empty body submitted")
}
Finally, Listing
15.5↓ shows our
fromMap method, which takes the data parsed by
fromJSON and
fromXML and converts it into an actual expense.
Converting the Intermediate Data to an Expense
def fromMap (data : scala.collection.Map[String,String],
account : Account) : Box[Expense] = {
val expense = Expense.create
try {
val fieldParsers : List[(String, String => Expense)] =
("date", (date : String) => expense.dateOf(timestamp.parse(date))) ::
("description", (desc : String) => expense.description(desc)) ::
("amount", (amount : String) => expense.amount(BigDecimal(amount))) :: Nil
val missing = fieldParsers.flatMap {
field => // We invert the flatMap here to only give us missing values
if (data.get(field._1).map(field._2).isDefined) None else Some(field._1)
}
if (missing.isEmpty) {
expense.account(account)
data.get("tags").foreach {
tags => expense.tags(tags.split(",").map(Tag.byName(account.id.is,_)).toList)
}
Full(expense)
} else {
Failure(missing.mkString("Invalid expense. Missing: ", ",", ""))
}
} catch {
case pe : java.text.ParseException => Failure("Failed to parse date")
case nfe : java.lang.NumberFormatException =>
Failure("Failed to parse amount")
}
}
Now that we’ve converted the PUT data into an
Expense, we need to actually perform our logic and persist the submitted
Expense. Listing
15.5↓ shows our
addExpense method, which matches against the parsed
Expense and either runs validation if the parse succeeded, or returns an error response to the user if something failed. If validation fails, the user is similarly notified. The
success parameter is a function that can be used to generate the appropriate response based on the newly created Expense. This allows us to return the new Expense in the same format (JSON, XML) in which it was submitted (see the dispatch function, Listing
15.4.1↑).
Saving the submitted Expense
def addExpense(parsedExpense : Box[Expense],
account : Account,
success : Expense => LiftResponse): LiftResponse =
parsedExpense match {
case Full(expense) => {
val (entrySerial,entryBalance) =
Expense.getLastExpenseData(account, expense.dateOf)
expense.account(account).serialNumber(entrySerial + 1).
currentBalance(entryBalance + expense.amount)
expense.validate match {
case Nil => {
Expense.updateEntries(entrySerial + 1, expense.amount.is)
expense.save
account.balance(account.balance.is + expense.amount.is).save
success(expense)
}
case errors => {
val message = errors.mkString("Validation failed:", ",","")
logger.error(message)
ResponseWithReason(BadResponse(), message)
}
}
}
case Failure(msg, _, _) => {
logger.error(msg)
ResponseWithReason(BadResponse(), msg)
}
case error => {
logger.error("Parsed expense as : " + error)
BadResponse()
}
}
15.6 The Request and Response Cycles for Our API
At the beginning of this chapter, we showed you a request and response conversation for
http://demo.liftweb.net/. Let’s see what that looks like for a request to our API. Listing
15.6↓ shows an XML GET request for a given expense. Note that we’re not showing the HTTP Basic authentication setup, required by our authentication configuration (Section
9.9 on page 1↑).
Request and Response for XML GET
Request:
http://www.pocketchangeapp.com/api/expense/3 GET
Response:
<?xml version="1.0" encoding="UTF-8"?>
<expense>
<id>http://www.pocketchangeapp.com/api/expense/3</id>
<accountname>Test</accountname>
<accountid>1</accountid>
<date>2010-10-06T00:00:00Z</date>
<description>Receipt test</description>
<amount>12.00</amount>
<tags>test,receipt</tags>
</expense>
Listing
15.6↓ shows the same request in JSON format.
Request and Response for JSON GET
Request:
http://www.pocketchangeapp.com/api/expense/3/json GET
Response:
{"id":"http://www.pocketchangeapp.com/api/expense/3",
"date":"2010-10-06T00:00:00Z",
"description":"Receipt test",
"accountname":"Test",
"accountid":1,
"amount":"12.00",
"tags":"test,receipt"}
Listing
15.6↓ shows the output for a PUT conversation:
Request and Response for an XML PUT
Request:
http://www.pocketchangeapp.com/api/account/1 - PUT - addEntry(request) + XML Body
Request Body:
<expense>
<date>2010-07-05T14:22:00Z</date>
<description>Test</description>
<amount>12.41</amount>
<tags>test,api</tags>
</expense>
Response:
<?xml version="1.0" encoding="UTF-8"?>
<expense>
<id>http://www.pocketchangeapp.com/api/expense/10</id>
<accountname>Test</accountname>
<accountid>1</accountid>
<date>2010-07-05T14:22:00Z</date>
<description>Test</description>
<amount>12.41</amount>
<tags>api,test</tags>
</expense>
15.7 Extending the API to Return Atom Feeds
In addition to being able to fetch specific expenses using our API, it would be nice to be able to provide a feed of expenses for an account as they’re added. For this example, we’ll add support for Atom, a simple publishing standard for content syndication. The first thing we need to do is write a method to generate an Atom feed for a given Account. Although Atom is XML-based, it’s sufficiently different enough from our REST API XML format that we’ll just write new methods for it. Listing
15.7↓ shows the
toAtom methods (one for
Account, one for
Expense) in our
RestFormatters object that will handle the formatting.
def toAtom (a : Account) : Elem = {
val entries = Expense.getByAcct(a,Empty,Empty,Empty,MaxRows(10))
<feed xmlns="http://www.w3.org/2005/Atom">
<title>{a.name}</title>
<id>urn:uuid:{a.id.is}</id>
<updated>{entries.headOption.map(restTimestamp) getOrElse
timestamp.format(new java.util.Date)}</updated>
{ entries.flatMap(toAtom) }
</feed>
}
def toAtom (e : Expense) : Elem =
<entry>
<id>urn:uuid:{restId(e)}</id>
<title>{e.description.is}</title>
<updated>{restTimestamp(e)}</updated>
<content type="xhtml">
<div xmlns="http://www.w3.org/1999/xhtml">
<table>
<tr><th>Amount</th><th>Tags</th><th>Receipt</th></tr>
<tr><td>{e.amount.is.toString}</td>
<td>{e.tags.map(_.name.is).mkString(", ")}</td>
<td>{
if (e.receipt.is ne null) {
<img src={"/image/" + e.id} />
} else Text("None")
}</td></tr>
</table>
</div>
</content>
</entry>
Now that we have the format, we simply hook into our dispatch method to match a GET request on a URL like:
http://www.pocketchangeapp.com/api/account/<accound ID>
Refer to Listing
15.4.1↑ again to see this match.
15.7.1 An Example Atom Request
An example Atom reqeust/response cycle for a test account is shown in Listing
15.7.1↓. We’ve cut off the entries here for brevity.
An Example Atom Request and Response
Request:
http://www.pocketchangeapp.com/api/account/1
Response:
<feed xmlns="http://www.w3.org/2005/Atom">
<title>Test</title>
<id>urn:uuid:1</id>
<updated>2010-10-06T00:00:00Z</updated>
<entry>
<id>urn:uuid:http://www.pocketchangeapp.com/api/expense/3</id>
<title>Receipt test</title>
<updated>2010-10-06T00:00:00Z</updated>
<content type="xhtml">
<div xmlns="http://www.w3.org/1999/xhtml">
<table>
<tr><th>Amount</th><th>Tags</th><th>Receipt</th></tr>
<tr><td>12.00</td>
<td>test, receipt</td>
<td><img src="/image/3" /></td></tr>
</table>
</div>
</content>
</entry>
...
15.7.2 Add a feed tag for the account page
As an extra nicety, we want to add an appropriate Atom
<link/> tag to our Account view page so that people can easily subscribe to the feed from their browser. We do this by making two modifications to our template and snippet code. Listing
15.7.2↓ shows how we insert a new binding point in our
viewAcct.html template to place the new link in the page head section.
Adding a binding to viewAcct.html
...
<lift:Accounts.detail eager_eval="true">
<head><acct:atomLink /></head>
...
Listing
15.7.2↓ shows how we generate a new Atom link based on the current
Account’s id that points to the proper URL for our API.
bind("acct", xhtml,
"atomLink" -> <link href={"/api/account/" + acct.id}
type="application/atom+xml"
rel="alternate" title={acct.name + " feed"} />,
"name" -> acct.name.asHtml,
...
15.8 Conclusion
In this chapter, we outlined a RESTful API for a web application and showed how to implement one using Lift. We then extended that API to return Atom in addition to XML and JSON.
A A Brief Tour of Maven↓
In this chapter we’ll discuss the Maven build tool and some of the basics of configuration and usage. Maven is what Lift uses for build management, so becoming acquainted with Maven is important to getting the most out of Lift. If you’re already familiar with Maven you can safely skip this chapter.
A.1 What is Maven?
Maven is a project management tool, as opposed to simply a build tool. The Maven site describes the goals of Maven as:
-
Make the build process easy
-
Provide a uniform build system
-
Provide quality project information
-
Provide guidelines for best practices
-
Allow transparent migration to new features
As a project management tool, Maven goes beyond just controlling compilation of your code. By default, Maven comes equipped not only to perform development-centric tasks, but it can generate documentation from your code and for your project website. Everything in Maven is controlled via the pom.xml (Project Object Model) file, which contains both information and configuration details on the project. We’ll be covering some of the basic aspects of the POM through the rest of this chapter.
A.2 Lifecycles, Phases and Goals
Maven is designed around the concept of project lifecycles. While you can define your own, there are three built-in lifecycles: default, clean and site. The default lifecycle builds and deploys your project. The clean lifecycle cleans (deletes) compiled objects or anything else that needs to be removed or reset to get the project to a pristine pre-build state. Finally, the site lifecycle generates the project documentation.
Within each lifecycle there are a number of phases that define various points in the development process. The most interesting lifecycle (from the perspective of writing code) is default. The most commonly used phases in the default lifecycle are:
-
compile - compiles the main source code of the project
-
test - tests the main code using a suitable unit testing framework. These tests should not require that the code is packaged or deployed. This phase implicitly calls the testCompile goal to compile the test case source code
-
package - packages the compiled code into its distributable format, such as a JAR. The POM controls how a project is packaged through the <packaging/> element
-
install - installs the package into the local repository (see section A.3↓), for use as a dependency in other projects locally
-
deploy - used in an integration or release environment. Copies the final package to the remote repository for sharing with other developers and projects.
Maven is typically run from the command line by executing command “mvn <phase>”, where <phase> is one of the phases listed above. Since phases are defined in order, all phases up to the one you specify will be run. For example, if you want to package your code, simply run “mvn package” and the compile and test phases will automatically be run. You can also execute specific goals for the various plugins that Maven uses. Execution of a specific goal is done with the command “mvn <plugin>:<goal>”. For instance, the compile phase actually calls the compiler:compile goal by default. A common usage of executing a goal for Lift is the jetty:run goal, which compiles all of your code and then runs an instance of the Jetty web server so that you can exercise your app. The jetty plugin is not directly bound to any lifecycle or phase, so we have to execute the goal directly.
One final note is that you can specify multiple phases/goals in one command line, and Maven will execute them in order. This is useful, for instance, if you want to do a clean build of your project. Simply run “mvn clean jetty:run” and the clean lifecycle will run, followed by the jetty:run goal (and all of the prerequisites for jetty:run, such as compile).
A.3 Repositories
Repositories are one of the key features of Maven. A repository is a location that contains plugins and packages for your project to use. There are two types of repository: local and remote. Your local repository is, as the name suggests, local to your machine, and represents a cache of artifacts downloaded from remote repositories as well as packages that you’ve installed from your own projects. The default locations of your local repo will be:
-
Unix: ~/.m2/repository
-
Windows: C:\Documents and Settings\<user>\.m2\repository
You can override the local repository location by setting the M2_REPO environment variable, or by editing the <home>/.m2/settings.xml file.
Remote repositories are repositories that are reachable via protocols like http and ftp and are generally where you will find the dependencies needed for your projects. Repositories are defined in the POM; listing
A.3↑ shows the definition of the scala-tools.org release repository where Lift is found. Maven has an internal default set of repositories so usually you don’t need to define too many extra repos.
<repositories>
<repository>
<id>scala-tools.org</id>
<name>Scala Tools Maven2 Repository</name>
<url>http://scala-tools.org/repo-releases</url>
</repository>
</repositories>
As a final note, sometimes you may not have net access or the remote repos will be offline for some reason. In this case, make sure to specify the “-o” (offline) flag so that Maven skips checking the remote repos.
A.4 Plugins
Plugins add functionality to the Maven build system. Lift is written in Scala, so the first plugin that we need to add is the Maven Scala Plugin; this adds the ability to compile Scala code in your project. Listing
A.4↓ shows how we configure the plugin in the pom.xml file for a Lift application. You can see the Scala plugin adds a
compile and
testCompile goal for the build phase, which makes Maven execute this plugin when those goals are called (explicitly or implicitly). In addition, the configuration element allows you to set properties of the plugin executions; in this case, we’re explicitly specifying the version of Scala that should be used for compilation.
Configuring the Maven Scala Plugin
<plugin>
<groupId>org.scala-tools</groupId>
<artifactId>maven-scala-plugin</artifactId>
<executions>
<execution>
<goals>
<goal>compile</goal>
<goal>testCompile</goal>
</goals>
</execution>
</executions>
<configuration>
<scalaVersion>${scala.version}</scalaVersion>
</configuration>
</plugin>
A.5 Dependencies
Dependency management is one of the more useful features of Maven. Listing
A.5↓ shows a declaration of the Jetty dependency for the default Lift application. The details of the specification are straightforward:
-
The groupId and artifactId specify the artifact. A given group may have many artifacts under it; for instance, Lift uses net.liftweb for its groupId and the core artifacts are lift-core and life-util
-
The version is specified either directly or with a range, as we’ve used in this example. A range is defined as <left>min,max<right> where left and right indicate an inclusive or exclusive range: [ and ] are inclusive, ( and ) are exclusive. Omitting a version in a range leaves that portion of the range unbounded. Here we configure the pom so that Jetty 6.1.6 or higher is used
-
The scope of the dependency is optional, and controls exactly where the dependency is used. In this case we specify a test scope which means that the package will only be available to test phases
<dependency>
<groupId>org.mortbay.jetty</groupId>
<artifactId>jetty</artifactId>
<version>[6.1.6,)</version>
<scope>test</scope>
</dependency>
A.5.1 Adding a Dependency
As an example, let’s say that you’d like to add a new library and you want Maven to make sure you’ve got the most up-to-date version. We’re going to add Configgy as a dependency. Configgy is “a library for handling config files and logging for a scala daemon. The idea is that it should be simple and straightforward, allowing you to plug it in and get started quickly, writing small useful daemons without entering the shadowy world of java frameworks.”
First we need to tell Maven where we can get Configgy, so in the <repositories> section add the following:
<repository>
<id>http://www.lag.net/repo/</id>
<name>http://www.lag.net/repo/</name>
<url>http://www.lag.net/repo/</url>
</repository>
Then in the <dependencies> section add:
Adding the Configgy dependency
<dependency>
<groupid>net.lag</groupid>
<artifactid>configgy</artifactid>
<version>[1.2,)</version>
</dependency>
That’s it, you’re done. The next time you run Maven for your project, it will pull down the Configgy jars into your local repository. Maven will periodically check for new versions of dependencies when you build, but you can always force a check with the “-U” (update) flag.
A.6 Further Resources
Obviously we’ve only scratched the surface on what you can with Maven and how to configure it. We’ve found the following set of references useful in learning and using Maven:
A.7 Project Layout
One of the things that allows Maven to work so well is that there is a standardized layout for projects. We’re not going to cover all of the standard locations for parts of your Maven project, but we do want to highlight a few locations that are important to Lift applications specifically:
<application_root>/src/main/scala This directory is where you place your Scala source, such as snippets, model objects, and any libraries you write. The subfolder structure follows the traditional Java packaging style.
<application_root>/src/main/resources This directory is where you would place any resources that you want to go into the WAR file. Typically this is used if you want to add entries to the META-INF directory in the WAR, since normal web resources should be placed under the webapp/WEB-INF directory.
<application_root>/src/main/webapp All of the web and static content for your application, such as images, XHTML templates, JavaScript and CSS are placed under this directory. This is also where your WEB-INF directory (and the configuration files it contains) goes. This directory is essentially what is packaged into the WAR in addition to the output from your Scala sources.
<application_root>/src/main/webapp/templates-hidden This is a special location for templates. As we discuss more in sections
5.1↑ and
4.5.7↑, templates placed in this directory cannot be viewed directly by clients, but are available to other templates.
<application_root>/src/test/scala This directory is where you can put all of your test code. As with src/main/scala, the subfolder structure follows the traditional Java packaging style.
B Message Handling
When we talk about message handling in Lift, we’re talking about how you provide feedback to the users of your application. While there are already a lot of mechanisms for displaying data to the user via snippets, views, etc, properly binding and setting up HTML-level elements can get complicated, especially when you’re dealing with callback functions or error handling. Lift provides an alternate mechanism for displaying messages to users that is easy to use and allows flexibility in display on the client side.
B.1 Sending Messages
Messages for non-Comet requests are handled via the S object (yes, even Ajax is handled automatically); specifically, the error, notice and warning methods allow you to send a String or a NodeSeq back to the user for display, with or without an association with a particular element id. The error method also provides an overload that takes a List[FieldError], the type returned from Mapper field validation (section
8.2.3↑). The messages that you send are held by a RequestVar (section
3.11↑) in the S object, so you can send messages from anywhere in your stateful request/response lifecycle without breaking the flow of your code. Listing
B.1↓ shows how you could use messages in form processing to send feedback on missing fields.
Using messages in form processing
object data extends RequestVar[String]("")
def addNote (xhtml : NodeSeq) : NodeSeq = {
def doAdd () = {
//validate
if (data.is == "") {
S.error("noteField", "You need to provide a note")
} else {
Note.create.note(data).save
S.notice("Note added")
redirectTo("/viewNotes")
}
}
bind("form", xhtml,
"note" -> SHtml.text(data.is, data(_), "id" -> "noteField"),
"add" -> SHtml.submit("Add", doAdd))
}
In this particular case we use two different messages. One is an error to be displayed when the form is re-shown; this error is associated with the “noteField” element. The second message is a simple notice to let the user know that the data was successfully saved.
For Comet
↓ the only difference in sending messages is that the error, notice and warning methods are defined in the CometActor class, so you just use those directly and Lift handles the rest.
B.2 Displaying Messages
The display of messages is handled by two builtin snippets, <lift:Msgs/> and <lift:Msg/>. The Msgs snippet displays all messages not associated with a particular element Id. The messages are displayed as an unordered list, but Lift allows customization of the messages via XML that you embed within the snippet. For each of the three message types, you can specify a <lift:TYPE_msg> and <lift:TYPE_class> element that controls the message label and CSS class, respectively. The default label is simply the title-case type (Error, Notice, Warning). For example, listing
B.2↓ shows how we could change the error and notice messages.
<lift:Msgs>
<lift:error_msg>Danger, Will Robinson! </lift:error_msg>
<lift:error_class>redtext</lift:error_class>
<lift:notice_msg>FYI: </lift:notice_msg>
</lift:Msgs>
The Msg snippet is used to display all messages associated with a particular Id by specifying the id attribute on the <lift:Msg/> element. With Msg, you don’t get a message label, so there’s no override mechanism for it. You do, however, have the ability to to change the message class on a per-type basis by setting the noticeClass, errorClass, or warningClass attributes on the <lfit:Msg/> element. Listing
B.2↓ shows usage of Msg corresponding to our snippet in listing
B.1↑.
<lift:Stuff.addNote form="POST">
<form:note /><lift:Msg id="noteField" errorClass="redtext" />
<form:add />
</lift:Stuff.addNote>
C Lift Helpers
C.1 Introduction
Lift provides a fairly useful collection of helper artifacts. The helpers are essentially utility functions that minimize the need for boilerplate code. This appendix is intended to introduce some of the more common utility classes and objects to you so that you’re familiar with them. If you would like more details, you can look at the API documentation for the net.liftweb.util package.
C.2 Box (or Scala’s Option class on steroids)
net.liftweb.util.Box (or Scala’s
scala.Option class on steroids) is a utility class that mimics Scala’s
Option type (also heavily used inside Lift). To understand some of the underlying concepts and assumptions, let’s take a quick look at
Option class first. The
Option class allows a type-safe way of dealing with a situation where you may or may not have a result.
Option has two values, either
Some(value), where
value is actually the value, and
None, which is used to represent nothing. A typical example for
Option is outlined using Scala’s Map type. Listing
C.2↓ shows a definition of a
Map, a successful attempt to get the value of key
a, and an attempt to get the value of key
i. Notice that when we retrieved the existing key-value pair for
a, the value returned was
Some(A) and when we asked for the value of key
i, we received None.
scala> val cap = Map("a" -> "A", "b" -> "B")
cap: scala.collection.immutable.Map[java.lang.String,java.lang.String] =
Map(a -> A, b -> B)
scala> cap.get("a")
res1: Option[java.lang.String] = Some(A)
scala> cap.get("i")
res2: Option[java.lang.String] = None
Getting the value out of an
Option is usually handled via Scala’s matching mechanism or via the
getOrElse function, as shown in Listing
C.2↓:
Fetch value from an Option
def prettyPrint(foo: Option[String]): String = foo match {
case Some(x) => x
case None => "Nothing found."
}
// Which would be used in conjunction with the previous code:
scala> prettyPrint(cap.get("a"))
res7: String = A
scala> prettyPrint(cap.get("i"))
res8: String = Nothing found.
Box in Lift covers the same base functionality as Option but expands the semantics for missing values. If we have an Option that is None at some point, we can’t really tell why that Option is None, although in many situations, knowing why would be quite helpful. With Box, on the other hand, you have either have a Full instance (corresponding to Some with Option) or an instance that subclasses EmptyBox (corresponding to None). EmptyBox can either be an Empty instance or a Failure instance incorporating the cause for the failure. So you can think of Box as a container with three states: full, empty, or empty for a particular reason. The Failure case class takes three arguments: a String message to describe the failure, a Box[Throwable] for an optional exception related to the failure, and a Box[Failure] for chaining based on earlier Failures.
As an example of how we can use
Box instances in real code, consider the case where we have to do a bunch of null checks, perform an operation, and then perform more null checks, other operations, and so on. Listing
C.2↓ shows an example of this sort of structure.
Pseudocode nested operations example
x = getSomeValue();
if (x != null) {
y = getSomeOtherValue();
if (y != null) {
compute(x, y);
}
}
This is tedious and error-prone in practice. Now let’s see if we can do better by combining Lift’s
Box with Scala’s for comprehensions as shown in Listing
C.2↓.
Box nested operations example
def getSomeValue(): Box[Int] = Full(12)
def getSomeOtherValue(): Box[Int] = Full(2)
def compute(x: Int, y: Int) = x * y
val res = for ( x <- getSomeValue();
y <- getSomeOtherValue() if x > 10) yield compute(x, y)
println(res)
In Listing
C.2↑, we have two values,
x and
y, and we want to do some computation with these values. But we must ensure that computation is done on the correct data. For instance, the computation cannot be done if
getSomeValue returns no value. In this context, the two functions return a
Box[Int]. The interesting part is that if either or both of the two functions return an
Empty Box instead of
Full (
Empty impersonating the nonexistence of the value), the
res value will also be
Empty. However, if both functions return a
Full (like in Listing
C.2↑), the computation is called. In our example the two functions return
Full(12) and
Full(2), so
res will be a
Full(24).
But we have something else interesting here: the if x > 10 statement (this is called a “guard” in Scala). If the call to getSomeValue returns a value less than or equal to 10, the y variable won’t be initialized, and the res value will be Empty. This is just a taste of some of the power of using Box for comprehensions; for more details on for comprehensions, see The Scala Language Specification, section 6.19, or one of the many Scala books available.
Lift’s
Box extends
Option with a few ideas, mainly the fact that you can add a message about why a
Box is
Empty.
Empty corresponds to
Option’s
None and
Full to
Option’s Some. So you can pattern match against a
Box as shown in Listing
C.2↓.
a match {
Full(author) => Text("I found the author " + author.niceName)
Empty => Text("No author by that name.")
// message may be something like "Database disconnected."
Failure(message, _, _) => Text("Nothing found due to " + message)
}
def confirmDelete {
(for (val id <- param("id"); // get the ID
val user <- User.find(id)) // find the user
yield {
user.delete_!
notice("User deleted")
redirectTo("/simple/index.html")
}) getOrElse {error("User not found"); redirectTo("/simple/index.html")}
}
In conjunction with Listing
C.2↑, we can use other
Box functions, such as the
openOr function shown in Listing
C.2↓.
lazy val UserBio = UserBio.find(By(UserBio.id, id)) openOr (new UserBio)
def view (xhtml: NodeSeq): NodeSeq = passedAuthor.map({ author =>
// do bind, etc here and return a NodeSeq
}) openOr Text("Invalid author")
We won’t be detailing all of the Box functions here, but a few words on the most common function might be benficial.
|
Function name
|
Description
|
Short example. Assume myBox is a Box
|
|
openOr
|
Returns the value contained by this Box. If the Box is Empty
|
myBox openOr “The box is Empty”
|
|
map
|
Apply a function on the values of this Box and return something else.
|
myBox map (value => value + “ suffix”)
|
|
dmap
|
Equivalent with map(..) openOr default_value. The default value will be returned in case the map is Empty
|
myBox dmap(“default”)(value => value + “ suffix”)
|
|
!!
|
If the argument is null in will return an Empty, otherwise a Full containing the arguent’s value. Note this this is a method on the Box object, not a given Box instance.
|
Box !! (<a reference>)
|
|
?~
|
Transforms an Empty to a Failure and passing a message. If the Box is a Full it will just return this.
|
myBox ?~ (“Error message”)
|
|
isDefined
|
Returns true if this Box contains a value
|
myBox isDefined
|
|
isEmpty
|
Retun true is this Boxis empty
|
myBox isEmpty
|
|
asA[B]
|
Return a Full[B] if the content of this Box is of type B, otherwise return Empty
|
myBox asA[Person]
|
|
isA[B]
|
Return a Full[B] if the contents of this Box is an instance of the specified class, otherwise return Empty
|
myBox isA[Person]
|
Note that Box contains a set of implicit conversion functions from/to Option and from/to Iterable.
Remember that Box is heavily used in Lift and most of the Lift’s API’s operates with
Boxes. The rationale is to avoid
null references and to operate safely in context where values may be missing. Of course, a
Box can be set to
null manually but we strongly recommend against doing so. There are cases, however, where you are using some third party Java libraries with APIs that return
null values. To cope with such cases in Lift you can use the
!! function to
Box that value. Listing
C.2↓ shows how we can deal with a possible
null value.
var x = getSomeValueThatMayBeNull();
var boxified = Box !! x
In this case the boxified variable will be Empty if x is null or Full(x) if x is a valid value/reference..
C.3 ActorPing
It provides convenient functionality to schedule messages to Actors.
// Assume myActor an existing Actor
// And a case object MyMessage
// Send the MyMessage message after 15 seconds
ActorPing.schedule(myActor, MyMessage, 15 seconds)
// Send the MyMessage message every 15 seconds. The cycle is stopped
// if recipient actor exits or replied back with UnSchedule message
ActorPing.scheduleAtFixedRate(myActor, MyMessage, 0 seconds, 15 seconds)
C.4 ClassHelpers
Provides convenient functions for loading classes using Java reflection, instantiating dinamically loaded classes, invoking methods vis reflection etc.
import _root_.net.liftweb.util.Helpers._
// lookup the class Bar in the three packages specified in th list
findClass("Bar", "com.foo" :: "com.bar" :: "com.baz" :: Nil)
invokeMethod(myClass, myInstance, "doSomething")
C.5 CodeHelpers
Provides a convenient way of telling why a boolean expression failed. For instance we are seeing manytime code like:
var isTooYoung = false;
var isTooBig = false;
var isTooLazy = true;
var exp = isTooYoung && isTooBig && isTooLazy
As you can see we have no way of telling if the exp was false because of isTooYoung, isTooBig or isTooLazy unless we test them again. But let’s see this:
import net.liftweb.util._
import net.liftweb.util.MonadicConversions._
val exp = (isTooYoung ~ "too young") &&
(isTooBad ~ "too bad") &&
(isToLazy ~ "too lazy")
println(exp match {
case False(msgs) =>
msgs mkString("Test failed because it is ’", "’ and ’", "’.")
case _ => "success"
})
Now if exp is a False we can tell why it failed as we have the messages now.
C.6 ControlHelpers
Provides convenient functions for try/catch situations. For example:
tryo {
// code here. Any exception thrown here will be silently caught
}
tryo((e: Throwable) => println(e)) {
// code here. Any exception here willbe caught add passed to
// the above function.
}
tryo(List(classOf[ClassNotFoundException], classOf[IOException])) {
// code here. If IOException or ClassNotFoundException is thrown
// (or a subclass of the two) they will be ignored. Any other
// exception will be rethrown.
}
C.7 CSSHelpers
This provide a convenient functionality to fix relative root paths in CSS (Cascade Stylesheet) files. Here is an example:
Assume this entry in a CSS file:
.boxStyle {
background-image: url(’/img/bkg.png’)
}
//in your code you can say
CSSHelpers.fixCSS(reader, "/myliftapp")
// where reader is a java.io.Reader that provides the
// content of the CSS file.
Now if your application is not deployed in the ROOT context path (“/”) and say it is deployed with the context root /myliftapp then the background picture will probably notbe found. Say http://my.domain.com/img/bkg.png is an unknown path. However http://my.domain.com/myliftapp/img/bkg.png is known. In the example above we are calling fixCSS so that it will automatically replace the root relative paths such that background-image: url(’/img/bkg.png’) becomes background-image: url(’/myliftapp/img/bkg.png’). To use that in your lift application you can do:
def boot(){
...
LiftRules.fixCSS("styles" :: "theme" :: Nil, Empty)
...
}
When the /styles/theme.css file Lift will apply the prefix specified. But in this case we provided an Empty Box. This actually means that Lift will apply the context path returned by S.contextPath function which as you know returns the context path from the HttpSession.
Internally when you call fixCSS a dispatch function is automatically created and pre-pended to LiftRules.dispatch. This is needed in order to intercept the browser request to this .css resource. Also internally we are telling Lift the this resource must be server by Lift and not by container.
The way it works internally is that we are using Scala combinator parsers to augment only the root relative paths with the given prefix.
C.8 BindHelpers
Binders are extensiveley discussed in other chapters so we won’t reiterate them here.
<lift:CountGame.run form="post">
<choose:guess>
Guess a number between 1 and 100.<br/>
Last guess: <count:last/><br />
Guess: <count:input/><br/>
<input type="submit" value="Guess"/>
</choose:guess>
<choose:win>
You Win!!<br />
You guessed <count:number/> after <count:count/> guesses.<br/>
</choose:win>
</lift:CountGame.run>
You can use the Helpers.chooseTemplate method to extract portions of a given XML input:
Choose template Scala code
import net.liftweb.util._
import Helpers._
class CountGame {
def run(xhtml: NodeSeq): NodeSeq = {
...
chooseTemplate("choose", "win", xhtml);
}
}
So in the snippet conditionally we can choose between parts of the snippet template. In the case above only the childs of <choose:win> node will be returned by the snippetfunction, hence rendered.
C.9 HttpHelpers
This provides helper functions for HTTP parameters manipulation, URL encoding/decoding etc. However there is some interesting functionality available that lets you choose between tags of a snippet.
Lift provides its own JSON parser if you ever need one. At a first glance it may be a bit redundant with Scala’s JSON parser but infact Scala’sparser has its own problems with large JSON objects hence List’s uses its own JSON parser implemented of course using combinator parsers.
Provides utility functions for calculating the distance between words
C.12 ListHelpers
Provides utility functions for manipulating lists that are not provided by Scala libraries.
C.13 NamedPartialFunctions
Provides extremly useful functions for invoking partial functions that are chained in lists of functions.
var f1: PartialFunction[Int,Int] = {
case 10 => 11
case 12 => 14
}
var f2: PartialFunction[Int,Int] = {
case 20 => 11
case 22 => 14
}
NamedPF(10, f1 :: f2 :: Nil)
Remember that many LiftRules variable are RuleSeq-s. Meaning that most of the times we re talking about lists of partial functions. Hence internally lift uses NamedPF for invoking such functions that are ultimately provided by the user. Please see LiftRules.dispatch
C.14 SecurityHelpers
Provides various functions used for random number generation, encryption/decriptions (blowfish), hash calculations (MD5, SHA, SHA-256) and so on.
C.15 TimeHelpers
Utility functions for time operations. For instance if also provides a set of implicit conversion functions that allow you to type “10 seconds” and returns the value in milliseconds.
D Internationalization ↓↓
The ability to display pages to users of multiple languages is a common feature of many web frameworks. Lift builds on the underlying Java I18N foundations to provide a simple yet flexible means for using Locales and translated strings in your app. Locales are used to control not only what language the text is in that’s presented to the user, but also number and date formatting, among others. If you want more details on the underlying foundation of Java I18N we suggest you visit the Internationalization Homepage at
http://java.sun.com/javase/technologies/core/basic/intl/.
Another note is that languages are selected in Lift using language tags, as defined in
http://www.w3.org/International/articles/language-tags/. Language tags are base on the ISO 639 standard. In general, you should keep language tags as short as possible and avoid adding information (such as regional specifiers) that does not provide otherwise distinguishing information. For example, if your Spanish page will be used for both Mexican and Spanish clients without modification, simply use
es and not
es_MX or
es_ES.
D.1 Localized Templates ↓
As we described in Section
4.1 on page 1↑, Lift automatically chooses the template for a request based on the current locale by appending the locale’s variants. That means that a request for
/index with a calculated locale of
en_US will try these filenames, in order:
-
index_en_US.html
-
index_en.html
-
index.html
Note that Java upper-cases the country portion of the locale, so you need to make sure you name your templates accordingly. For instance, in the above example a file named index_en_us.html wouldn’t match.
D.2 Resource Bundles
Resource bundles are sets of property files that contain keyed strings for your application to use in messages. In addition to the key/value pair contents of the files, the filename itself is significant. When a
ResourceBundle is specified by name, the base name is used as the default, and additional files with names of the form “<base name>_<language tag>” can be used to specify translations of the default strings in a given language. As an example, consider listing
D.2↓, which specifies a default resource bundle for an application that reports the status of a door (open or closed).
openStatus=The door is open
closedStatus=The door is closed
Suppose this file is called “DoorMessages.properties”; we can provide an additional translation for Spanish by creating a file called “DoorMessages_es.properties”, shown in listing
D.2↓.
openStatus=La puerta está abierta
closedStatus=La puerta está cerrada
When you want to retrieve a message (covered in the next two sections) Lift will check the current Locale and see if there’s a specialized ResourceBundle available for it. If so, it uses the messages in that file; otherwise, it uses the default bundle.
Lift supports using multiple resource bundle files so that you can break your messages up into functional groups. You specify this by setting the LiftRules.resourceNames property to a list of the base names (without a language or “.properties” extension):
LiftRules.resourceNames = "DoorMessages" ::
"DoorknobMessages" :: Nil
The order that you define the resource bundle names is the order that they’ll be searched for keys. The message properties files should be located in your WEB-INF/classes folder so that they are accessible from Lift’s classloader; if you’re using Maven this will happen if you put your files in the src/main/resources directory.
Note: According to the
Properties documentation, keys
must escape significant whitespace, colons or equals signs in the key itself with backslashes. For example, to specify “this = that” as a key, you would have to write it as “this\ \=\ that” in the properties file.
↓
D.3 An Important Note on Resource Bundle Resolution↓
Per Java’s documentation on
ResourceBundle, resolution of property files is done in this order:
-
baseName + “_” + language1 + “_” + country1 + “_” + variant1
-
baseName + “_” + language1 + “_” + country1
-
baseName + “_” + language1
-
baseName + “_” + language2 + “_” + country2 + “_” + variant2
-
baseName + “_” + language2 + “_” + country2
-
baseName + “_” + language2
-
baseName
where “language1”, “country1”, and “variant1” are the requested locale parameters, and “language2”, “country2”, “variant2” are the default locale parameters.
For example, if the default locale for your computer is “en_GB”, someone requests a page for “ja”, and you have the following property files defined:
-
Messages_fr_FR.properties
-
Messages_en_GB.properties
-
Messages.properties
then the
Messages_en_GB.properties file, and not
Messages.properties will be used. If you want to change this behavior so that any undefined locales utilize the base properties file, set your default Locale to the ROOT locale in your
Boot.scala with the code shown in Listing
D.3↓:
Setting the ROOT Default Locale
import java.util.Locale
Locale.setDefault(Locale.ROOT)
D.4 Localized Strings in Scala Code
Retrieving localized strings in your Scala code is primarily performed using the
S.? method. When invoked with one argument the resource bundles are searched for a key matching the given argument. If a matching value is found it’s returned. If it can’t be found then Lift calls
LiftRules.localizationLookupFailureNotice on the (key, current Locale) pair and then simply returns the key. If you call
S.? with more than one argument, the first argument is still the key to look up, but any remaining arguments are used as format parameters for
String.format executed on the retrieved value. For example, listing
D.4↓ shows a sample bundle file and the associated Scala code for using message formatting.
// bundle
tempMsg=The current temperature is %0.1 degrees
// code
var currentTmp : Double = getTemp()
Text(S.?("tempMsg", currentTemp))
Lift also provides the S.?? method, which is similar to S.? but uses the ResourceBundle for internal Lift strings. Lift’s resource-bundles are located in the i18n folder with the name lift-core.properties The resource-bundle name is given by LiftRules.liftCoreResourceName variable. Generally you won’t use this method.
D.5 Formatting Localized Strings
While Lift provides facilities for retrieving strings from localized property bundles (Section
D.4↑), it does not provide direct support for localized formatting of those strings. There is an
S.? method which takes additional parameters, but it uses
String.format (and printf syntax) to format the strings and does not properly support date/time formatting. Instead, we recommend you use
java.text.MessageFormat for localized strings that will use parameters. Listing
D.5↓ shows a utility method that you can use in your code to localize strings with parameters. Note that if you have a lot of Lift’s implicit conversions in scope you may need to explicitly type some arguments as we have in this example.
A Utility Method for Localizing Strings
private def i10n(key : String, args : Object*) = {
import java.text.{FieldPosition,MessageFormat}
val formatter = new MessageFormat(S.?(key), S.locale)
formatter.format(args.toArray, new StringBuffer, new FieldPosition(0)).toString
}
// Usage:
<span>{i10n("welcome", new java.util.Date, 6 : Integer)}</span>
D.6 Localized Strings in Templates↓
You can add localized strings directly in your templates through the
<lift:loc /> tag. You can either provide a locid attribute on the tag which is used as the lookup key, or if you don’t provide one, the contents of the tag will be used as the key. In either case, if the key can’t be found in any resource bundles, the contents of the tag will be used. Listing
D.6↓ shows some examples of how you could use lift:loc. In both examples, assume that we’re using the resource bundle shown in listing
D.2↑. The fallthrough behavior lets us put a default text (English) directly in the template, although for consistency you should usually provide an explicit bundle for all languages.
<!-- using explicit key (preferred) -->
<lift:loc locid="openStatus">The door is open</lift:loc>
<!-- should be the same result, but a missing bundle
will result in the key being displayed -->
<lift:loc>openStatus</lift:loc>
D.7 Calculating Locale↓↓
The Locale for a given request is calculated by the function set in LiftRules.localeCalculator, a (Box[HttpServletRequest]) ⇒ Locale. The default behavior is to call getLocale on the HTTPRequest, which allows the server to set it if your clients send locale preferences. If that call returns null, then Locale.getDefault is used. You can provide your own function for calculating locales if you desire.
Listing
D.7↓ shows how you can use a cookie in addition to a URL query parameter to select the locale for your pages. This code would be placed in your
Boot.boot method. Lines 2-3 define some imports beyond the standard imports (see Section
3.3 on page 1↑). Lines 6-10 define a utility function to convert a language tag string into a
Locale. Line 13 defines the name of the cookie that will store your locale choice. Lines 15-34 define the partial function that will be used to compute the new
Locale. First, we only do computation if the
LiftRules.localeCalculator method is invoked with an
HTTPRequest (line 16). Our next step is to determine the current locale by checking whether there is an existing locale cookie set (lines 18-20), or by utilizing the default Lift locale calculator (line 21). Our next check is to determine if the user has explicitly requested a locale via a query parameter (line 24). If the parameter is set (and not
null), we construct a new
Locale from the value (line 26), set the cookie so that the request is remembered (line 27), and return the new locale. If there is no request parameter then we use the current locale as defined on line 18.
Calculating Locale Based on Cookies and Parameters
// Import the classes we’ll be using beyond the standard imports
import java.util.Locale
import provider.{HTTPCookie,HTTPRequest}
// Properly convert a language tag to a Locale
def computeLocale(tag : String) = tag.split(Array(’-’, ’_’)) match {
case Array(lang) => new Locale(lang)
case Array(lang, country) => new Locale(lang, country)
case Array(lang, country, variant) => new Locale(lang, country, variant)
}
// Define this to be whatever name you want
val LOCALE_COOKIE_NAME = "SelectedLocale"
LiftRules.localeCalculator = {
case fullReq @ Full(req) => {
// Check against a set cookie, or the locale sent in the request
def currentLocale : Locale =
S.findCookie(LOCALE_COOKIE_NAME).flatMap {
cookie => cookie.value.map(computeLocale)
} openOr LiftRules.defaultLocaleCalculator(fullReq)
// Check to see if the user explicitly requests a new locale
S.param("locale") match {
case Full(requestedLocale) if requestedLocale != null => {
val computedLocale = computeLocale(requestedLocale)
S.addCookie(HTTPCookie(LOCALE_COOKIE_NAME, requestedLocale))
computedLocale
}
case _ => currentLocale
}
}
case _ => Locale.getDefault
}
E Logging in Lift
Logging is a useful part of any application, Lift app or otherwise. Logging can be used to audit user actions, give insight into runtime performance and operation, and even to troubleshoot and debug issues. Lift comes with a thin logging facade that sits on top of the SLF4J library. This facade provides simple access to most common logging functions and aims to be easy to use, flexible, and most important, inconspicuous. If you do decide that Lift’s logging facilities don’t meet your needs, it’s possible to use any Java logging framework you desire, but it’s still useful to understand Lift’s framework since Lift uses it internally for logging.
E.1 Logging Backend
The detailed configuration of SLF4J is outside the scope of this book, but we would like to highlight a few key notes concerning SLF4J. First, SLF4J splits the API from the implementation into separate JAR files. This allows you to choose the backing implementation that best suits your deployment. For example, SLF4J contains implementations for JDK logging, log4j, and more. For example, the JBoss application server version 5 and newer comes bundled with its own implementation of the SLF4J API, so you can simply deploy a Lift WAR on JBoss and use the server’s configuration and logging. Similarly, Jetty comes bundled with the SLF4J API.
Outside of container-provided implementations, the logback logging framework is a very nice implementation of the SLF4J API. It’s written by the same people who wrote log4j and has much improved performance and functionality over log4j. Because logback-classic implements the SLF4J API, you simply need to drop the logback-classic jar into your classpath, or add it as a dependency in your WAR to use it. One particularly nice feature of logback is that if it can’t locate a configuration file (which can be written in XML, Groovy, or soon, Scala), it will default to logging everything to the console.
E.2 Basic Logging
Logging in Lift is performed via the
net.liftweb.common.Logger object and trait. The
Logger object provides a set of utility methods for configuration and instantiation of logger instances. The
Logger trait can be mixed into your snippet, comet, or other classes to provide direct methods for logging (we’ll cover these in Section
E.2.3↓).
E.2.1 Logging Setup
The first step in utilizing Lift’s logging is to configure the logger. As we mentioned in Section
E.1↑, Lift uses the SLF4J framework. The configuration of SLF4J depends on which backing implementation you use, but Lift comes with helpers for both log4j (
net.liftweb.common.Log4j) and for logback (
net.liftweb.common.Logback). These helpers are utilized with the
Logger object’s
setup var. The
Log4j helpers provides methods that can be used to load a configuration from a
String, a file (either XML or properties), or with Lift’s default (console) logging. The
Logback helper provides a single method to load a configuration from an XML file. Listing
E.2.1↓ shows how you could use the
Logback helper in the
Boot.boot method to configure logging from the
logconfig.xml file.
Configuring Logback via Logger.setup
def boot {
// Get a reference to the config from our classpath
val logUrl = LiftRules.getResource("logconfig.xml")
// Apply the reference, if found
logUrl.foreach { Logger.setup = Logback.withFile(_) }
...
}
E.2.2 Obtaining a Logger
There are two basic means of obtaining a logger instance. The first is to mix the Logger trait into your class. The second is to instantiate a logger using the Logger object’s apply methods.
Mixing the
Logger trait into your class is a very simple way to add logging methods in your code, as shown in Listing. When you do this, the underlying logger will have a name derived from your class’s dynamic type. For example, Listing
E.2.2↓ shows the definition of our
Accounts snippet object with a
Logger trait mixed in. When we log in the
Accounts object the name will be the fully-qualified classname, or “com.pocketchangeapp.snippet.Accounts” in our case. When you mix the Logger trait into your class, you can access the logging methods (Section
E.2.3↓) directly.
Mixing Logger into a Class
object Accounts extends DispatchSnippet with Logger {
...
warn("This is a warning")
The second basic way to obtain a logger instance is to construct one directly via the
Logger object’s
apply method, as shown in Listing
E.2.2↓. The
apply method takes either a
String or
Class that will be used to determine the constructed logger’s name. In our example, we use the
classOf[Boot], so our logger will be named “bootstrap.liftweb.Boot”. When you obtain a logger via construction you need to access the logging methods via the logger instance.
Constructing a Logger instance
class Boot {
// Set up a logger to use for startup messages
val logger = Logger(classOf[Boot])
...
logger.warn("This is a warning")
There is a third, hybrid, approach to obtaining a
Logger that allows you to mix in the
Logger trait while controlling the logger name. Listing
E.2.2↓ shows how we can mix in th trait and then override the underlying SLF4J logger with our own named instance.
class AddEntry extends StatefulSnippet with Logger {
// Use a different name for our logger
import org.slf4j.LoggerFactory
override val _logger = LoggerFactory.getLogger("EntryEdit")
E.2.3 Logging Methods
The
Logger trait provides some basic log methods which we’ll summarize here. Each log method comes in three forms: one with just a
⇒ Object argument, one with a
⇒ Object and
Throwable argument, and one with a
⇒ Object,
Throwable, and
Marker argument. These correspond roughly to the SLF4J log methods, although the order of the parameters is different and the parameters are passed by-name. Pass-by-name arguments are used so that computation of the log message can be deferred. This is useful to avoid processing messages for log statements below the current logging threshold, a topic we’ll cover more in Section
E.3↓.
trace This logs a message at trace level. Trace level is generally intended for very detailed “tracing” of processing, even more detailed than debug level.
debug Logs a message at debug level. This level is usually used to output internal variable values or other information that is useful in debugging and troubleshooting an app.
info Logs a message at info level. This level is appropriate for general information about the app.
warn Logs a message at warning level. This level should be used for reporting issues that are in error but can be handled cleanly, such as someone trying to submit a character string for a numeric field value.
error Logs a message at error level. This level should be used for messages relating to errors that can’t be handled cleanly, such as a failure to connect to a backing database.
assertLog This allows you to test an assertion condition and if true, logs the assertion as well as a given message.
Listing
E.2.3↓ shows our REST API authentication hook, which uses a few different Logging methods within the handler method.
LiftRules.authentication = HttpBasicAuthentication("PocketChange") {
case (userEmail, userPass, _) => {
logger.debug("Authenticating: " + userEmail)
User.find(By(User.email, userEmail)).map { user =>
if (user.password.match_?(userPass)) {
logger.info("Auth succeeded for " + userEmail)
User.logUserIn(user)
// Set an MDC for logging purposes
MDC.put("user", user.shortName)
// Compute all of the user roles
userRoles(user.editable.map(acct => AuthRole("editAcct:" + acct.id)) ++
user.allAccounts.map(acct => AuthRole("viewAcct:" + acct.id)))
true
} else {
logger.warn("Auth failed for " + userEmail)
false
}
} openOr false
}
}
E.3 Log Level Guards
We want to provide a brief discussion on the use of log guards and why they’re usually not needed with Lift’s log framework. A log guard is a simple test to see if a given log statement will actually be processed. The Log object provides a test method (returning a boolean) for each log level:
-
isDebugEnabled
-
isErrorEnabled
-
isInfoEnabled
-
isTraceEnabled
-
isWarnEnabled
Log guards are fairly common in logging frameworks to avoid expensive computation of log message that won’t actually be used. This is particularly relevant with debug logging, since they often cover a large section of code and usually aren’t enabled in production. The Log object can implicitly do log guards for you because of the pass-by-name message parameters. As we showed in listing
E.2.3↑, simply converting your log message into a closure allows the Log object decide whether to execute the closure based on the current log level. You get the flexibility and simplicity of adding log statements anywhere you want without explicit log guards, without losing the performance benefit of the guards. To explain it a bit more, let’s assume for instace that the
debug method would have been declared as
def debug(msg:AnyRef): Unit. When
debug would be called the parameter will be first evaluated and then passed to the method. Inside the method we have the test to see if the debug level is enabled to know if we actaully need to trace that message or not. Well in this case even if the debugging level is turned off we still have the evaluation of the parameters and that leads to unnecessary computing and in an application that uses logging heavily that would likely lead to a performance impact.
E.4 Logging Mapper Queries
If you want to log Mapper query activity, there are two main approaches. The first is to utilize the
net.liftweb.mapper.DB.addLogFunc method to add your own logging function. A logging function is of the type
(DBLog, Long) ⇒ Any. The
DBLog trait contains two separate lists of log entries, one for meta operations (such as
getFetchSize) and one for actual work statements (such as
executeQuery). You can access these two log lists via either the
metaEntries or
statementEntries methods. You can also access the entire list of both types via the
allEntries method. Listing
E.4↓ shows how we can hook a log function in the
Boot.boot method to log Mapper activity for each request.
// Add a query logger
DB.addLogFunc {
case (log, duration) => {
logger.debug("Total query time : %d ms".format(duration))
log.allEntries.foreach {
case DBLogEntry(stmt,duration) =>
logger.debug(" %s in %d ms".format(stmt, duration))
}
}
}
Another approach to logging Mapper queries is to use the
DB.queryCollector logging function and then either use
S.queryLog to access the query log, or hook into
S.addAnalyzer. Listing
E.4↓ shows how we could use this instead for our logging in
Boot.boot.
Mapper Logging via S.queryLog
// Add a query logger (via S.queryLog)
DB.addLogFunc(DB.queryCollector)
S.addAnalyzer {
case (Full(req), duration, log) => {
logger.debug(("Total request time on %s: %d ms").format(req.uri, duration))
log.foreach {
case (stmt,duration) =>
logger.debug(" %s in %d ms".format(stmt, duration))
}
}
case _ => // we don’t log for non-requests
}
Note that the duration you get when your analyzer function is called is the time spent in
S, not necessarily the total duration of your queries. Also, only work statements are logged via
S.queryLog. If you want meta entries you’ll have to use a direct logging function as in Listing
E.4↑.
F Sending Email
Sending email is a common enough task (user registration, notifications, etc) within a web application that we’ve decided to cover it here. Although email isn’t Lift’s primary focus, Lift does provide some facilities to simplify email transmission.
Configuration of the mailer is handled in a few different ways. The net.liftweb.util.Mailer object defines a hostFunc function var, () ⇒ String, that is used to compute the hostname of your SMTP server to be used for transmission. The default value is a function that looks up the mail.smtp.host system property and uses that String. If that property isn’t defined then the mailer defaults to localhost. Setting the system property is the simplest way to change your SMTP relay, although you could also define your own function to return a custom hostname and assign it to Mailer.hostFunc.
F.2 Sending Emails
The mailer interface is simple but covers a wide variety of cases. The Mailer object defines a number of case classes that correspond to the components of an RFC822 email. The addressing and subject cases classes, From, To, CC, BCC, ReplyTo and Subject should all be self-explanatory. For the body of the email you have three main options:
PlainMailBodyType Represents a plain-text email body based on a given String
XHTMLMailBodyType Represents an XHTML email body based on a given NodeSeq
XHTMLPlusImages Similar to XHTMLMailBodyType, but in addition to the NodeSeq, you can provide one or more PlusImageHolder instances that represent images to be attached to the email (embedded images, so to speak)
The
Mailer.sendMail function is used to generate and send an email. It takes three arguments: the
From sender address, the
Subject of the email, and a varargs list of recipient addresses and body components. The mailer creates MIME/Multipart messages, so you can send more than one body (i.e. plain text and XHMTL) if you would like. Listing
F.2↓ shows an example of sending an email to a group of recipients in both plain text and XHTML format. The Mailer object defines some implicit conversions to PlainMailBodyType and XHTMLMailBodyType, which we use here. We also have to do a little List trickery to be able to squeeze multiple arguments into the final vararg argument since Scala doesn’t support mixing regular values and coerced sequences in vararg arguments.
import net.liftweb.util.Mailer
import Mailer._
...
val myRecips : List[String] = ...
val plainContent : String = "..."
val xhtmlContent : NodeSeq = ...
Mailer.sendMail(From("no-reply@foo.com"), Subject("Just a test"),
(plainContent :: xhtmlContent :: myRecips.map(To(_))) : _*)
When you call sendMail you’re actually sending a message to an actor in the background that will handle actual mail delivery; because of this, you shouldn’t expect to see a synchronous relay of the message through your SMTP server.
G JPA Code Listings
To conserve space and preserve flow in the main text, we’ve placed full code listings for the JPA chapter in this appendix.
G.1 JPA Library Demo
G.1.1 Author Entity
package com.foo.jpaweb.model
import javax.persistence._
/**
An author is someone who writes books.
*/
@Entity
class Author {
@Id
@GeneratedValue(){val strategy = GenerationType.AUTO}
var id : Long = _
@Column{val unique = true, val nullable = false}
var name : String = ""
@OneToMany(){val mappedBy = "author", val targetEntity = classOf[Book],
val cascade = Array(CascadeType.REMOVE)}
var books : java.util.Set[Book] = new java.util.HashSet[Book]()
}
G.1.2 orm.xml↓ Mapping
<?xml version="1.0" encoding="UTF-8" ?>
<entity-mappings xmlns="http://java.sun.com/xml/ns/persistence/orm"
xmlns:xsi="http://www.w3.org/2001/XMLSchema-instance"
xsi:schemaLocation="http://java.sun.com/xml/ns/persistence/orm
http://java.sun.com/xml/ns/persistence/orm_1_0.xsd" version="1.0">
<package>com.foo.jpaweb.model</package>
<entity class="Book">
<named-query name="findBooksByAuthor">
<query><![CDATA[from Book b where b.author.id = :id order by b.title]]></query>
</named-query>
<named-query name="findBooksByDate">
<query><![CDATA[from Book b where b.published between :startDate and :endDate]]></query>
</named-query>
<named-query name="findBooksByTitle">
<query><![CDATA[from Book b where lower(b.title) like :title order by b.title]]></query>
</named-query>
<named-query name="findAllBooks">
<query><![CDATA[from Book b order by b.title]]></query>
</named-query>
</entity>
<entity class="Author">
<named-query name="findAllAuthors">
<query><![CDATA[from Author a order by a.name]]></query>
</named-query>
</entity>
</entity-mappings>
G.1.3 Enumv Trait
package com.foo.jpaweb.model
/* adds a valueOf function, assumes name is defined
add optional description */
trait Enumv {
this: Enumeration =>
private var nameDescriptionMap = scala.collection.mutable.Map[String, String]()
/* store a name and description for forms */
def Value(name: String, desc: String) : Value = {
nameDescriptionMap += (name -> desc)
new Val(name)
}
/* get description if it exists else name */
def getDescriptionOrName(ev: this.Value) = {
try {
nameDescriptionMap(""+ev)
} catch {
case e: NoSuchElementException => ev.toString
}
}
/* get name description pair list for forms */
def getNameDescriptionList = this.elements.toList.map(v => (v.toString, getDescriptionOrName(v) ) ).toList
/* get the enum given a string */
def valueOf(str: String) = this.elements.toList.filter(_.toString == str) match {
case Nil => null
case x => x.head
}
}
G.1.4 EnumerationType
package com.foo.jpaweb.model
import java.io.Serializable
import java.sql.PreparedStatement
import java.sql.ResultSet
import java.sql.SQLException
import java.sql.Types
import org.hibernate.HibernateException
import org.hibernate.usertype.UserType
/**
* Helper class to translate enum for hibernate
*/
abstract class EnumvType(val et: Enumeration with Enumv) extends UserType {
val SQL_TYPES = Array({Types.VARCHAR})
override def sqlTypes() = SQL_TYPES
override def returnedClass = classOf[et.Value]
override def equals(x: Object, y: Object): Boolean = {
return x == y
}
override def hashCode(x: Object) = x.hashCode
override def nullSafeGet(resultSet: ResultSet, names: Array[String], owner: Object): Object = {
val value = resultSet.getString(names(0))
if (resultSet.wasNull()) return null
else {
return et.valueOf(value)
}
}
override def nullSafeSet(statement: PreparedStatement, value: Object, index: Int): Unit = {
if (value == null) {
statement.setNull(index, Types.VARCHAR)
} else {
val en = value.toString
statement.setString(index, en)
}
}
override def deepCopy(value: Object): Object = value
override def isMutable() = false
override def disassemble(value: Object) = value.asInstanceOf[Serializable]
override def assemble(cached: Serializable, owner: Object): Serializable = cached
override def replace(original: Object, target: Object, owner: Object) = original
}
This shows the LiftFilter setup as well as the persistence-context-ref.
<?xml version="1.0" encoding="ISO-8859-1"?>
<!DOCTYPE web-app
PUBLIC "-//Sun Microsystems, Inc.//DTD Web Application 2.3//EN"
"http://java.sun.com/j2ee/dtds/web-app_2_3.dtd">
<web-app>
<filter>
<filter-name>LiftFilter</filter-name>
<display-name>Lift Filter</display-name>
<description>The Filter that intercepts lift calls</description>
<filter-class>net.liftweb.http.LiftFilter</filter-class>
<persistence-context-ref>
<description>
Persistence context for the library app
</description>
<persistence-context-ref-name>
persistence/jpaweb
</persistence-context-ref-name>
<persistence-unit-name>
jpaweb
</persistence-unit-name>
</persistence-context-ref>
</filter>
<filter-mapping>
<filter-name>LiftFilter</filter-name>
<url-pattern>/*</url-pattern>
</filter-mapping>
</web-app>
Index
AJAX:
Attributes: ↑
% operator: ↑
-%> operator: ↑, ↑
binding: ↑
computing via snippet: ↑
delete with CSS transform: ↑
discarded in bind: ↑
in form elements: ↑
retrieving from elements: ↑
Authentication: ↑, ↑
Autoconversion: ↑
Binding: ↑
Boot: ↑, ↑
Bootstrap: ↑
By: ↑
ByList: ↑
ByRef: ↑
By_>: ↑
By_<: ↑
CGI: ↑
CMP: ↑
CSS: ↑, ↑, ↑, ↑
CSS Transforms: ↑
attribute copying: ↑
attribute replacement: ↑
deleting attribute: ↑
Calendar: ↑
Comet: ↑, ↑
Custom dispatch:
per-session: ↑
stateful: ↑
stateless: ↑
Designer-friendly templates: ↑
DispatchSnippet: ↑, ↑
EntityManager: ↑
Extraction: ↑
File uploads: ↑
Forms: ↑
File uploads: ↑
file upload: ↑
multipart: ↑
saving file uploads to disk: ↑
snippet tag: ↑
Git: ↑
HTML:
HTML5: ↑
HTTP:
Hibernate: ↑
HttpServletRequest: ↑
I18N: ↑
Calculating locale: ↑
Localized templates: ↑, ↑
Resource bundle resolution: ↑
whitespace in keys: ↑
IHaveValidatedThisSQL: ↑
If: ↑
In: ↑
InMemoryFileParamHolder: ↑
InMemoryResponse: ↑
InRaw: ↑
IndexedField: ↑
InsecureLiftView: ↑
Internationalization | see I18N: ↑
JPA: ↑
JPOX: ↑
JSON:
KeyedMapper: ↑
KeyedMetaMapper: ↑
Lift 2.2: ↑
LiftResponse: ↑
LiftRules: ↑
dispatch: ↑
statelessDispatchTable: ↑
LiftView: ↑
Like: ↑
Locale:
MVC: ↑
Map: ↑
Mapper: ↑
asJs: ↑
multiple databases: ↑, ↑
toXml: ↑
Maven: ↑, ↑
Menu.title: ↑
MetaMapper: ↑
MetaRecord: ↑
NodeSeq: ↑, ↑
NotBy: ↑
NotNullRef: ↑
NullRef: ↑
OnDiskFileParamHolder: ↑
Override form template: ↑
Parameters: ↑
ParsePath: ↑
PreCache: ↑
RESTful: ↑
Record: ↑
RedirectWithState: ↑
Reflection: ↑
RequestVar: ↑, ↑
RewriteResponse: ↑
S: ↑, ↑
addHighLevelSessionDispatcher: ↑
S.param: ↑
SHtml: ↑
Scala: ↑
Schemifier: ↑
SessionVar: ↑
SiteMap: ↑, ↑
Snippet parameters: ↑
Snippets: ↑
Dispatch: ↑
Explicit Dispatch: ↑
Implicit dispatch: ↑
Per-request remapping: ↑
binding: ↑
binding with CSS: ↑
eager_eval: ↑
explicit dispatch with StatefulSnippet: ↑
invoking via class attributes: ↑
stateful: ↑
stateful vs stateless: ↑
StatefulSnippet: ↑, ↑, ↑
Tags:
CSS: ↑
a: ↑
bind: ↑
bind-at: ↑
children: ↑
comet: ↑
embed: ↑, ↑
snippet: ↑
surround: ↑
Templates: ↑
Designer-friendly: ↑
HTML5: ↑
content element: ↑
embedded: ↑
Title: ↑
TopLink: ↑
Transactions: ↑
Type: ↑
URL rewriting: ↑
Unless: ↑
Validation: ↑
View-First: ↑
Views: ↑, ↑
Explicit dispatch: ↑, ↑, ↑
Implicit dispatch: ↑
Reflection dispatch: ↑
XHTML: ↑, ↑
XML: ↑, ↑
attribute handling: ↑
attributes: ↑
preserving attributes: ↑
_id_> operator: ↑
anchor: ↑
annotations: ↑
bind: ↑
binding: ↑, ↑, ↑
bootloader: ↑
children: ↑
closure: ↑
cookie: ↑
create: ↑
dbColumnName: ↑
dbIndexed_?: ↑
dbTableName: ↑
eager eval: ↑
embed: ↑, ↑
entity class: ↑
entity classes: ↑
enumerations: ↑
fieldOrder: ↑
findAll: ↑
form: ↑
formTemplate: ↑
head: ↑
hidden templates: ↑
httpAuthProtectedResources: ↑
implicit conversions: ↑
lift:surround: ↑
many-to-many: ↑, ↑
many-to-one: ↑
mapSnippet: ↑
master project: ↑
named queries: ↑, ↑
one-to-many: ↑
orm.xml: ↑, ↑, ↑
redirect: ↑
reflection: ↑
rendering pipeline: ↑
request parameters: ↑
rewriting: ↑
snippet: ↑
snippets: ↑
surround: ↑
table name: ↑
template: ↑, ↑
toForm: ↑
validation: ↑
viewDispatch: ↑, ↑, ↑
web service: ↑
web.xml: ↑, ↑, ↑
(C) 2012 Lift 2.0 EditionWritten by Derek Chen-Becker, Marius Danciu and Tyler Weir