11 AJAX and Comet in Lift
In this chapter we’re going to discuss AJAX and Comet, two approaches to improving the user experience through dynamic web pages. While a full treatment of the techniques and technologies behind these approaches is beyond the scope of this book [C] [C] There are a number of good resources on the web that you can find by searching for “AJAX”., we’re going to cover the basics of how AJAX and Comet work. In particular, we’re going to look at how Lift handles them behind the scenes to simplify your work.
11.1 What are AJAX and Comet, really?
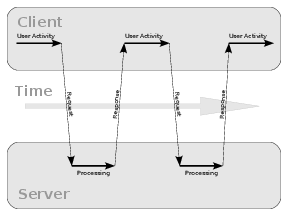
AJAX and Comet are variations on the traditional model of the web application request/response lifecycle. In the traditional model, the user starts by making a request for a page. The server receives this request, performs processing, then sends a response back to the user. The response is then rendered by the user’s browser. At this point there are no further interactions between the user and the server until the user clicks on a link or performs some other action that starts a completely new request/response lifecycle. AJAX and Comet extend this model to allow for asynchronous updates from either the user to the server (AJAX), or from the server back to the user (Comet).
If we take the example of adding a comment to a blog post, the traditional model has the user fill in a form, hit the submit button, and send the request to the server. The server processes and adds the comment and then sends the updated blog post back to the user with the newly added comment. At the same time, if other people are viewing the blog post, they won’t see the new comment until they reload the page.
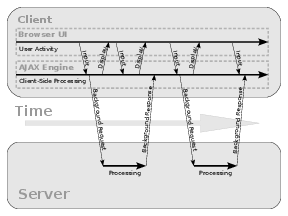
The AJAX model of this session changes such that the display of the new comment is not tied to the response from the server. When the user hits submit, the request to add the comment is sent to the server in the background. While it’s being processed by the server, a JavaScript fragment (the “J” in AJAX) updates the user’s page via DOM [D] [D] Document Object Model. More information can be found at http://www.w3.org/DOM/ and adds the comment without the need for a full page reload.
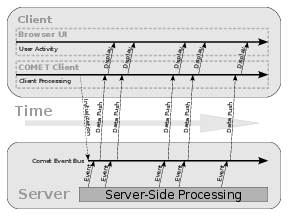
Comet changes the traditional model by using a long-polling HTTP request in the background that allows the server to push data to the browser without requiring additional requests. Essentially this is like AJAX, except in the opposite direction.
While the AJAX model increases the richness of the User Experience for a single client at a time, Comet can do the same for multiple users. Going back to our example of a blog post, Comet would enable the server to notify anyone viewing the current blog post to automatically have their pages updated when the new comment is added.
Figures a↓, b↓, and c↓ show graphical representations of how the models differ in terms of timeline and server interaction.
11.2 Using AJAX in Lift
In previous chapters we’ve shown how to synchronously process forms (chapter 6↑) and use JavaScript to perform client-side behavior (chapter10↑). AJAX blends these Lift techniques to give you powerful support for asynchronous client-server interaction. As with standard form and link elements, Lift uses methods on the SHtml object to generate AJAX components in a concise manner. We’ll cover each of the AJAX-specific SHtml methods in a later section, but for now we want to cover the high-level aspects of using AJAX in Lift.
The first thing we want to point out is that AJAX generators take callback methods just like regular element generators. The major difference is that while standard SHtml generator callbacks return scala.Any, AJAX callbacks must return a net.liftweb.http.js.JsCmd. The reason is that the return from the callback is itself a client-side callback that can be used to update the client content. An example is shown in Listing 11.2↓. In this example we generate a button, that when clicked, will log a message and then set the contents of the div named my-div to a Text element. As you can see, adding client-side content changes is trivial.
import _root_.net.liftweb.http.SHtml._
// The next two imports are used to get some implicit conversions
// in scope.
import _root_.net.liftweb.http.JE._
import _root_.net.liftweb.http.JsCmds._
// Use logging facilities
import _root_.net.liftweb.util.Log
// define a snippet method
def myFunc(html: NodeSeq) : NodeSeq = {
bind("hello", html, "button" -> ajaxButton(Text("Press me"), {() =>
Log.info("Got an AJAX call")
SetHtml("my-div", Text("That’s it"))
})
}
The second important aspect of Lift’s AJAX support is that behind the scenes Lift provides a robust mechanism for AJAX submission. For example, Lift provides its own JavaScript that handles retrying when the submission times out. You can control the timeout duration and retry count through LiftRule’s ajaxPostTimeout (in milliseconds) and ajaxRetryCount variables, respectively.
The third aspect of Lift’s AJAX support is that it’s so easy to enable. Lift automatically takes care of adding the proper JavaScript libraries to your templates when they’re rendered, and sets up the proper callback dispatch for you. By default, dispatch is done relative to the /ajax_request path in your web context, but Lift allows you change this via the LiftRules.ajaxPath variable.
The final aspect is the flexibility the library provides. Besides standard form elements and links that can be AJAXified, Lift also provides the SHtml.ajaxCall method which constructs a JsExp that you can use directly on any element. In addition, it allows you to construct a String argument to your callback function via JavaScript so that you have full access to client-side data.
11.3 A more complex AJAX example
Let’s take a look on a comparison example. We’ve seen how to use SHtml.ajaxButton, so let’s see in Listing 11.3↓ how can we achieve the same effect using SHtml.ajaxCall and SHtml.ajaxInvoke:
class SimpleSnippet {
import _root_.net.liftweb.http.js.{JE,JsCmd,JsCmds}
import JsCmds._ // For implicits
import JE.{JsRaw,Str}
def ajaxFunc1() : JsCmd = JsRaw("alert(’Button1 clicked’)")
def ajaxFunc2(str: String) : JsCmd = {
println("Received " + str)
JsRaw("alert(’Button2 clicked’)")
}
def ajaxFunc3() : JsCmd = JsRaw("alert(’Button3 clicked’)")
def renderAJAXButtons(xhtml: Group): NodeSeq = {
bind("ex", xhtml,
"button1" -> SHtml.ajaxButton("Press me", ajaxFunc1 _),
"button2" ->
// ajaxCall and ajaxInvoke actually returns a pair (String, JsExp).
// The String is used for garbage collection, so we only need
// to use the JsExp element (_2).
<button onclick={SHtml.ajaxCall(Str("Button-2"), ajaxFunc2 _)._2}>
Press me 2</button>,
"button3" ->
<button onclick={SHtml.ajaxInvoke(ajaxFunc3 _)._2}>
Press me 3</button>)
}
}
Basically, in Listing 11.3↑, we created three AJAX buttons using three different SHtml functions. The difference between ajaxCall and ajaxInvoke is that for ajaxCall you can specify a JsExp parameter that will be executed on the client side. The result of this JsExp will be sent to the server. In our case this parameter is simply a static String, Str(“Button-2”), but you can provide any JsExp code here to calculate a client-side value to be passed to your callback. For an overview of the rest of the SHtml generator functions please see Chapter 6↑.
11.4 AJAX Generators in Detail
The following table provides a brief synopsis of the AJAX generator methods on the
net.liftweb.http.SHtml object:
net.liftweb.http.SHtml object:
| Function name | Description |
| ajaxButton | Renders a button that will submit an AJAX request to server |
| a | Renders an anchor tag that when clicked will submit an AJAX request |
| makeAJAXCall | Renders the JavaScript code that will submit an AJAX request |
| span | Renders a span element that when clicked will execute a JsCmd |
| ajaxCall | Renders the JavaScript code that will submit an AJAX request but it will also send the value returned by the JsExp provided. |
| ajaxInvole | Similar to ajaxCall but there is no value to be computed and sent to the server |
| toggleKids | Provides the toggle effect on an element. When clicked it will also send an AJAX call |
| ajaxText | Renders an input text element that will send an AJAX request on blur. |
| jsonText | Renders an input type text element the will send a JSON request on blur. |
| ajaxCheckbox | Renders a checkbox element that when clicked will send an AJAX call |
| ajaxSelect | Renders a select element then sends an AJAX call when the value changes |
| ajaxForm | Wraps a NodeSeq that represents the form’s content and makes an AJAX call when the form is submitted. |
| jsonForm | Similar to ajaxForm, but on the client side, the form is JSONified and the JSON content sent to the server and processed by JsonHandler |
| swappable | Renders a span that contains one visible element and the other hidden. When the visible element is clicked it will be hidden and the other one will be shown |
11.5 Comet and Lift
Figure c↑ diagrams the interaction between client and server in the Comet. model. There are several resources on the web that explain the history and specific techniques related to Comet [E] [E] http://en.wikipedia.org/wiki/Comet_(programming) is a good start., so we won’t get too detailed here. In essence Comet is not a technology but a technique which allows a web application to push messages from server to client. There are a couple of approaches used to make this work, but the approach that Lift uses is long polling, so that’s what we’ll be covering here. As an example, consider a web chat application where you can chat real-time with friends. Let’s take a quick look at how receiving a message using Comet works in Lift:
- The client sends an AJAX request to the server asking for any new messages.
- The server does not respond immediately but waits until there is a message that needs to be sent for that client.
- When a message is available, the server responds to the initial request from the client with the new message(s).
- The client receives the response, processes it, and issues another AJAX request, and the process continues.
Of course, things are more complicated then that. For instance, it may take a while until the response is actually returned to the client. During this delay, the connection could be dropped for any number of reasons. The client should be smart enough to re-establish the connection automatically. But there is another problem - scalability. If we have these long-running connections, the server would typically put the processing threads into a waiting state until messages are available to send back to the client. Having many waiting threads is a scalability killer because numerous threads from the web container’s thread pool will lie in the wait state doing nothing until, before you know it, your entire thread pool is empty. The immediate consequence is that your server can not do any other request processing. Because of this, a thread-per-connection approach combined with long-running connections is totally unacceptable.
The key to scalability is NON-BLOCKING IO. Most operating systems support non-blocking I/O, which actually means that when you utilize an I/O resource for reading or writing (say the streams from a socket) there is no blocking operation. So if you read from a stream your read function would immediately return regardless of whether there is data available or not. In Java, non-blocking I/O is provided by the Java New I/O (NIO) library using Selectors and perhaps the Reactor pattern [F] [F] A nice overview of NIO is at http://gee.cs.oswego.edu/dl/cpjslides/nio.pdf. This has a major impact on scalability because the threads are only held as long as there is work to do. Once they’re finished with the available data, they are returned to the thread pool so that they may be reused for processing other requests. In this model the threads are allocated to connections only when data is available for processing, which inherently leads to better resource utilization.
Note: This is somewhat off-topic, but if you’re looking to do a lot of work with NIO and networking, we recommend looking at the Apache MINA project at http://mina.apache.org/. MINA provides some nice abstractions for NIO that allows you use a stateful approach to developing NIO applications without having to deal with a lot of the underlying details of using NIO.
Having nonblocking I/O enabled by the web container also has a major impact on application scalability with regard to long-lived connections from client to server. In addition, the Lift framework has support for Jetty Continuations, which work like this:
- You application receives a request and wants to wait to respond, as there is no message yet.
- You call suspend on the Jetty Continuation object. Here, Jetty will throw a special exception that will be caught in the container. The current thread is immediately returned to the thread pool, so it can process other requests.
- Assume that, after a while, you have a message for that particular client. You call resume on the same Continuation object. This time, Jetty will actually replay the initial HTTP request, and your servlet behaves like that request was just received from the client and, of course, returns the appropriate response.
More details on Jetty’s Continuations are available on the Jetty web site at http://docs.codehaus.org/display/JETTY/Continuations.
If you run your Lift application in a Jetty container, Lift will automatically detect that and utilize the Continuation mechanism. Currently, on other containers, Comet in Lift will still work but won’t scale as well because Continuations aren’t supported. However, the Servlet 3.0 spec contains a more generic facility, called Suspended Requests, that will make this feature usable across a variety of containers.
11.5.1 Actors in Scala
It is important to understand that Comet support in Lift is primarily driven via Scala Actors. We won’t go into too much detail regarding Scala Actors, as you can find very detailed information in the paper by Philipp Haller, Actors that Unify Threads And Events [G] [G] http://lamp.epfl.ch/~phaller/doc/haller07coord.pdf.
Scala Actors are based on the concepts of the Erlang [H] [H] http://erlang.org/ Actors model where an Actor is an asynchronous component that receives messages and sends or replies to messages. In Erlang, processes communicate via a very simple and effective messaging system built into the VM.
In Scala, however, Actors are supported at the library level and not at the language level. While less integrated, this does provide greater flexibility as the Actors library evolution does not impact the language itself. Since Scala typically sits on top of the JVM, Scala Actors are not bound to processes but rather to JVM threads. The key to understanding the scalability of Scala Actors is that there is no one-to-one relationship between Actors and Threads. For instance, when an Actor is waiting for a message we don’t end up having a thread waiting for a lock. Instead, the Actor body is impersonated by a closure that captures the rest of the computation. This closure is ’cached’ internally until a message is designated for this Actor to consume. In particular, Scala’s Actor library leverages the match construct to allow very fine-grained selection of messages for processing. Another interesting note is that the Actor body (react function) never returns normally; in fact, the return type of the react function is Nothing.
Let’s take a look on a simple Actor-based example in Listing 11.5.1↓:
import scala.actors._
import scala.actors.Actor._
object PingPong extends Application {
var count = 0;
val pong = actor {
loop {
react {
case Ping => println("Actor Pong Received Ping")
sender ! Pong
case Stop => println("Stopping Pong")
exit()
}
}
}
val ping = actor {
pong ! Ping
loop {
react {
case Pong => println("Actor Ping Received Pong")
count = count + 1;
if (count < 3) {
sender ! Ping
} else {
sender ! Stop
println("Stopping Ping")
exit()
}
}
}
}
}
case object Ping
case object Pong
case object Stop
This is a trivial example in which we have two Actors exchanging Ping, Pong and Stop messages (note that the messages are case objects for pattern matching purposes). Also note that we did not explicitly used threads anywhere. We also did not use any thread blocking technique such as synchronized blocks. The reason is that we don’t have to. Actors’ message-passing mechanism is generally thread-safe (although deadlock is still possible due to dependent Actors [I] [I] http://ruben.savanne.be/articles/concurrency-in-erlang-scala). Note that threads are used internally and in this specific example the execution may even occur on the same thread. The reason is that internally the Actors library uses a thread pool, and when an Actor receives a message the execution occurs in a thread from the thread pool. This is also a key to Actors’ scalability, because they allow threads to be used very efficiently and returned to the pool as soon as the Actor consumes the message.
Getting deeper into the details of actions is beyond the scope of this book, but we recommend that you read other materials in order to fully understand Scala actors. In particular, Philipp Haller has a nice page summarizing papers and tutorials on actors at http://lamp.epfl.ch/~phaller/actors.html.
11.5.2 Building a Comet Application in Lift
As we have seen, Comet support in Lift is provided by Scala Actors. Lift greatly simplifies the use of Actors by providing a CometActor trait that does almost all the work. You simply extend CometActor with your own class and fill in some implementation methods.
Note that your CometActor classes needs to exist in a comet subpackage as configured by LiftRules.addToPackages. For example, if you call LiftRules.addToPackages(“com.myapp”) in your boot method, your comet actors must exist in the com.myapp.comet package.
Let’s take a look at a simple example. Let’s say that we want to build a Clock snippet where the server will update the client page with the current server time every 10 seconds. First, we need a template, as shown in Listing 11.5.2↓.
In our template, we use the <lift:comet> tag to bind the CometActor to the portion of the template where it will render content, and the body of the <lift:comet> tag is quite similar to the body of a snippet. The <clk:time> tag will be bound by the Clock actor. The type attribute tells Lift which CometActor to call, and the name attribute is the name of this CometActor. The name attribute is a discriminator that allows you to have more then one CometActor of the same type on a given page. Next, we need to define our actor as shown in Listing 11.5.2↓.
package com.myapp.comet
class Clock extends CometActor {
override def defaultPrefix = Full("clk")
def render = bind("time" -> timeSpan)
def timeSpan = (<span id="time">{timeNow}</span>)
// schedule a ping every 10 seconds so we redraw
ActorPing.schedule(this, Tick, 10000L)
override def lowPriority : PartialFunction[Any, Unit] = {
case Tick => {
println("Got tick " + new Date());
partialUpdate(SetHtml("time", Text(timeNow.toString)))
// schedule an update in 10 seconds
ActorPing.schedule(this, Tick, 10000L)
}
}
}
case object Tick
First, our actor defines the default prefix, which should be used for all nodes that will be bound inside <lift:comet> tag. In our case, we’re using the clk prefix.
Next, we have the render function where we do the binding between the <clk:time> node and the result of the timespan function. Basically, the <clk:time> node will be replaced by the span element returned by the timespan function. It is important to note that Comet content rendered by the <lift:comet> tag is a <span> tag by default. This default can be changed by overriding the parentTag function in your comet actor.
timeNow is a function from the net.liftweb.util.TimeHelpers trait that returns the current system time. We use the net.liftweb.util.ActorPing.schedule method to send a Tick message back to our actor after 10 seconds. This method is part of the the Clock class default constructor, and therefore will be called when the Clock class is instantiated.
Finally, we have the lowPriority function that returns a PartialFunction. To process messages in your CometActor, you can override the following functions: highPriority,
mediumPriority, and lowPriority. This multiplicity of functions is just a way of prioritizing application messages. The only thing that we do here is to pattern match the messages. In this simple example, we have only the Tick object. When a Tick is sent by the ActorPing, our code gets executed and the following actions occur:
mediumPriority, and lowPriority. This multiplicity of functions is just a way of prioritizing application messages. The only thing that we do here is to pattern match the messages. In this simple example, we have only the Tick object. When a Tick is sent by the ActorPing, our code gets executed and the following actions occur:
- We print the current time to the console (just for fun)
- We call partialUpdate function. With a partial update we can update specific fragments on the client side and not actually re-render the entire content that the CometActor may produce. This optimization allows us to send something very specific to be updated on the client side. If we call reRender(true) instead, the entire real estate on the client side will be re-rendered. Getting back to our partialUpdate call, we are basically sending a JsCmd that we use to set the XHTML content for the element that has the id “time”. This is the span element returned by the timeSpan function. Since partialUpdate takes a JsCmd, you can use it to do just about anything on the client side accessible from JavaScript.
- We tell ActorPing to send another Tick message after 10 seconds.
As you have seen, with just a few lines of code, we were able to create a Clock application in which the server updates the client every 10 seconds. Of course, this is just a trivial example, but now, you should have a clear picture of how CometActor works, so you can build more complex cases for your Lift application.
Note: As described earlier It is also possible to use notices (notice/warning/error) from your comet actor. The CometActor trait already has notice, warning and error methods on it that will properly handle sending these messages to the client. Do not use the notice/warning/error methods on S, since they assume a stateful response and will not work from within a Comet callback.
11.6 Coordinating Between Multiple Comet Clients
So far, our example has only shown a self-contained CometActor for the clock. But what if we want to have interaction between different clients? Scala’s actors are still the answer, but with a twist—we can use a singleton actor object that coordinates with the CometActor objects so that it can send messages to all of them. First, we define our singleton actor, as shown in Listing 11.6↓.
case class SubscribeClock(clock : Clock)
case class UnsubClock(clock : Clock)
object ClockMaster extends Actor {
private var clocks : List[Clock] = Nil
def act = loop {
react {
case SubscribeClock(clk) =>
clocks ::= clk
case UnsubClock(clk) =>
clocks -= clk
case Tick =>
clocks.foreach(_ ! Tick)
}
}
}
We’ve defined two case classes representing messages for subscribing and unsubscribing to the ClockMaster actor. The ClockMaster itself is a simple Actor (not a CometActor) that defines a simple message loop. It can either subscribe a new clock, unsubscribe to an existing clock, or distribute a Tick to all subscribed clocks. The other half of this equation slightly modifies our Clock class (as shown in Listing 11.6↓) so that it subscribes and unsubscribes to the ClockMaster at initialization and shutdown, respectively.
Now, we can add an AJAX button (to an administration page, of course) that would allow the administrator to update everyone’s clocks at once. Listing 11.6↓ shows how we would bind in the button.
Here’s what’s happening behind the scenes in our modified Clock application. Lift first identifies a Comet request by matching against the path given by the LiftRules.cometPath variable. Essentially the flow is as follows:
- Lift gets a Comet request.
- Lift checks the CometActors to see if there are any messages. If there are no messages to be sent to this client, and the application is running in a Jetty container, the Jetty continuation is suspended, but no response is actually sent to client.
- Later, when your Comet actor is asked to render or partially update, the response is calculated, and the Jetty continuation is resumed.
- When Lift gets the resumed request from the container it returns the response calculated by the CometActor to the client.
Note that CometActors work even if you are not using Jetty container; the only issue is that you won’t benefit from the improved scalability of the suspend/resume mechanism offered by the Jetty container.
11.7 Summary
In this chapter, we explored how easily you can create AJAX and Comet interfaces in Lift. We discussed the underlying techniques used for AJAX and Comet, as well as how Lift provides support functions and classes to simplify writing apps that utilize these techniques. We showed examples of how to use the SHtml object to create AJAX-enabled form elements and how to customize things like the AJAX request path in Lift. We reviewed Scala actors and how the CometActor trait is used to make a Comet event handler. We also discussed how Lift works to alleviate scalability issues with Comet on supported containers. Finally, we wrote a simple Clock application and showed how you can mix AJAX and Comet in the same application.
(C) 2012 Lift 2.0 EditionWritten by Derek Chen-Becker, Marius Danciu and Tyler Weir