2 PocketChange
As a way to demonstrate the concepts in the book, we’re going to build a basic application and then build on it as we go along. As it evolves, so will your understanding of Lift. The application we’ve picked is an Expense Tracker. We call it PocketChange.
PocketChange will track your expenses, keep a running total of what you’ve spent, allow you to organize your data using tags, and help you to visualize the data. During the later chapters of the book we’ll add a few fun features, such as AJAX charting and allowing multiple people per account (with Comet update of entries). Above all, we want to keep the interface lean and clean.
We’re going to be using the View First pattern for the design of our app, because Lift’s separation of presentation and logic via templating, views, and snippets lends itself to the View First pattern so well. For an excellent article on the design decisions behind Lift’s approach to templating and logic, read David Pollak’s Lift View First article on the Wiki [L] [L] http://www.assembla.com/wiki/show/liftweb/View_First.
Another important thing to note is that we’re going to breeze through the app and touch on a lot of details. We’ll provide plenty of references to the chapters where things are covered. This chapter is really intended just to give you a taste of Lift, so feel free to read ahead if you want more information on how something works. The full source for the entire PocketChange application is available at GitHub [M] [M] http://github.com/tjweir/pocketchangeapp. Enough chatter, let’s go!
2.1 Defining the Model
The first step we’ll take is to define the database entities that we’re going to use for our app. The base functionality of a categorized expense tracker is covered by the following items:
- User: A user of the application
- Account: A specific expense account - we want to support more than one per user
- Expense: A specific expense transaction tied to a particular account
- Tag: A word or phrase that permits us a to categorize each expense for later searching and reporting
We’ll start out with the User, as shown in listing 2.1↓. We leverage Lift’s MegaProtoUser (Section 8.2.8 on page 1↓) class to handle pretty much everything we need for user management. For example, with just the code you see, we define an entire user management function for our site, including a signup page, a lost password page, and a login page. The accompanying SiteMap (Section 7 on page 1↓) menus are generated with a single call to User.siteMap. As you can see, we can customize the XHTML that’s generated for the user management pages with a few simple defs. The opportunities for customization provided by MetaMegaProtoUser are extensive.
package com.pocketchangeapp.model
// Import all of the mapper classes
import _root_.net.liftweb.mapper._
// Create a User class extending the Mapper base class
// MegaProtoUser, which provides default fields and methods
// for a site user.
class User extends MegaProtoUser[User] {
def getSingleton = User // reference to the companion object below
def allAccounts : List[Account] =
Account.findAll(By(Account.owner, this.id))
}
// Create a "companion object" to the User class (above).
// The companion object is a "singleton" object that shares the same
// name as its companion class. It provides global (i.e. non-instance)
// methods and fields, such as find, dbTableName, dbIndexes, etc.
// For more, see the Scala documentation on singleton objects
object User extends User with MetaMegaProtoUser[User] {
override def dbTableName = "users" // define the DB table name
// Provide our own login page template.
override def loginXhtml =
<lift:surround with="default" at="content">
{ super.loginXhtml }
</lift:surround>
// Provide our own signup page template.
override def signupXhtml(user: User) =
<lift:surround with="default" at="content">
{ super.signupXhtml(user) }
</lift:surround>
}
Note that we’ve also added a utility method, allAccounts, to the User class to retrieve all of the accounts for a given user. We use the MetaMapper.findAll method to do a query by owner ID (Section 8.1.8 on page 1↓) supplying this user’s ID as the owner ID.
Defining the Account entity is a little more involved, as shown in Listing 2.1↓. Here we define a class with a Long primary key and some fields associated with the accounts. We also define some helper methods for object relationship joins (Section 8.1.11 on page 1↓). The Expense and Tag entities (along with some ancillary entities) follow suit, so we won’t cover them here.
package com.pocketchangeapp.model
import _root_.java.math.MathContext
import _root_.net.liftweb.mapper._
import _root_.net.liftweb.util.Empty
// Create an Account class extending the LongKeyedMapper superclass
// (which is a "mapped" (to the database) trait that uses a Long primary key)
// and mixes in trait IdPK, which adds a primary key called "id".
class Account extends LongKeyedMapper[Account] with IdPK {
// Define the singleton, as in the "User" class
def getSingleton = Account
// Define a many-to-one (foreign key) relationship to the User class
object owner extends MappedLongForeignKey(this, User) {
// Change the default behavior to add a database index
// for this column.
override def dbIndexed_? = true
}
// Define an "access control" field that defaults to false. We’ll
// use this in the SiteMap chapter to allow the Account owner to
// share out an account view.
object is_public extends MappedBoolean(this) {
override def defaultValue = false
}
// Define the field to hold the actual account balance with up to 16
// digits (DECIMAL64) and 2 decimal places
object balance extends MappedDecimal(this, MathContext.DECIMAL64, 2)
object name extends MappedString(this,100)
object description extends MappedString(this, 300)
// Define utility methods for simplifying access to related classes. We’ll
// cover how these methods work in the Mapper chapter
def admins = AccountAdmin.findAll(By(AccountAdmin.account, this.id))
def addAdmin (user : User) =
AccountAdmin.create.account(this).administrator(user).save
def viewers = AccountViewer.findAll(By(AccountViewer.account, this.id))
def entries = Expense.getByAcct(this, Empty, Empty, Empty)
def tags = Tag.findAll(By(Tag.account, this.id))
def notes = AccountNote.findAll(By(AccountNote.account, this.id))
}
// The companion object to the above Class
object Account extends Account with LongKeyedMetaMapper[Account] {
// Define a utility method for locating an account by owner and name
def findByName (owner : User, name : String) : List[Account] =
Account.findAll(By(Account.owner, owner.id.is), By(Account.name, name))
... more utility methods ...
}
2.2 Our First Template
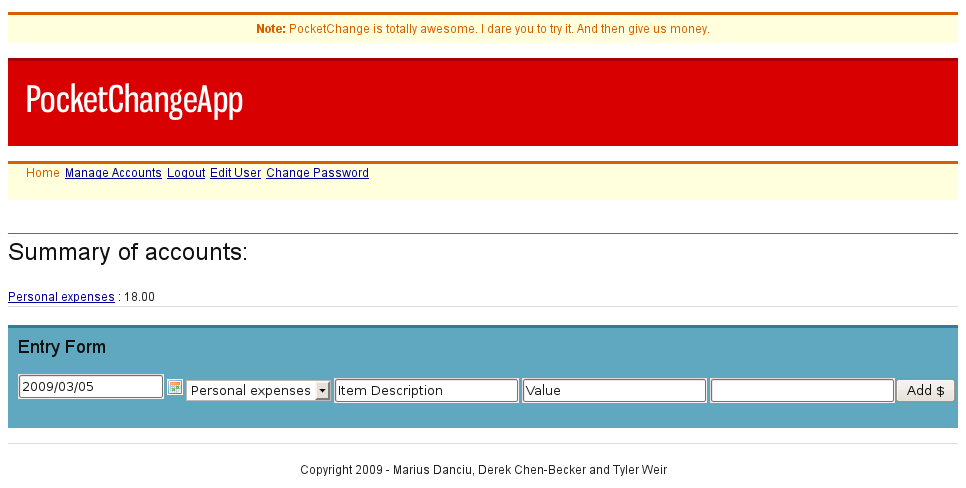
Our next step is to figure out how we’ll present this data to the user. We’d like to have a home page on the site that shows, depending on whether the user is logged in, either a welcome message or a summary of account balances with a place to enter new expenses. Listing 2.2↓ shows a basic template to handle this. We’ll save this as index.html. The astute reader will notice that we have a head element but no body. This is XHTML, so how does that work? This template uses the <lift:surround> tag (Section 4.5.17 on page 1↓) to embed itself into a master template (/templates_hidden/default). Lift actually does what’s called a “head merge” (Section on page 1↓) to merge the contents of the head tag in our template below with the head element of the master template. The <lift:HomePage.summary> and <lift:AddEntry.addentry> tags are calls to snippet methods. Snippets are the backing Scala code that provides the actual page logic. We’ll be covering them in the next section.
<lift:surround with="default" at="content">
<head>
<!-- include the required plugins -->
<script type="text/javascript" src="/scripts/date.js"></script>
<!--[if IE]>
<script type="text/javascript" src="/scripts/jquery.bgiframe.js">
</script>
<![endif]-->
<!-- include the jQuery DatePicker JavaScript and CSS -->
<script type="text/javascript" src="/scripts/jquery.datePicker.js">
</script>
<link rel="stylesheet" type="text/css" href="/style/datePicker.css" />
</head>
<!-- The contents of this element will be passed to the summary method
in the HomePage snippet. The call to bind in that method will
replace the XML tags below (e.g. account:name) with the account
data and return a NodeSeq to replace the lift:HomePage.summary
element. -->
<lift:HomePage.summary>
<div class="column span-24 bordered">
<h2>Summary of accounts:</h2>
<account:entry>
<acct:name /> : <acct:balance /> <br/>
</account:entry>
</div>
<hr />
</lift:HomePage.summary>
<div class="column span-24">
<!-- The contents of this element will be passed into the add method
in the AddEntry snippet. A form element with method "POST" will
be created and the XML tags (e.g. e:account) below will be
replaced with form elements via the call to bind in the add
method. This form will replace the lift:AddEntry.addentry element
below. -->
<lift:AddEntry.addentry form="POST">
<div id="entryform">
<div class="column span-24"><h3>Entry Form</h3>
<e:account /> <e:dateOf /> <e:desc /> <e:value />
<e:tags/><button>Add $</button>
</div>
</div>
</lift:AddEntry.addentry>
</div>
<script type="text/javascript">
Date.format = ’yyyy/mm/dd’;
jQuery(function () {
jQuery(’#entrydate’).datePicker({startDate:’00010101’,
clickInput:true});
})
</script>
</lift:surround>
As you can see, there’s no control logic at all in our template, just well-formed XML and some JavaScript to activate the jQuery datePicker functionality.
2.3 Writing Snippets
Now that we have a template, we need to write the HomePage and AddEntry snippets so that we can actually do something with the site. First, let’s look at the HomePage snippet, shown in Listing 2.3↓. We’ve skipped the standard Lift imports (Listing 3.3↓) to save space, but we’ve specifically imported java.util.Date and all of our Model classes.
package com.pocketchangeapp.snippet
import ... standard imports ...
import _root_.com.pocketchangeapp.model._
import _root_.java.util.Date
class HomePage {
// User.currentUser returns a "Box" object, which is either Full
// (i.e. contains a User), Failure (contains error data), or Empty.
// The Scala match method is used to select an action to take based
// on whether the Box is Full, or not ("case _" catches anything
// not caught by "case Full(user)". See Box in the Lift API. We also
// briefly discuss Box in Appendix C.
def summary (xhtml : NodeSeq) : NodeSeq = User.currentUser match {
case Full(user) => {
val entries : NodeSeq = user.allAccounts match {
case Nil => Text("You have no accounts set up")
case accounts => accounts.flatMap({account =>
bind("acct", chooseTemplate("account", "entry", xhtml),
"name" -> <a href={"/account/" + account.name.is}>
{account.name.is}</a>,
"balance" -> Text(account.balance.toString))
})
}
bind("account", xhtml, "entry" -> entries)
}
case _ => <lift:embed what="welcome_msg" />
}
}
Our first step is to use the User.currentUser method (this method is provided by the MetaMegaProtoUser trait) to determine if someone is logged in. This method returns a “Box,” which is either Full (with a User) or Empty. (A third possibility is a Failure, but we’ll ignore that for now.) If it is full, then a user is logged in and we use the User.allAccounts method to retrieve a List of all of the user’s accounts. If the user doesn’t have accounts, we return an XML text node saying so that will be bound where our tag was placed in the template. If the user does have accounts, then we map the accounts into XHTML using the bind function. For each account, we bind the name of the account where we’ve defined the <acct:name> tag in the template, and the balance where we defined <acct:balance>. The resulting List of XML NodeSeq entities is used to replace the <lift:HomePage.summary> element in the template. Finally, we match the case where a user isn’t logged in by embedding the contents of a welcome template (which may be further processed). Note that we can nest Lift tags in this manner and they will be recursively parsed.
Of course, it doesn’t do us any good to display account balances if we can’t add expenses, so let’s define the AddEntry snippet. The code is shown in Listing 2.3↓. This looks different from the HomePage snippet primarily because we’re using a StatefulSnippet (Section 5.3.3 on page 1↓). The primary difference is that with a StatefulSnippet the same “instance” of the snippet is used for each page request in a given session, so we can keep the variables around in case we need the user to fix something in the form. The basic structure of the snippet is the same as for our summary: we do some work (we’ll cover the doTagsAndSubmit function in a moment) and then bind values back into the template. In this snippet, however, we use the SHtml.select and SHtml.text methods to generate form fields. The text fields simply take an initial value and a function (closure) to process the value on submission. The select field is a little more complex because we give it a list of options, but otherwise it is the same concept.
package com.pocketchangeapp.snippet
import ... standard imports ...
import com.pocketchangeapp.model._
import com.pocketchangeapp.util.Util
import java.util.Date
/* date | desc | tags | value */
class AddEntry extends StatefulSnippet {
// This maps the "addentry" XML element to the "add" method below
def dispatch = {
case "addentry" => add _
}
var account : Long = _
var date = ""
var desc = ""
var value = ""
// S.param("tag") returns a "Box" and the "openOr" method returns
// either the contents of that box (if it is "Full"), or the empty
// String passed to it, if the Box is "Empty". The S.param method
// returns parameters passed by the browser. In this instance, the
// name of the parameter is "tag".
var tags = S.param("tag") openOr ""
def add(in: NodeSeq): NodeSeq = User.currentUser match {
case Full(user) if user.editable.size > 0 => {
def doTagsAndSubmit(t: String) {
tags = t
if (tags.trim.length == 0)
S.error("We’re going to need at least one tag.")
else {
// Get the date correctly, comes in as yyyy/mm/dd
val entryDate = Util.slashDate.parse(date)
val amount = BigDecimal(value)
val currentAccount = Account.find(account).open_!
// We need to determine the last serial number and balance
// for the date in question. This method returns two values
// which are placed in entrySerial and entryBalance
// respectively
val (entrySerial, entryBalance) =
Expense.getLastExpenseData(currentAccount, entryDate)
val e = Expense.create.account(account)
.dateOf(entryDate)
.serialNumber(entrySerial + 1)
.description(desc)
.amount(BigDecimal(value)).tags(tags)
.currentBalance(entryBalance + amount)
// The validate method returns Nil if there are no errors,
// or an error message if errors are found.
e.validate match {
case Nil => {
Expense.updateEntries(entrySerial + 1, amount)
e.save
val acct = Account.find(account).open_!
val newBalance = acct.balance.is + e.amount.is
acct.balance(newBalance).save
S.notice("Entry added!")
// remove the statefullness of this snippet
unregisterThisSnippet()
}
case x => error(x)
}
}
}
val allAccounts =
user.allAccounts.map(acct => (acct.id.toString, acct.name))
// Parse through the NodeSeq passed as "in" looking for tags
// prefixed with "e". When found, replace the tag with a NodeSeq
// according to the map below (name -> NodeSeq)
bind("e", in,
"account" -> select(allAccounts, Empty,
id => account = id.toLong),
"dateOf" -> text(Util.slashDate.format(new Date()).toString,
date = _,
"id" -> "entrydate"),
"desc" -> text("Item Description", desc = _),
"value" -> text("Value", value = _),
"tags" -> text(tags, doTagsAndSubmit))
}
// If no user logged in, return a blank Text node
case _ => Text("")
}
}
The doTagsAndSubmit function is a new addition. Its primary purpose is to process all of the submitted data, create and validate an Expense entry, and then return to the user. This pattern of defining a local function to handle form submission is quite common as opposed to defining a method on your class. The main reason is that by defining the function locally, it becomes a closure on any variables defined in the scope of your snippet function.
2.4 A Little AJAX Spice
So far this is all pretty standard fare, so let’s push things a bit and show you some more advanced functionality. Listing 2.4↓ shows a template for displaying a table of Expenses for the user with an optional start and end date. The Accounts.detail snippet will be defined later in this section.
<lift:surround with="default" at="content">
<lift:Accounts.detail eager_eval="true">
<div class="column span-24">
<h2>Summary</h2>
<table><tr><th>Name</th><th>Balance</th></tr>
<tr><td><acct:name /></td><td><acct:balance /></td></tr>
</table>
<div>
<h3>Filters:</h3>
<table><tr><th>Start Date</th><td><acct:startDate /></td>
<th>End Date</th><td><acct:endDate /></td></tr>
</table>
</div>
<div class="column span-24" >
<h2>Transactions</h2>
<lift:embed what="entry_table" />
</div>
</lift:Accounts.detail>
</lift:surround>
The <lift:embed> tag (Section 4.5.7 on page 1↓) allows you to include another template at that point. In our case, the entry_table template is shown in Listing 2.4↓. This is really just a fragment and is not intended to be used alone, since it’s not a full XHTML document and it doesn’t surround itself with a master template. It does, however, provide binding sites that we can fill in.
<table class="" border="0" cellpadding="0" cellspacing="1"
    width="100%">
  <thead>
    <tr>
      <th>Date</th><th>Description</th><th>Tags</th><th>Value</th>
      <th>Balance</th>
    </tr>
  </thead>
  <tbody id="entry_table">
    <acct:table>
      <acct:tableEntry>
    <tr><td><entry:date /></td><td><entry:desc /></td>
        <td><entry:tags /></td><td><entry:amt /></td>
        <td><entry:balance /></td>
    </tr>
      </acct:tableEntry>
    </acct:table>
  </tbody>
</table>
Before we get into the AJAX portion of the code, let’s define a helper method in our Accounts snippet class, shown in Listing 2.4↓, to generate the XHTML table entries that we’ll be displaying (assuming normal imports). Essentially, this function pulls the contents of the <acct:tableEntry> tag (via the Helpers.chooseTemplate method, Section C.8 on page 1↓) and binds each Expense from the provided list into it. As you can see in the entry_table template, that corresponds to one table row for each entry.
package com.pocketchangeapp.snippet
... imports ...
class Accounts {
...
def buildExpenseTable(entries : List[Expense], template : NodeSeq) = {
// Calls bind repeatedly, once for each Entry in entries
entries.flatMap({ entry =>
bind("entry", chooseTemplate("acct", "tableEntry", template),
"date" -> Text(Util.slashDate.format(entry.dateOf.is)),
"desc" -> Text(entry.description.is),
"tags" -> Text(entry.tags.map(_.tag.is).mkString(", ")),
"amt" -> Text(entry.amount.toString),
"balance" -> Text(entry.currentBalance.toString))
})
}
...
}
The final piece is our Accounts.detail snippet, shown in Listing 2.4↓. We start off with some boilerplate calls to match to locate the Account to be viewed, then we define some vars to hold state. It’s important that they’re vars so that they can be captured by the entryTable, updateStartDate, and updateEndDate closures, as well as the AJAX form fields that we define. The only magic we have to use is the SHtml.ajaxText form field generator (Chapter 11 on page 1↓), which will turn our update closures into AJAX callbacks. The values returned from these callbacks are JavaScript code that will be run on the client side. You can see that in a few lines of code we now have a page that will automatically update our Expense table when you set the start or end dates!
package com.pocketchangeapp.snippet
import ... standard imports ...
import com.pocketchangeapp.model._
import com.pocketchangeapp.util.Util
class Accounts {
def detail (xhtml: NodeSeq) : NodeSeq = S.param("name") match {
// If the "name" param was passed by the browser...
case Full(acctName) => {
// Look for an account by that name for the logged in user
Account.findByName(User.currentUser.open_!, acctName) match {
// If an account is returned (as a List)
case acct :: Nil => {
// Some closure state for the AJAX calls
// Here is Lift’s "Box" in action: we are creating
// variables to hold Date Boxes and initializing them
// to "Empty" (Empty is a subclass of Box)
var startDate : Box[Date] = Empty
var endDate : Box[Date] = Empty
// AJAX utility methods. Defined here to capture the closure
// vars defined above
def entryTable = buildExpenseTable(
Expense.getByAcct(acct, startDate, endDate, Empty),
xhtml)
def updateStartDate (date : String) = {
startDate = Util.parseDate(date, Util.slashDate.parse)
JsCmds.SetHtml("entry_table", entryTable)
}
def updateEndDate (date : String) = {
endDate = Util.parseDate(date, Util.slashDate.parse)
JsCmds.SetHtml("entry_table", entryTable)
}
// Bind the data to the passed in XML elements with
// prefix "acct" according to the map below.
bind("acct", xhtml,
"name" -> acct.name.asHtml,
"balance" -> acct.balance.asHtml,
"startDate" -> SHtml.ajaxText("", updateStartDate),
"endDate" -> SHtml.ajaxText("", updateEndDate),
"table" -> entryTable)
}
// An account name was provided but did not match any of
// the logged in user’s accounts
case _ => Text("Could not locate account " + acctName)
}
}
// The S.param "name" was empty
case _ => Text("No account name provided")
}
}
2.5 Conclusion
We hope that this chapter has demonstrated how powerful Lift can be while remaining concise and easy to use. Don’t worry if there’s something you didn’t understand, we’ll be explaining in more detail as we go along. We’ll continue to expand on this example app throughout the book, so feel free to make this chapter a base reference, or pull your own version of PocketChange from the git repository with the following command (assuming you have git installed):
git clone git://github.com/tjweir/pocketchangeapp.git
Now let’s dive in!
(C) 2012 Lift 2.0 EditionWritten by Derek Chen-Becker, Marius Danciu and Tyler Weir