9 Advanced Lift Architecture
This chapter is still under active development. The contents will change.
Congratulations! You’ve either made it through the introduction to Lift, or maybe you’ve just skipped Basics and jumped right to here to Advanced; either way, the next group of chapters will be exciting.
In this chapter we’re going to dive into some of the advanced guts of Lift so that you have a thorough understanding of what’s going on before we explore further.
9.1 Architectural Overview
Before we jump into the specific details of the architecture, let’s refresh our memories. Figure 9.1↓ highlights the main Lift components and where they live in the ecosystem. Scala compiles down to Java bytecode, so we sit on top of the JVM. Lift Applications are typically run in a J(2)EE web container, such as Jetty or Tomcat. As we explained in section 3.1↑, Lift is set up to act as a Filter [L] [L] http://java.sun.com/j2ee/1.4/docs/api/javax/servlet/Filter.html that acts as the entry point. Usage of the rest of the framework varies from application to application, depending on how simple or complex you make it.
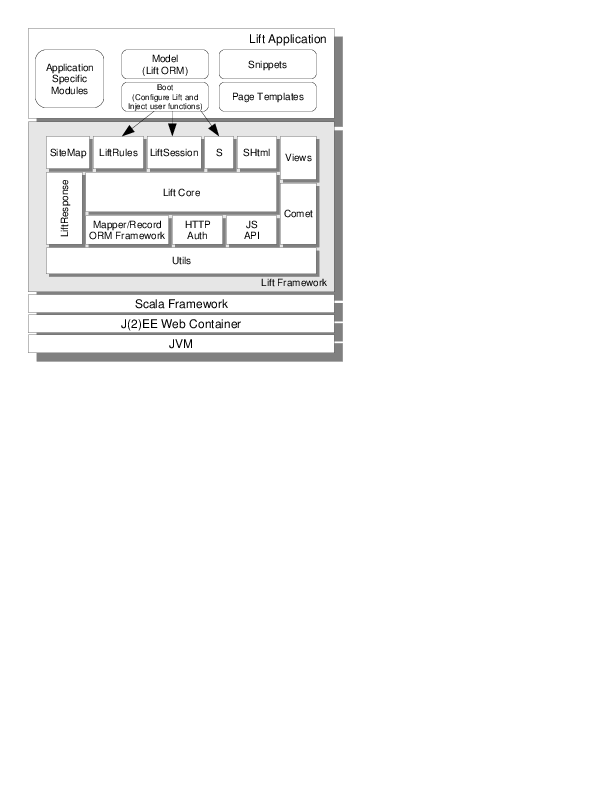
The major components outlined in the diagram are:
LiftCore The engine of the framework responsible for request/response lifecycle, rendering pipeline, invoking user’s functions etc. We don’t directly cover the core in this book since essentially all of the functionality that we do cover sits on top of the core
SiteMap Contains the web pages for a Lift application (chapter7↑)
LiftRules Allows you to configure Lift. We cover this in various sections throughout the book
LiftSession The session state representation (section 9.5↓)
S The stateful object impersonating the state context for a given request/response lifecycle (section 9.7↓)
Views LiftView objects impersonating a view as a XML content. Thus pages can be composed from other sources not only from html files. (section 4.4↑)
LiftResponse Represents the abstraction of a response that will be propagated to the client. (section 9.4↓)
Comet Represents the Comet Actors layer which allows the sending of asynchronous content to the browser (section 11.5↓)
ORM - Either Mapper or Record - The lightweight ORM library provided by Lift. The Mapper framework is the proposed ORM framework for Lift 1.0 and the Record framework will be out for next releases. (chapter 8↑)
HTTP Auth - You can use either Basic or Digest HTTP authentication in your Lift application. This provides you more control as opposed to web-container’s HTTP authentication model. (section 9.9↓)
JS API The JavaScript abstraction layer. These are Scala classes/objects that abstract JavaScript artifacts. Such objects can be combined to build JavaScript code (chapter 10↓)
Utils Contains a number of helper functions that Lift uses internally and are available to your application
9.2 The Request/Response Lifecycle
We briefly discussed the Request/Response Liftcycle in section 3.5↑, and now we’re going to cover it in depth. This will serve not only to familiarize you with the full processing power of Lift, but also to introduce some of the other advanced topics we’ll be discussing in this and later chapters.
One important thing we’d like to mention is that most of the configurable properties are in LiftRules, and are of type RulesSeq. With a RulesSeq you essentially have a list of functions or values that are applied in order. RulesSeq defines a prepend and append method that allows you to add new configuration items at the beginning or end of the configuration, respectively. This allows you to prioritize things like partial functions and compose various methods together to control Lift’s behavior. You can think of a RulesSeq as a Seq on steroids, tweaked for Lift’s usage.
The following list outlines, in order, the process of transforming a Request into a Response. We provide references to the sections of the book where we discuss each step in case you want to branch off.
- Execute early functions: this is a mechanism that allows a user function to be called on the HttpServletRequest before it enters the normal processing chain. This can be used for, for example, to set the XHTML output to UTF-8. This is controlled through LiftRules.early
- Perform URL Rewriting, which we already covered in detail in section 3.7↑. Controlled via LiftRules.rewrite, this is useful for creating user-friendly URLs, among other things. The result of the transformation will be checked for possible rewrites until there are no more matches or it is explicitly stopped by setting the stopRewriting val in ReqwriteResponse to true. It is relevant to know that you can have rewriter functions per-session hence you can have different rewriter in different contexts. These session rewriters are prended to the LiftRules rewriters before their application.
- Call LiftRules.onBeginServicing hooks. This is a mechanism that allows you to add your own hook functions that will be called when Lift is starting to process the request. You could set up logging here, for instance.
- Check for user-defined stateless dispatch in LiftRules.statelessDispatchTable. If the partial functions defined in this table match the request then they are used to create a LiftResponse that is sent to the user, bypassing any further processing. These are very useful for building things like REST APIs. The term stateless refers to the fact that at the time the dispatch function is called, the stateful object, called S, is not available and the LiftSession is not created yet. Custom dispatch is covered in section 3.8↑
- Create a LiftSession. The LiftSession holds various bits of state for the request, and is covered in more detail in section 9.5↓.
- Call LiftSession.onSetupSession. This is a mechanism for adding hook functions that will be called when the LiftSession is created. We’ll get into more details when we discuss Lift’s session management in section 9.5↓.
- Initialize the S object (section 3.4.1↑). The S object represents the current state of the Request and Response.
- Call any LoanWrapper instances that you’ve added through S.addAround. A LoanWrapper is a way to insert your own processing into the render pipeline, similar to how Filter works in the Servlet API. This means that when your LoanWrapper implementation is called, Lift passes you a function allowing you to chain the processing of the request. With this functionality you can execute your own pre- and post-condition code. A simple example of this would be if you need to make sure that something is configured at the start of processing and cleanly shut down when processing terminates. LoanWrappers are covered in section 9.6.1↓
-
Process the stateful request
- Check the stateful dispatch functions defined in LiftRules.dispatch. This is similar to the stateless dispatch in step #4 except that these functions are executed in the context of a LiftSession and an S object (section 3.4.1↑). The first matching partial function is used to generate a LiftResponse that is returned to the client. If none of the dispatch functions match then processing continues. Dispatch functions are covered in section 3.8↑. This flow is wrapped by LiftSession.onBeginServicing/onEndServicing calls
- If this is a Comet request, then process it and return the response. Comet is a method for performing asynchronous updates of the user’s page without a reload. We cover Comet techniques in chapter 11↓
- If this is an Ajax request, execute the user’s callback function; the specific function is mapped via a request parameter (essentially a token). The result of the callback is returned as the response to the user. The response can be a JavaScript snippet, an XML construct or virtually any LiftResponse. For an overview of LiftResponse please see section 9.4↓. This flow is wrapped by LiftSession.onBeginServicing/onEndServicing calls.
-
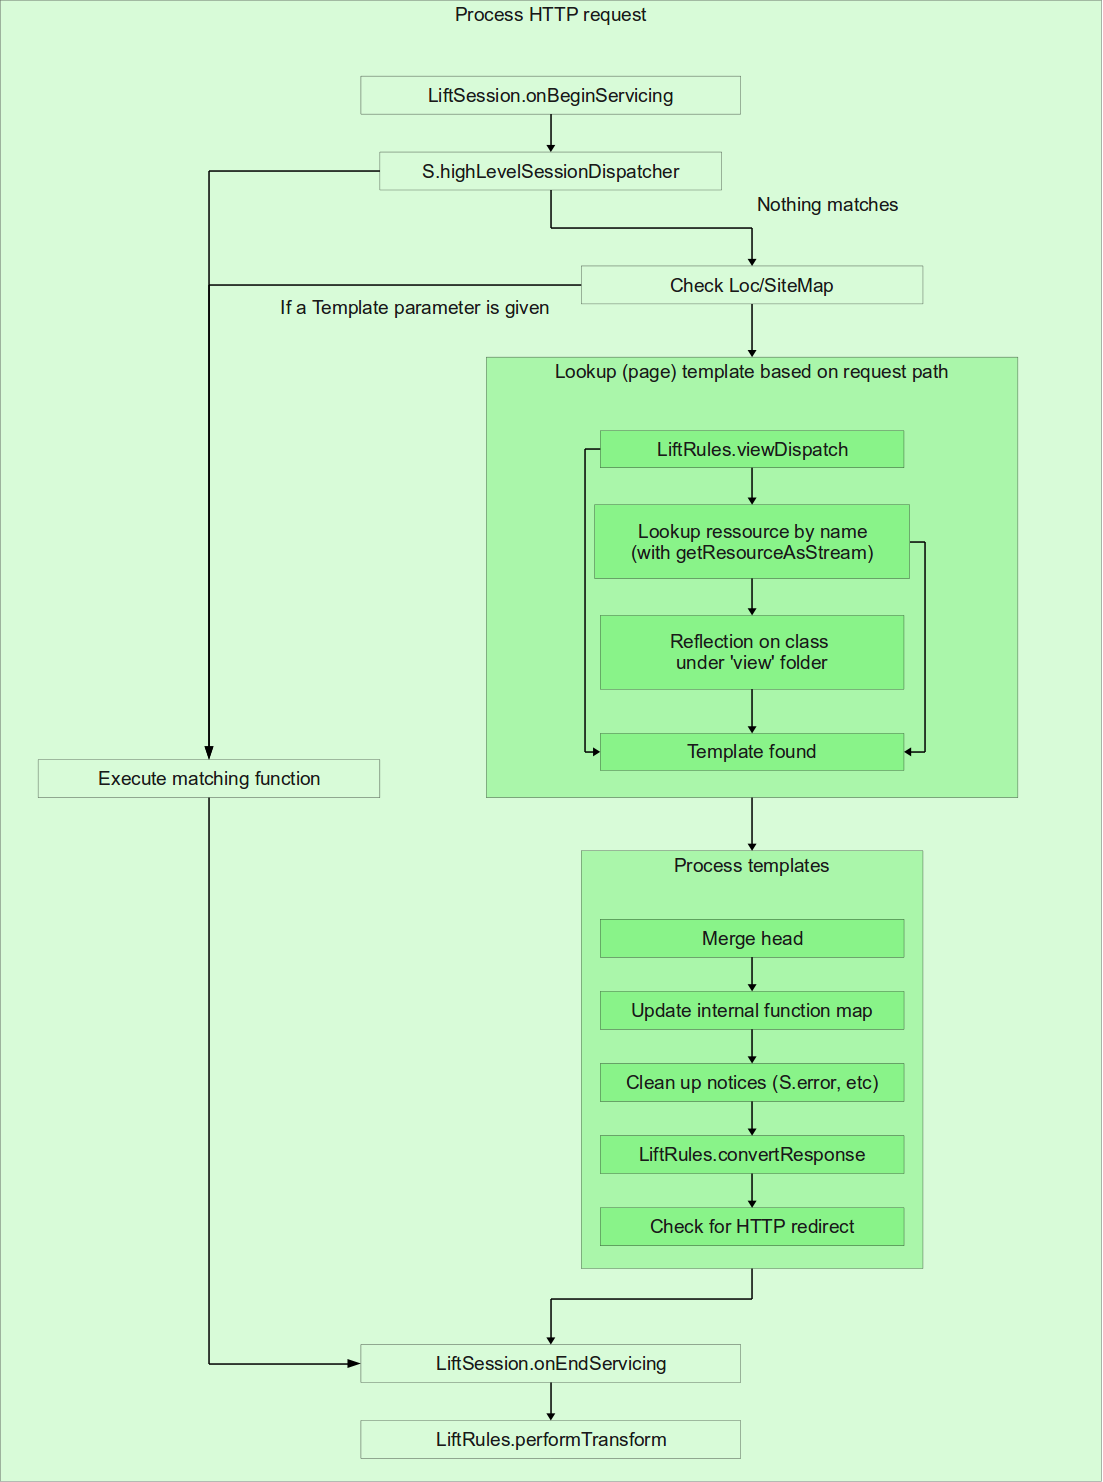
If this is a regular HTTP request, then:
- Call LiftSession.onBeginServicing hooks. Mostly “onBegin”/”onEnd” functions are used for logging. Note that the LiftRules object also has onBeginServicing and onEndServicing functions but these are “wrapping” more Lift processing and not just statefull processing.
- Check the user-defined dispatch functions that are set per-session (see S.addHighLevelSessionDispatcher). This is similar to LiftRules.dispatch except that you can have different functions set up for a different session depending on your application logic. If there is a function applicable, execute it and return its response. If there is no per-session dispatch function, process the request by executing the Scala function that user set up for specific events (such as when clicking a link, or pressing the submit button, or a function that will be executed when a form field is set etc.). Please see SHtml obejct 3.4.2↑.
- Check the SiteMap and Loc functions. We cover SiteMap extensively in chapter 7↑.
-
Lookup the template based on the request path. Lift will locate the templates using various approaches:
- Check the partial functions defined in LiftRules.viewDispatch. If there is a function defined for this path invoke it and return an Either[() ⇒ Can[NodeSeq],LiftView]. This allows you to either return the function for handling the view directly, or delegate to a LiftView subclass. LiftView is covered in section 4.4↑
- If no viewDispatch functions match, then look for the template using the ServletContext’s getResourceAsStream.
- If Lift still can’t find any templates, it will attempt to locate a View class whose name matches the first component of the request path under the view folder of any packages defined by LiftRules.addToPackages method. If an InsecureLiftView class is found, it will attempt to invoke a function on the class corresponding to the second component of the request path. If a LiftView class is found, it will invoke the dispatch method on the second component of the request path.
-
Process the templates by executing snippets, combining templates etc.
- Merge <head> elements, as described in section e↓
- Update the internal functions map. Basically this associates the user’s Scala functions with tokens that are passed around in subsequent requests using HTTP query parameters. We cover this mechanism in detail in section 9.3↓
- Clean up notices (see S.error, S.warning, S.notice) since they were already rendered they are no longer needed. Notices are covered in section B↓.
- Call LiftRules.convertResponse. Basically this glues together different pieces if information such as the actual markup, the response headers, cookies, etc into a LiftResponse instance.
- Check to see if Lift needs to send HTTP redirect. For an overview please see 3.9↑
- Call LiftSession.onEndServicing hooks, the counterparts to LiftSession.onBeginServicing
- Call LiftRules.performTransform. This is actually configured via the LiftRules.responseTransformers RulesSeq. This is a list of functions on LiftResponse ⇒ LiftResponse that allows the user to modify the response before it’s sent to the client
- Call LiftRules.onEndServicing hooks. These are the stateless end-servicing hooks, called after the S object context is destroyed.
- Call any functions defined in LiftRules.beforeSend. This is the last place where you can modify the response before it’s sent to the user
- Convert the LiftResponse to a raw byte stream and send it to client as an HTTP response.
- Call any functions defined in LiftRules.afterSend. Typically these would be used for cleanup.
We realize that this is a lot of information to digest in one pass, so as we continue to cover the specific details of the rendering pipeline you may want to keep a bookmark here so that you can come back and process the new information in the greater context of how Lift is working.
Tyler Weir has created a set of diagrams on the following two pages that outline Lift’s processing at the global level and also for HTTP requests in particular. For the visually-oriented these may explain things a bit better.
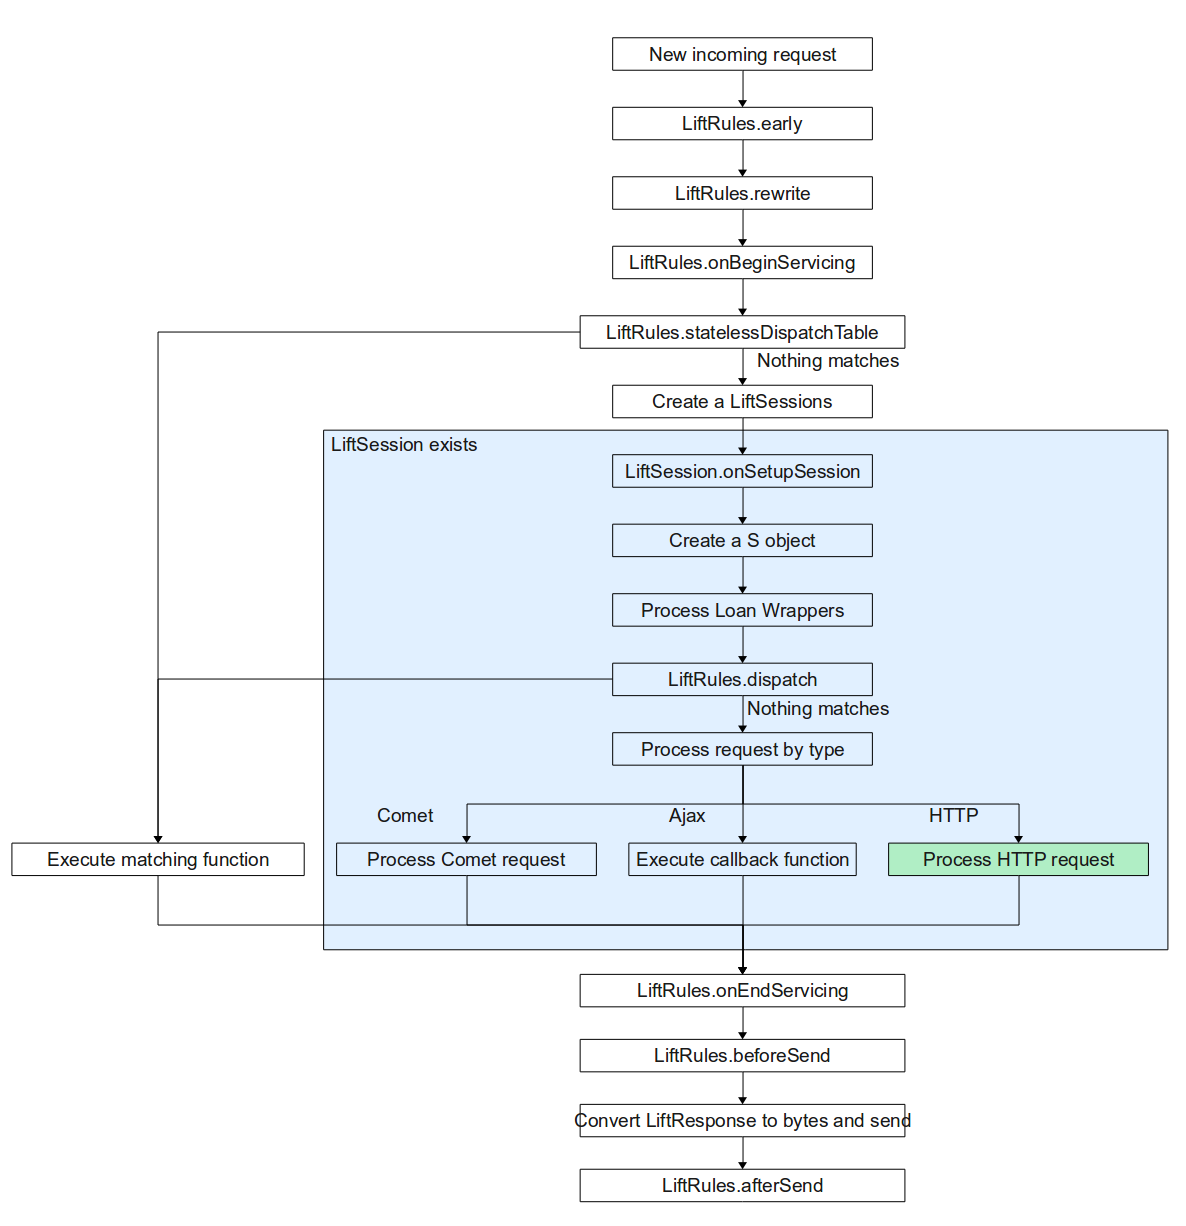
The “Process HTTP request” step is expanded on the following page.
9.3 Lift Function Mapping
As we mentioned in section 6.1↑, lift utilizes scala closures and functions for almost all processing of client data. Because of this, Lift’s ability to associate functions with specific form elements, AJAX calls, etc, is critical to its operation. This association of functions, commonly known as “mapping” is handled through a combination of request parameters, Scala closures and Session data. We feel that understanding how mapping works is important if you want to work on advanced topics.
At its most basic, mapping of functions is just that; a map of the user’s currently defined functions. To simplify things, Lift actually uses one of four subclasses of AFuncHolder [M] [M] net.liftweb.http.S.AFuncHolder:
BinFuncHolder used for binding functions for file uploading. It will hold a FileParamHolder ⇒ Any function, which is used to process the file data after upload (section 6.4↑)
SFuncHolder used for binding String ⇒ Any functions. This function corresponds to a single HTTP query parameter, except that the parameter name is unique to this request (we’ll cover naming shortly)
LFuncHolder used for binding List[String] ⇒ Any functions. This is essentially the same as SFuncHolder but for multiple values
NFuncHolder used for binding () ⇒ Any functions. Typically these are used for event callabcks (such as form submission)
Wherever Lift takes a function callback it is converted to one of these types behind the scenes. Also on the backend, each function is assigned a token ID (generated by Helpers.nextFuncName), which is then added to the session, typically via S.addFunctionMap or S.mapFunc. The token is generally used as the form element name so that the tokens for a given form are passed back to Lift when the form is submitted; in AJAX, the token is used as an HTTP query parameter of the AJAX callback from the client JavaScript code. In either case, Lift processes the query parameters within LiftSession.runParams and executes each associated function in the function mapping.
As a concrete example, let’s look at a simple binding in a form. Listing 9.3↓ shows a small example snippet that will request a person’s name and print it out when the person clicks the submit button.
Listing 9.3↓ shows the corresponding template using our sample snippet.
Finally, listing 9.3↓ shows an example of the resulting HTML that’s generated when a user views the template. As you can see, each of the elements with callbacks has a corresponding form element with a token ID for the name value. Since we’ve used the GET CGI method here (we usually recommend using POST in the real world), when we submit the form our URL would look like /greet.html?F541542594358JE2=...&F541542594359PM4=Greet. For SFuncHolder mappings the value of the request parameter is passed directly. For NFuncHolders the presence of the token in the query parameter list is enough to fire the function. For BinFuncHolder and LFuncHolder mappings some additional processing is performed to coerce the submitted values into proper values for the functions to handle.
Normally you do not have to directly deal with the function holder classes, since the generator functions in SHtml handle that internally. However, if you’re in a situation when you need to bind functions by yourself (such as building your own widget where SHtml doesn’t provided needed elements), you can use the previously mentioned S.addFunctionMap or S.mapFunc to do the “registration” for you.
9.4 LiftResponse in Detail
In some cases, particularly when using dispatch functions (section 3.8↑), you may want explicit control over what Lift returns to the user. The LiftResponse trait is the base of a complete hierarchy of response classes that cover a wide variety of functionality, from simply returning an HTTP status code to returning a byte stream or your own XML fragments. In this section we’ll cover some of the more common classes.
9.4.1 InMemoryResponse
The InMemoryResponse allows you to return an array of bytes directly to the user along with a set of HTTP headers, cookies and a response code. An example of using InMemoryResponse was given in section 3.8↑, showing how we can directly generate a chart PNG in memory and send it to the user. This is generally useful as long as the data you need to generate and send is relatively small; when you start getting into larger buffers you can run into memory constraints as well as garbage collection pressure if you’re serving a large number of requests.
9.4.2 StreamingResponse
The StreamingResponse class is similar to the InMemoryResponse, except that instead of reading from a buffer, it reads from an input object. The input object is not required to be a subclass of java.io.InputStream, but rather is only required to implement the method “def read(buf: Array[Byte]): Int” [N] [N] This is done with Scala’s structural typing, which we don’t cover in this book. For more info, see http://scala.sygneca.com/patterns/duck-typing-done-right, or the Scala Language Spec, section 3.2.7. This allows you to essentially send back anything that can provide an input stream. Additionally, you can provide a () ⇒ Unit function (cleanup, if you will) that is called when the input stream is exhausted. As an example, let’s look at how we could stream a file from our WAR back to the client. Listing 9.4.2↓ shows how we can retrieve the input stream from our classloader and then send it directly to the user. Note that you must know the size of the file you’re streaming before sending it.
def sendFile () : Box[LiftResponse] = {
  // Locate the file and process it
  LiftRules.getResource("/some-file.txt").map { url =>
    val input = url.openStream()
    val filesize = ... // must compute or predetermine this.
    StreamingResponse(inPipe,
                      () => { input.close },
                      filesize,
                      (Content-Type -> "text/plain") :: Nil,
                      Nil,
                      200)
  }
}
Note that we use the cleanup function to close the input stream once we’re done so that we make sure to release resources.
9.4.3 Hierarchy
The Lift framework makes a lot of things really easy and it provides extremly useful abstractions as you may have already discovered. Responses to clients are also abstacted by LiftResponse trait. There are numerous response types and here is the simplified view of the class hierarchy:
-
LiftResponse
-
BasicResponse
- InMemoryResponse
- StreamingResponse
- JSonResponse
-
RedirectResponse
- RedirectWithState
-
ToResponse
- XhtmlRespomse
- XmlResponse
- XmlMimeResponse
- AtomResponse
- OpenSearchResponse
- AtomCreatedResponse
- AtomCategoryResponse
- AtomServiceResponse
- CreatedResponse
- OkResponse
- PermRedirectResponse
- BadResponse
- UnauthorizedResponse
- UnauthorizedDigestResponse
- NotFoundResponse
- MethodNotAllowedResponse
- GoneResponse
-
BasicResponse
We won’t get into details right now on what exactly each and every class/object does, although their purpose is given away by their names. It is important to know that whenever you need to return a LiftResponse reference from one of your functions, for example LiftRules.dispatch you can you can use one of these classes. Lift doesn’t really provide the HttpServletResponse object, instead all responses are impersonated by a LiftResponse instance and it content (the actual payload, http headers, content-type, cookies etc.) is written internally by Lift to the container’s output stream.
Still let’s take a look at a few examples
9.4.4 RedirectWithState
RedirectWithState example
// Assume you boot function
import MessageState._
...
def boot = {
LiftRules.dispatch.prepend {
case Req("redirect1" :: _, _, _) => () =>
Full(RedirectWithState("/page1", "My error" -> Error))
case Req("redirect2" :: _, _, _) => () =>
Full(RedirectWithState("/page2",
RedirectState(() => println("Called on redirect!"),
"My error" -> Error)))
}
First of all we added a DispatchPF function that pattern matches for paths starting with redirect1 and redirect2. Let’s see what happens in each case.
- redirect1 - We are returning a RedirectWithState response. It will do HTTP redirect towards /page1 and the state is impersonated by the tuple “MyError” -> Error. Because MessageState object holds an implicit conversion function from Tuple2 to MessageState it suffices to just provide the tuple here. Essentially we are saying here that when the browser sends the redirect request to server we already have an Error notice set up and the <lift:msgs> tag from your /page1 will show this “My error” error message.
- redirect2 - Similarly it does an HTTP redirect to browser towards your /page2. But we are passing now a RedirectState object. This object holds a () => Unit function that will be executed when browser send the redirect request and the Notices impersonated by a repeated parameter (String, NoticeType.Value)*. In fact the mapping between the actual message and its type: Notice, Warning or Error.
9.4.5 XmlResponse
XmlResponse example
// Assume you boot function
def boot = {
LiftRules.dispatch.prepend {
case Req("rest" :: Nil, _, _) => () => Full(XmlResponse(
<persons>
<name>John</name>
<name>Jane</name>
</persons>
))
}
When you are receiving a request with the path /rest the code is returning an XML response. The content-type and everything else is taken care of by XmlResponse. You can build much more complex REST API’s an return XML response which is probably mot commonly used.
9.5 Session Management
Lift is a stateful framework and naturally this state needs to be managed. You may already be familiar with HttpSession and and how a J(2)EE web container identifies an HttpSession; either by a JSESSIONID cookie or by a JSESSIONID URI sequence (in case of URL rewriting). Similarly, Lift uses a LiftSession reference which is not actually “persisted” in HttpSession. As a matter of fact Lift does not really use the HttpSession provided by the web container to maintain conversational state, but rather uses a bridge between the HttpSession and the LiftSession. This bridge is impersonated by SessionToServletBridge class which implements javax.servlet.http.HttpSessionBindingListener and javax.servlet.http.HttpSessionActivationListener and works like this:
- When receiving an HTTP Request and there was no stateless dispatch function to execute, Lift does the stateful processing. But before doing that it checks to see if there is a LiftSession associated with this HTTP session ID. This mapping is kept on a SessionMaster Scala actor.
- If there is no associated LiftSession in the SessionMaster actor, create it and add a SessionToServletBridge attribute on HttpSession. This will make Lift aware of the session when the container terminates the HttpSession or when the HTTP session is about to be passivated or activated.
-
When the container terminates the HTTP session, SessionToServletBridge sends a message to the SessionMaster Actor to terminate the LiftSession, which includes the following steps:
- Call any defined LiftSession.onAboutToShutdownSession hooks
- Send a ShutDown message to all Comet Actors pertaining to this session
- Clean up any internal LiftSession state
- Call LiftSession.onShutdownSession hooks
The SessionMaster Actor is also protected by another watcher Actor. This watcher Actor receives the Exit messages of the watched Actors. When it receives an Exit message it will call the users’ failure functions and restart the watched actor (Please see ActorWatcher.failureFuncs).
Even while Lift is handling session management you still have the ability to manually add attributes to the HttpSession object. We do not recommend this unless you really must. A simpler way to keep your own session variables, is to use SessionVars. For more details about SessionVar please see the fundamental chapter 3.11↑
The next question would probably be “So we have internal session management, how do we cope with that in a clustered environment? ... how are sessions replicated?” the answer is, they aren’t. There is no intention to use the web container’s session replication as these technologies appears to be inferior to other solutions on the market. Relying on Java serialization brings a lot of performance concerns and alternative technologies have been investigated and they are still under investigation. Until there is a standard session replication technology you can still cluster you application using “sticky session”. This meas that all requests pertaining to a HTTP session must be processed by the same cluster node. This can be done by software or hardware load balancers, as they would dispatch the requests based on JSESSIONID cookie. Another approach is that the dispatching is done based on some URI or query parameters. For example, a query parameter like serverid=1 is configured in the load balancer to always be dispatched to the node 1 of the cluster, and so on. There are some downsides for the sticky session approach. For instance you are logged in the application and do your stuff. Suddenly the node designated to your session crashes. At this moment you lost your session. The next subsequent request would be automatically dispatched by the load balancer to another cluster node and depending how your application is built this may mean that you need to log in again or if part of the state was persisted in DB you may resume your work from some point avoiding re-login ... but this is application specific behavior that is beyond the scope of this discussion. The advantages of sticky sessions are related with application performance since in this model the state does not need to be replicated in all cluster nodes which for significant state information can be quite time/resources consuming.
9.5.1 Lift garbage collection
As you have seen, Lift tailors Scala functions with client side artifacts (XHTML input elements, Ajax requests etc.). Naturally these functions are kept into the session state. Also for every rendered page, a page ID is generated and functions bound for these pages as asociated with this page ID. In order to prevent accumulation of such mappings, Lift has a mechanism of purging unused functions. Basically the idea is
- On client side, a script periodically sends to the server an Ajax request impersonating a lift GC request.
- On service side Lift updates the timestamps of the functions associated with this page ID. The functions older then LiftRules.unusedFunctionsLifeTime (default value is 10 minutes) become eligible for garbage collection as they are de-referenced from the current session. The frequency of such Ajax requests is given by LiftRules.liftGCPollingInterval. By default it is set to 75 seconds.
- Each Ajax request contains includes the page ID as new function may be bound as a result of processing the Ajax request, dependin on the application code. Such function that are dynamically bound are automatically associated with the same page ID.
You can of course turn off this garbage collection mechanism by setting LiftRules.enableLiftGC = false typically in your Boot. You can also fine tune the garbage collection mechanims to fit your application needs, by changing the default LiftRules variables.
LiftRules gabage collection variables
/** * By default lift uses a garbage-collection mechanism of removing * unused bound functions from LiftSesssion * Setting this to false will disable this mechanims and there will * be no Ajax polling request attempted. */ var enableLiftGC = true; /** * If Lift garbage collection is enabled, functions that are not seen * in the page for this period of time (given in milliseonds) will be * discarded, hence eligible for garbage collection. The default value * is 10 minutes. */ var unusedFunctionsLifeTime: Long = 10 minutes /** * The polling interval for background Ajax requests to prevent * functions of being garbage collected. * Default value is set to 75 seconds. */ var liftGCPollingInterval: Long = 75 seconds /** * The polling interval for background Ajax requests to prevent functions * of being garbage collected. * This will be applied if the Ajax request will fail. Default value is * set to 15 seconds. */ var liftGCFailureRetryTimeout: Long = 15 seconds
9.6 Miscellaneous Lift Features
In this section we will discuss various features that can prove helpful in building rich Lift applications.
9.6.1 Wrapping Lift’s processing logic
Lift provides the ability to allow user functions to be part of processing lifecycle. In these cases Lift allows you to provide your own functions and the actual Lift’s processing function is passed to your function. Hence your own function is responsible of calling the actual Lift’s processing logic.
But let’s see how exactly you can do this.
LoanWrapper example
class Boot {
def boot {
...
S.addAround(new LoanWrapper { // Y
def apply[T](f: => T): T = {
println("Y -> hello to the request!")
val result = f // Let Lift do normal request processing.
println("Y -> goodbye!")
result
}
})
S.addAround(new LoanWrapper { // X
def apply[T](f: => T): T = {
println("X -> hello to the request!")
val result = f // Let Lift do normal request processing.
println("X -> goodbye!")
result
}
})
}
The code looks pretty straight-forward in the sense that we add two LoanWrapper instances to the S object. (Note that we’re using the S object not LiftRules meaning that LoanWrappers are applicable only for stateful processing. See 9.2↑ for when exactly LoanWrappers are invoked.)
So let’s see what happens when the above code processess a request from a client. You can think of the invocation sequence as X(Y(f)) where f is the Lift function that impersonates the core processing. Therefore you’ll see the following output in the console:
X -> hello to the request!
Y -> hello to the request!
<Lift’s logic ... whatever is printed here>
Y -> goodbye!
X -> goodbye!
This feature allows you use a resource before Lift does and release them after Lift has finished processing the stateful request and before the LiftResponse object is constructed.
9.6.2 Passing Template Parameters to Snippets↓↓
In addition to the standard attributes for snippets, outlined in Section 5.1↑, you can set your own attributes on the snippet element. Attributes used in this manner are called “parameters”. Listing 9.6.2↓ shows us setting a default parameter on our Ledger.balance snippet.
The S.attr function allows us to access all parameters defined on the snippet element itself, as shown in Listing 9.6.2↓.
9.6.3 Computing Attributes with Snippets↓
You can use snippets to compute tag attributes, as shown in Listing 9.6.3↓:
9.6.4 Processing Element Attributes↓
Now we have seen how we can pass xml parameters to snippets but what if we want to pass parameters on the nodes that will be bound? For instance, we may want to pass the am/pm information on the time element such as:
<ledger:time ampm=”true”/>
to control the time display format. Listing 9.6.4↓ shows how we can use the BindHelpers object to retrieve the current element’s attributes.
class Ledger {
def balance (content : NodeSeq ) : NodeSeq = {
val dflt = S.attr("default") openOr "0";
bind ("ledger", content,
"balance" -> Text(currentLegdger.formattedBalance),
"time" -> {
node: NodeSeq => println(BindHelpers.attr("ampm"));
Text((new java.util.Date).toString))
})
}
}
You can use the BindHelpers object for obtaining information about node attributes. This context is maintained internally using ThreadLocals and closures. Note that the context is cleared after the bind method is executed. In our example above for “time” node we are actually binding a function that takes the child nodes of the <ledger:time> node. When our function is called by Lift we can access the BindHelpers, such ass the attributes of the current node. The sequence <string> -> <right-hand-side-expression> is turned into a BindParam object using implicit conversions. It is important to note that BindParam.calcValue function is called in the correct context so that BindHelpers can be safely used.
9.7 Advanced S Object Features
The S, or Stateful, object is a very important part of Lift. The S context is created when a client request is recieved that needs to be handled as a stateful reuest. Please see 9.2↑ for more details on the state creation and handling. The actual state information is kept inside the S object using ThreadLocal [O] [O] java.lang.ThreadLocal variables since S is a singleton. This means that if you have any code that is executed in the stateful context you can safely use any S object goodies, which include:
9.7.1 Managing cookies
You can retrieve cookies from the request or set cookies to be sent in the response. Cookies are covered in section 3.10↑.
9.7.2 Localization and Internationalization
Localization (also called L10N) and Internationalization (also called I18N) are very important aspects of many web applications that deal with different languages. These topics are covered in chapter D↓.
9.7.3 Managing the Timezone
The S.timeZone function returns the current timezone as computed by the
LiftRules.timeZoneCalculator function. By default, the LiftRules method simply executes TimeZone.getDefault, but you can provide your own Box[HttpServletRequest] ⇒ TimeZone partial function to define your own behavior. Examples would include allowing users to choose their own timezone, or to use geographic lookup of the user’s IP address.
LiftRules.timeZoneCalculator function. By default, the LiftRules method simply executes TimeZone.getDefault, but you can provide your own Box[HttpServletRequest] ⇒ TimeZone partial function to define your own behavior. Examples would include allowing users to choose their own timezone, or to use geographic lookup of the user’s IP address.
9.7.4 Per-session DispatchPF functions
You can set DispatchPF functions that operate in the context of a current session. Essentially you can bind DispatchPF functions with a given name. Relevant functions are:
- S.highLevelSessionDispatcher - returns a List[LiftRules.DispatchPF]
- S.highLevelSessionDispatchList - returns a List[DispatchHolder]
- S.addHighLevelSessionDispatcher - maps a name with a given DispatchPF
- S.removeHighLevelSessionDispatcher - removes the DispatchPF given its name
- S.clearHighLevelSessionDispatcher - removes all DispatchPF associations
9.7.5 Session re-writers
Session re-writers are per session functions that allow you to modify a HTTP request (URI, query parameters etc.) before the request is actually processed. This is similar with LiftRules.rewrite variable but you can apply rewriters per a given session. Hence you can have different rewrites in diferent contexts. The relevant functions are:
- S.sessionRewriter - returns a List[RewriteHolder]
- S.addSessionRewriter - maps a LiftRules.RewritePF with a given name
- S.removeSessionRewriter - removes a rewriter by a name
- S.clearSessionRewriter - remove all session rewriters.
9.7.6 Access to HTTP headers
Accessing HTTP header parameters from the request and adding HTTP header parameters to the HTTP response represent very common operations. You can easily perform these operations using the following functions:
- S.getHeaders - returns a List[(String, String)] containing all HTTP headers grouped by name and value pair
- S.setHeader - sets a HTTP header parameter by specifying the name and value pair
9.7.7 Manage the document type
You can also read and write the XML document type set for the current response. You can use the following functions:
- S.getDocType - returns the doc type that was set forthe current response
- S.setDocType - sets a document type for the curent response object.
9.7.8 Other functions
- Access to the raw HttpServletRequest and HttpSession if you really need it.
- Managing the function map. The function map generates an association between a String and a function. This string represents a query parameter that when Lift receives upon a HTTP request, it will execute your function. Normally these names are auto-generated by Lift but you can also provide you own name. Please see 9.3↑ for more details.
- Managing wrappers - see 9.6.1↑
- Managing notices - see 3.6↑
- Managing HTTP redirects - see S.redirectTo functions and 9.4↑
- Using XML attibutes of a snippet - see ↓
9.8 ResourceServer
ResourceServer is a Lift component that manages the serving of resources like JS, CSS etc. Well the web container can do that right? ... still container does not serve these resources if they are inside jar files. The default URI path for serving such resources is given by LiftRules.resourceServerPath variable which by default it is set to “classpath”. The folder location where the resource is looked up inside jar files is given by ResourceServer.baseResourceLocation variable which by default it is set to “toserve”. Let’s assume the following folder structure inside you Lift project:
lift-proj/src/main/resources/toserve/css/mystyle.css
Maven will create the toserver folder in the jar/war file generated. Then in your web page you add something like:
<link rel="stylesheet" href="/classpath/css/mystyle.css" type="text/css"/>
Because the first URI part matches with LiftRules.resourceServerPath Lift will tell ResouceServer to load this resource from ’toserve’ folder. But it will fail. There is one thing left to do. We need to tell ResouceServer to allow the loading of mystyle.css resource. We can do this from Boot by calling:
ResourceServer.allow {
case "css" :: _ => true
}
We basically told Lift here to allow any resource found in css folder under toserve. Note that toserver comes from ResourceServer.baseResourceLocation which can be changed.
9.9 HTTP Authentication ↓↓
HTTP authentication is described by RFC 2617 [P] [P] http://www.isi.edu/in-notes/rfc2617.txt. It describes the means of protecting server resources and allowing access only to authorized entities. As you may know, any J(2)EE web container provides HTTP authentication support using JAAS [Q] [Q] Java Authentication and Authorization Service. More information can be found at http://java.sun.com/javase/6/docs/technotes/guides/security/jaas/JAASRefGuide.html↓. However, this approach has limitations. For example, if you provide your own LoginModule or CallbackHandler implementation this will not be loaded by the web application classloader but instead by the container classloader (at least in tomcat). This can lead to dependency loading issues since the web application classloader sits below the container’s classloader in the delegation chain. Lift, however, provides supports for both basic and digest authentications via a simplified, scala-oriented API that you can use directly. This API provides not only direct support for the HTTP authentication mechanisms, but also a path and role based authorization mechanism. The following sections show how we use basic authentication to protect our REST API (Chapter 15 on page 1↓).
9.9.1 Determining which Resources to Protect
The first thing we need to do is tell Lift which resources are protected by authentication. This is done by configuring LiftRules.httpAuthProtectedResources↓ with one or more PartialFunction[Req,Box[Role]] [R] [R] net.liftweb.http.auth.Role to match on the request. Listing 9.9.1↓ shows the PartialFunction defined in our DispatchRestAPI object (Section 15.4.1 on page 1↓) used to protect our REST API from unauthorized access.
  // We explicitly protect GET and PUT requests in our REST API
  import net.liftweb.http.auth.AuthRole
  def protection : LiftRules.HttpAuthProtectedResourcePF = {
    case Req(List("api", "account", accountId), _, PutRequest) =>
       Full(AuthRole("editAcct:" + accountId))
    case Req(List("api", "account", accountId), _, GetRequest) =>
       Full(AuthRole("viewAcct:" + accountId))
    // If the account is public, don’t enforce auth
    case Req(List("api", "expense", Expense(e, true)), _, GetRequest) => Empty
    case Req(List("api", "expense", Expense(e, _)), _, GetRequest) =>
      Full(AuthRole("viewAcct:" + e.account.obj.open_!.id))
  }
The PartialFunction matches on the Req and can either return an Empty, indicating that the given request does not require authentication, or a Full[Role], that indicates which Role a user requires to be authorized to access the given resource. One important thing to remember is that HTTP authentication and SiteMap access control (Section 7.3 on page 1↑) are synergistic, so make sure that you configure both properly. We will discuss Roles further in Section 9.9.3↓, but for now you can simply consider them as String attributes associated with the current session. Once we’ve defined which resources are to be protected, we need to hook our PartialFunction into LiftRules in the Boot.boot method, shown in Listing 9.9.1↓.
9.9.2 Providing the Authentication Hook
After we’ve defined what resources we want to protect, we need to configure the LiftRules.authentication function to perform the actual authentication. Lift supports both HTTP Basic and Digest authentication schemes, which we’ll cover in the next two sections.
Note that in these examples we use stateful dispath (Section 3.8 on page 1↑) since the User.logUserIn method utilizes a backing SessionVar. If you use stateless dispatch you will need to provide your own RequestVars to store the current user and roles.
9.9.2.1 HTTP Basic Authentication
HTTP Basic authentication is provided by the net.liftweb.http.auth.HttpBasicAuthentication implementation class, constructed using the authentication realm name as well as a PartialFunction[(String, String, Req), Boolean] that actually does the authentication. The tuple passed to the PartialFunction consists of the attempted username password, and the request object (Req). It’s your responsibility to return true or false to indicate whether the provided credentials succeed. Listing 9.9.2.1↓ shows the code in Boot.boot that PocketChange uses to perform authentication based on the user’s email address and password. Note that when authentication succeeds for a given user not only do we return true, but we set the user as logged in (via User.logUserIn) and we compile a set of all of the Roles that the user so that Lift knows which protected resources the user may access. The net.liftweb.http.auth.userRoles RequestVar is a built-in construct in Lift that the authentication backend uses for bookkeeping.
import net.liftweb.http.auth.{AuthRole,HttpBasicAuthentication,userRoles}
LiftRules.authentication = HttpBasicAuthentication("PocketChange") {
case (userEmail, userPass, _) => {
logger.debug("Authenticating: " + userEmail)
User.find(By(User.email, userEmail)).map { user =>
if (user.password.match_?(userPass)) {
logger.debug("Auth succeeded for " + userEmail)
User.logUserIn(user)
// Compute all of the user roles
userRoles(user.editable.map(acct => AuthRole("editAcct:" + acct.id)) ++
user.allAccounts.map(acct => AuthRole("viewAcct:" + acct.id)))
true
} else {
logger.warn("Auth failed for " + userEmail)
false
}
} openOr false
}
}
9.9.2.2 HTTP Digest Authentication
HTTP Digest authentication is provided by the net.liftweb.http.auth.HttpDigestAuthentication implementation class. Like Basic authentication, the HttpDigestAuthentication instance is constructed with a realm name and a PartialFunction, but in this case the PartialFunction uses a tuple of (String,Req,(String) ⇒ Boolean). The first parameter is still the username, and the second parameter is the request instance, but the third parameter is a function that will compute and compare the digest for authentication based on a plaintext password. This means that if we want to use Digest authentication, we need to be able to retrieve a plaintext password for the user from the database somehow. Listing 9.9.2.2↓ shows how we could do this in PocketChange if we modified the User.password field to simply be a MappedString.
import net.liftweb.http.auth.{AuthRole,HttpBasicAuthentication,userRoles}
LiftRules.authentication = HttpBasicAuthentication("PocketChange") {
case (userEmail, _, authenticates) => {
logger.debug("Authenticating: " + userEmail)
User.find(By(User.email, userEmail)).map { user =>
if (authenticates(user.password.is)) {
logger.debug("Auth succeeded for " + userEmail)
User.logUserIn(user)
// Compute all of the user roles
userRoles(user.editable.map(acct => AuthRole("editAcct:" + acct.id)) ++
user.allAccounts.map(acct => AuthRole("viewAcct:" + acct.id)))
true
} else {
logger.warn("Auth failed for " + userEmail)
false
}
} openOr false
}
}
Another important factor with Digest authentication is that it uses nonces [S] [S] http://en.wikipedia.org/wiki/Cryptographic_nonce for authenticating the client, and the nonces have a limited lifetime. The default nonce lifetime is 30 seconds, but you can configure this by overriding the HttpDigestAuthentication.nonceValidityPeriod method.
9.9.3 Role Hierarchies
So far we’ve discussed Roles as essentially flat constructs. A Role, however, is an n-ary tree structure, meaning that when we assign a Role to a protected resource we can actually provide a hierarchy. Figure 9.4↓ shows an example of one such hierarchy. In this example, the Admin is the “superuser” role for admins, and can do what any sub-role can do and more. The Site-Admin can monitor the application, the User-Admin can manage users, and then we specify a set of location-specific roles: the Romania-Admin that can manage users from Romania, US-Admin that can manage users from US and UK-Admin that can only manage users from UK. With this hierarchy a User-Admin can manage users from anywhere but a Site-Admin can not manage any users. A Romania-Admin can’t monitor the site, nor it can manage the US or UK users.
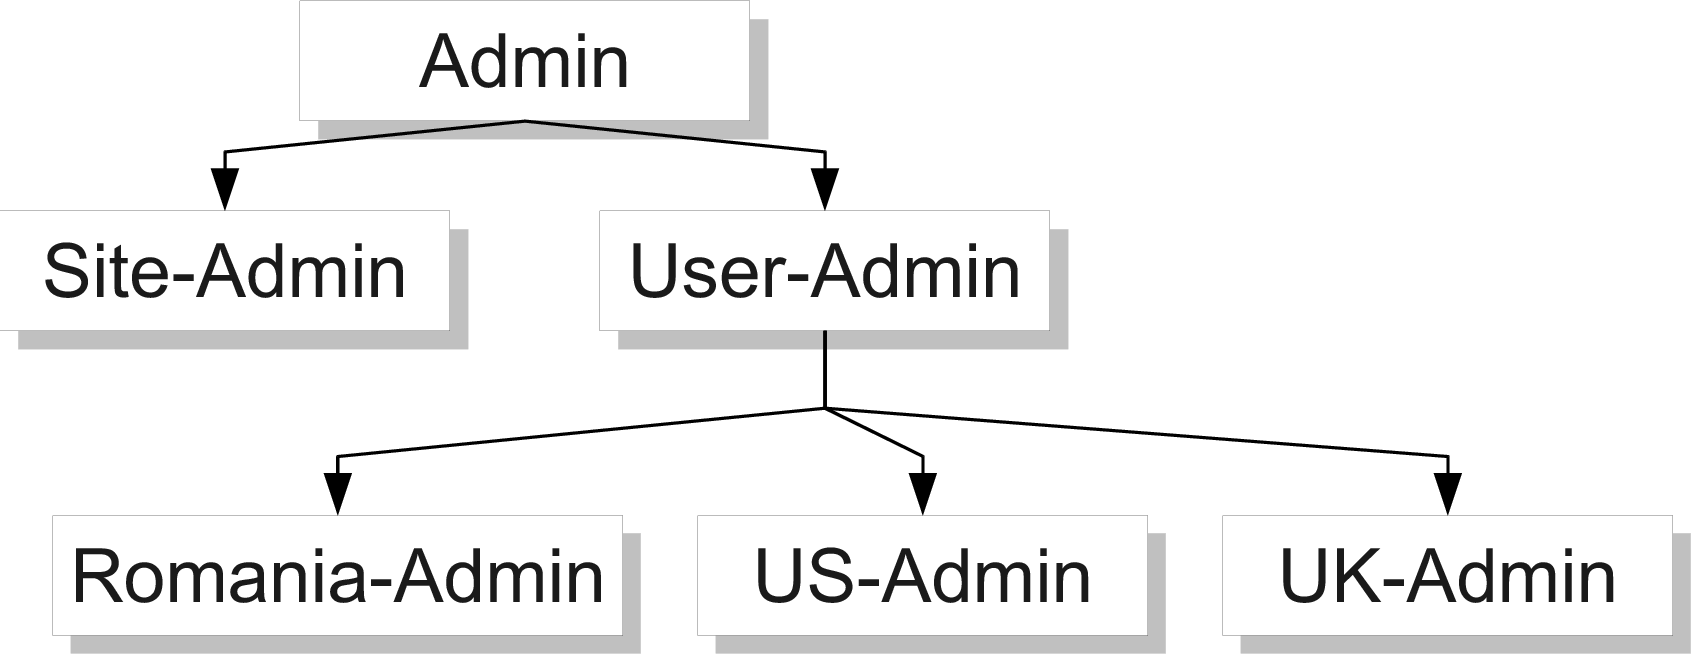
Given this Role hierarchy, Listing 9.9.3↓ shows how we can implement this in our code by creating our Role hierarchy and then using the Role.getRoleByName method to locate the proper Role when we perform authentication. In this example we’re restricting access to the /users/ro path to only users with the “Romania-Admin” role. However, our fictional “John” user is assigned the “User-Admin” role, so he will be able to access that path.
import auth._
class Boot {
def boot = {
...
val roles =
AuthRole("Admin",
AuthRole("Site-Admin"),
AuthRole("User-Admin",
AuthRole("Romania-Admin"),
AuthRole("US-Admin"),
AuthRole("UK-Admin")
)
)
LiftRules.protectedResource.append {
case (ParsePath("users" :: "ro" :: _, _, _, _)) =>
roles.getRoleByName("Romania-Admin")
}
LiftRules.authentication = HttpBasicAuthentication("lift") {
case ("John", "12test34", req) =>
println("John is authenticated !")
userRoles(AuthRole("User-Admin"))
true
}
...
}
}
(C) 2012 Lift 2.0 EditionWritten by Derek Chen-Becker, Marius Danciu and Tyler Weir